Charges & credits adjustments
Effortlessly manage your Recurly account's billing events with Charge & Credit Adjustments. Customize charges and credits to align with your unique business needs.
Overview
Required plan
This feature or setting is available to all customers on any Recurly subscription plan.
Definition
Charge and Credit Adjustments in Recurly are created automatically during subscription billing events or can be manually configured by merchants. These adjustments include various types of charges and credits that can be billed separately or included with the next subscription invoice.
Key benefits
- Flexible billing management: Easily create custom charges and credits for unique scenarios, such as one-time products or professional services.
- Automated & manual options: Adjustments are created automatically during subscription billing events, but can also be manually configured for precise control.
- Streamlined invoicing: Consolidate various charges and credits into a single invoice, simplifying the billing process for both you and your customers.
Most charge and credit adjustments are created automatically by the Recurly system when there is a subscription billing event. Merchants can manually or programmatically create custom charges and credits on customer accounts that can be billed separately or included with the next subscription invoice.
Key details
Adjustments in Recurly are created during various subscription billing events. They represent a change to the amount a customer is charged and can be either a charge or a credit.
Subscription Billing Events that Trigger Adjustments
- Sign-up: When a customer signs up, adjustments are created for setup fees, plan fees, and add-on fees associated with the subscription.
- Immediate downgrade/upgrade: Changing a subscription can result in a prorated credit and/or charge, depending on whether the change is an upgrade or a downgrade. More information on this can be found [https://docs.recurly.com/docs/change-subscription].
- Start of new billing period: When a new billing period starts, adjustments are created for the plan and any add-ons.
- Refund: When a refund is issued, a credit adjustment is created to reflect the amount returned to the customer.
- Final invoice (usage-based billing): For usage-based billing plans, adjustments are created when the final invoice is issued.
Custom charge adjustments
Custom charge adjustments are manually created charges that are separate from the regular subscription billing. They are useful for various scenarios, such as:
- Purchase of a one-time product: For example, if a customer buys a physical product in addition to their subscription.
- Purchase of professional services: For example, consulting or training services.
- Recreate a previously incorrect invoice: If an invoice was incorrect and had to be voided, a custom charge can be used to recreate the correct charges.
Custom credit adjustments
Custom credit adjustments are manually created credits that reduce the amount a customer owes. They are useful for various scenarios, such as:
- Issue a service credit: For example, if a customer experienced downtime or another issue, you might issue a service credit as compensation.
- Issue an external gift card credit (API only): For example, if a customer has a gift card, you can issue a credit adjustment for the amount of the gift card.
Create charges using purchases endpoint
The Purchases endpoint in Recurly’s API is a powerful tool for creating charges. It is designed to handle complex billing scenarios with ease, such as:
- Creating custom one-time charges.
- Creating subscription charges (plan fee, add-on fee, setup fee).
- Creating a combination of subscription charges and one-time charges.
- Signing up new customers to subscriptions and/or one-time products.
All charges created via this method are combined into a single total transaction that is sent to your payment gateway. This ensures that the entire purchase is treated as a single unit, simplifying both billing and reporting.
Create charges using adjustments/line items endpoint or admin UI
For more straightforward scenarios, or when you need to create a charge without immediately invoicing it, you might use the Adjustments (for v2 API) or Line Items (for v3 API) endpoint, or create the charge directly in the Recurly Admin UI.
This method is particularly useful when you want to create a charge on a customer's account but do not want the customer to be charged until their next invoice. For example, if you add a charge in the middle of a billing cycle, you might want that charge to be included on the next regularly scheduled invoice rather than generating a new invoice immediately.
Create credits using the Admin UI
To issue a credit, navigate to the customer's account in the Recurly Admin UI and click the Add Credit button within the Account Actions dropdown.
This is useful for scenarios such as:
- Issuing a refund for a returned product.
- Providing a credit as a gesture of goodwill or as compensation for a service issue.
When issuing a credit, you have full control over the amount of the credit, the currency it is issued in, and how it is described on the customer’s invoice. This allows you to use credits in a flexible way that matches your business needs.
Credit Application Control
Recurly provides the ability to dictate when available credit is used by setting the credit_application_policy field while creating or editing a subscription, creating a purchase, or creating an invoice through the V3 API. Furthermore, when credit_application_policy is set to all, you may choose which credit invoice origin types (credit, gift card, prepayment, etc) can be used. Optionally, you may choose to override a subscription's credit application policy on a specific purchase using the credit_application_policy_override field. If neither of these are used, the default behavior to automatically use credits will be invoked.
Example:
"credit_application_policy": {
	"mode": "all",
	"allowed_origins": [
		"line_item_refund"
	]
}
Impacted APIs:
Creating a custom charge in the UI:
-
Navigate to Customer Account:
- Log in to your Recurly Admin UI.
- Navigate to the customer’s account page.
-
Add Charge:
- Click the Add Item/Charge button above the Charges and Credits table.
-
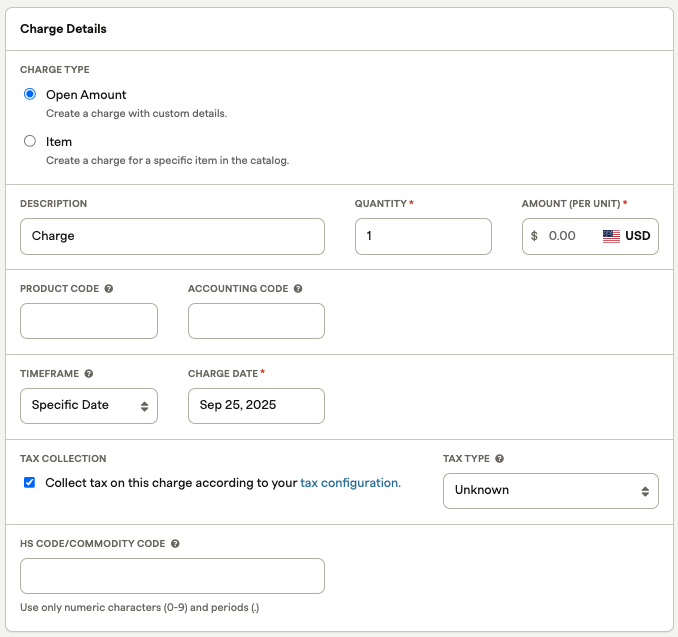
Fill in Charge Details:
- Select the currency of the charge.
- Select the invoice option from “Invoice Now” or “Invoice at Next Bill Date”
- Configure the Charge Details by selecting the “Charge Type” and filling in the description, quantity, and amount.
- Optionally, enter product code, accounting code, HS code, and timeframe.
-
Tax Collection (if applicable):
- Check the Tax Collection box if you would like to collect tax on this charge according to your tax configuration.
-
Save and Review:
- Click Add to account and review the charge that you have just created.
Issuing a credit in the UI
-
Navigate to Customer Account:
- Log in to your Recurly Admin UI.
- Navigate to the customer’s account page.
-
Add Credit:
- Click the Add Credit button above the Charges and Credits table.
-
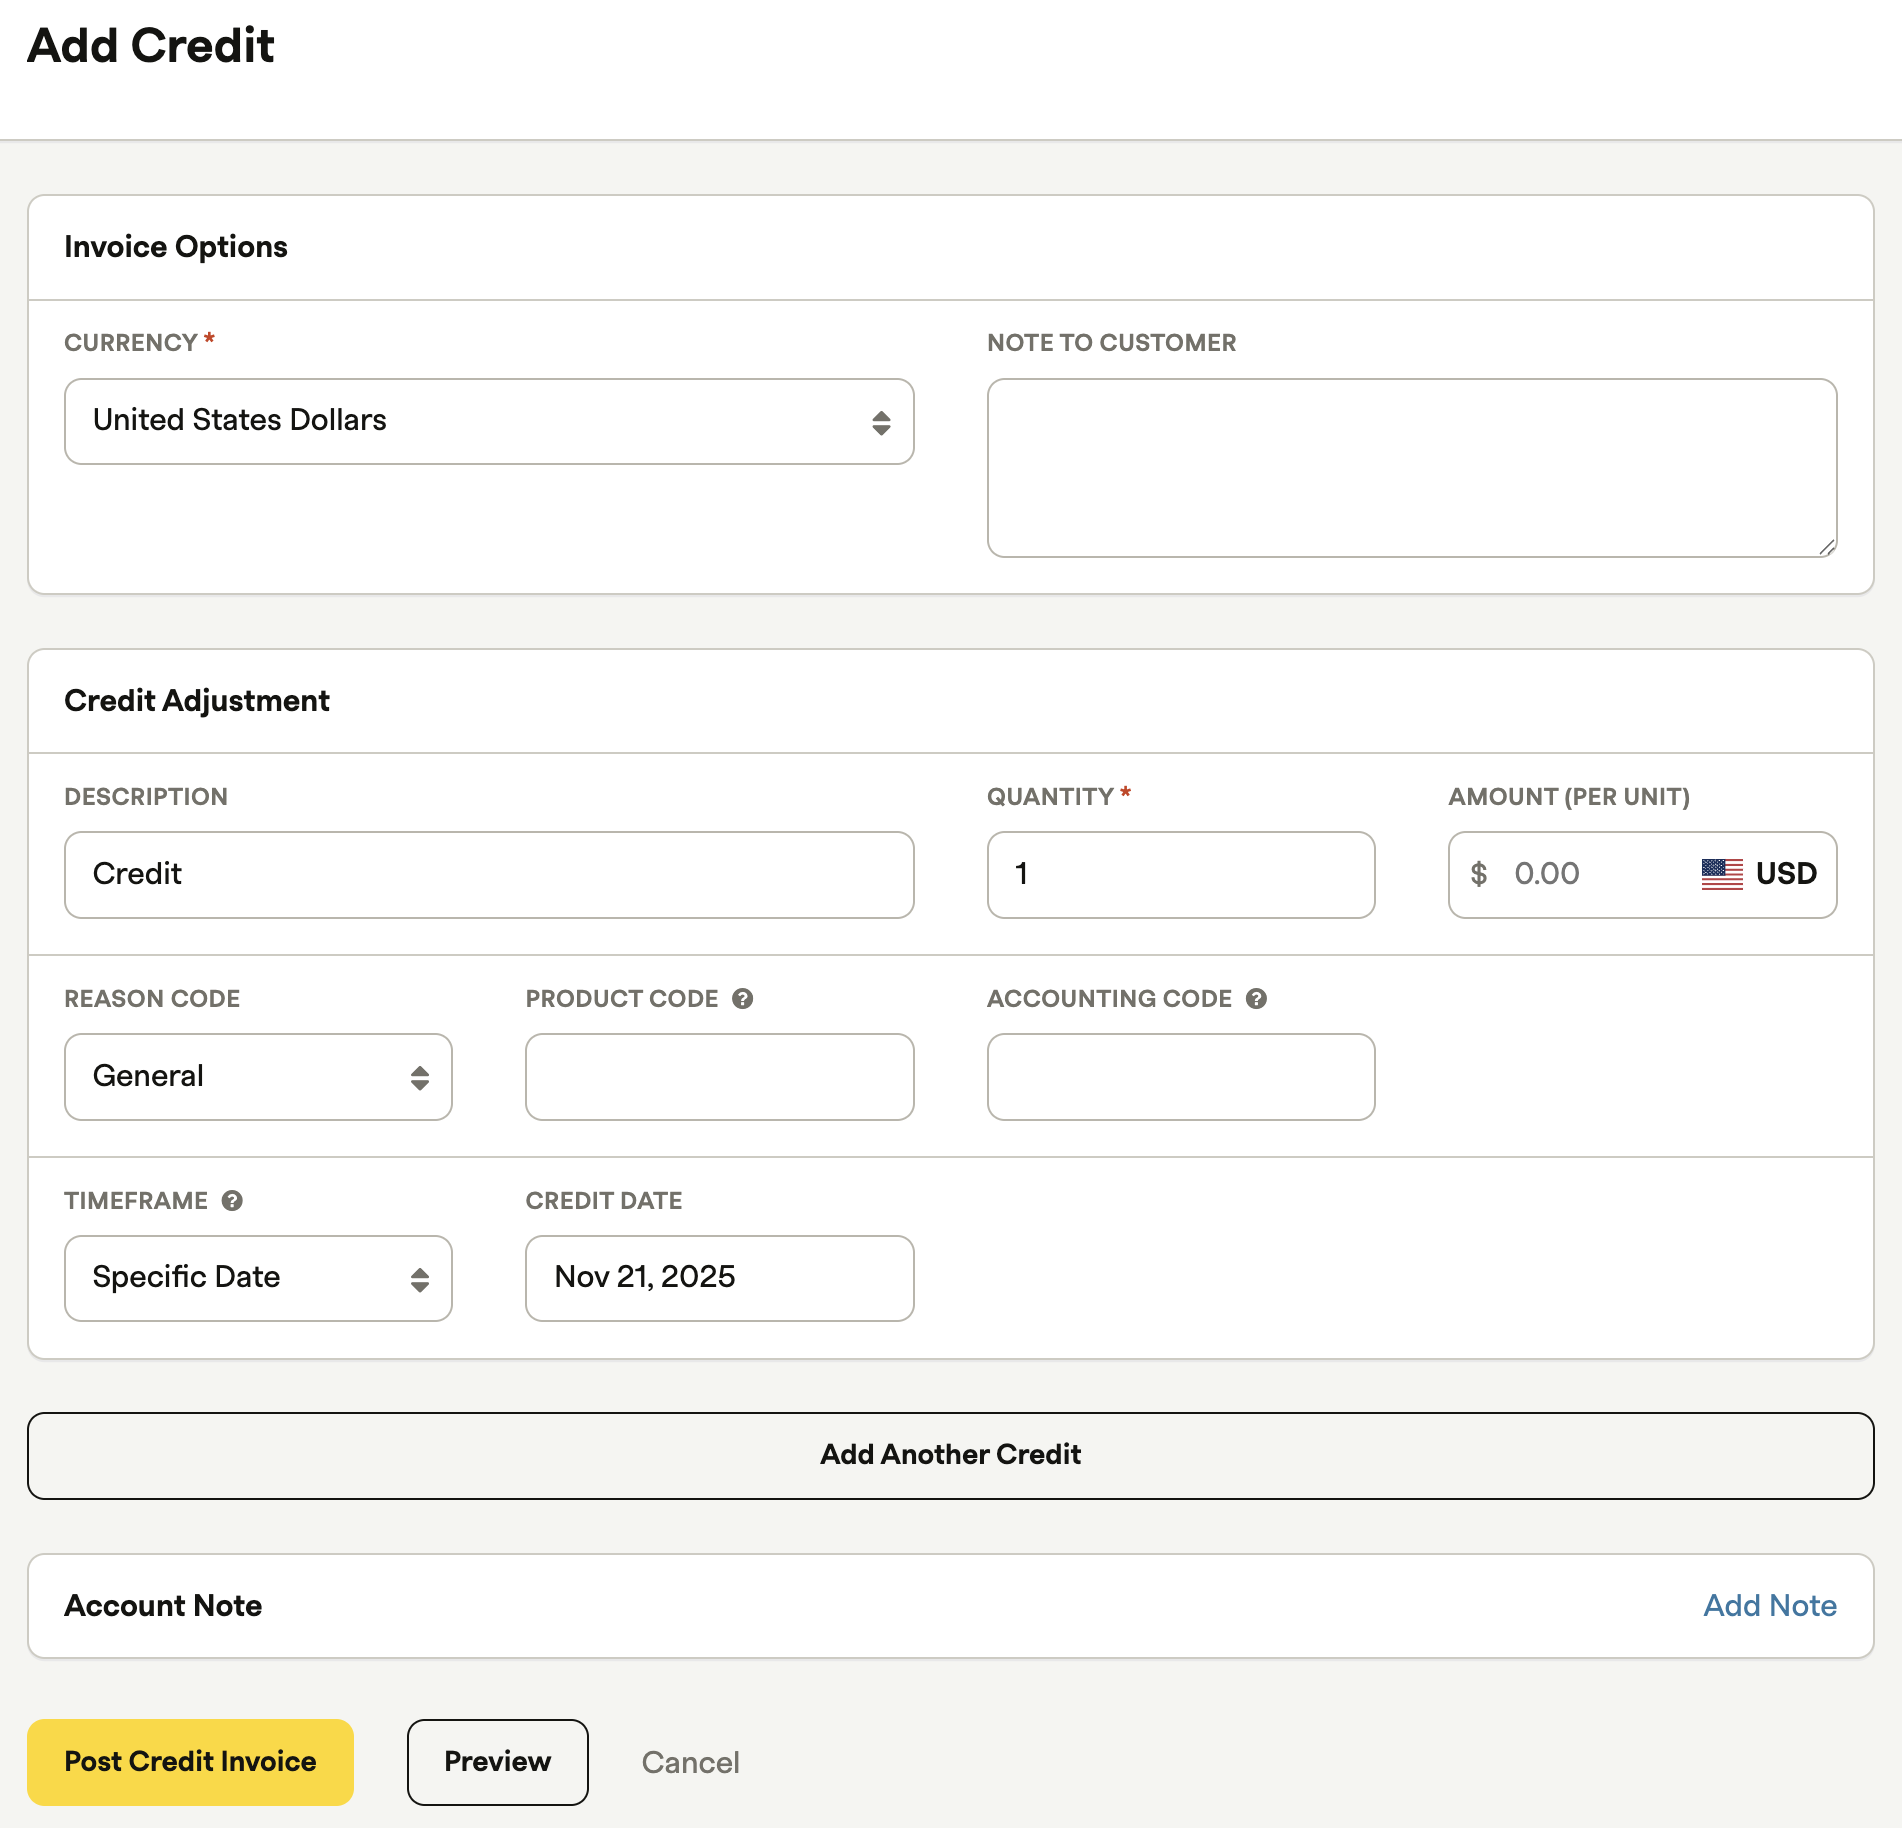
Fill in Credit Details:
- Select the currency of the credit and write a note if applicable.
-
Configure the Credit Adjustment Details:
- Enter the description, quantity, and amount.
- Optionally, enter reason code, product code, accounting code, and timeframe.
-
Save and Review:
- Click Save and review the credit that you have just created.
-
Post Credit Invoice:
- Press the “Post Credit Invoice” to generate the view of the invoice with the credit applied.
- If you just want to preview the credit, press “Preview”.
FAQs
Q: Can I create a charge without immediately invoicing it?
A: Yes, you can create a charge that will not be invoiced until the next subscription billing event or until you manually post an invoice.
Q: Can I issue a credit that reverses a tax or discount amount?
A: Custom credits are not taxable or discountable by default. To reverse tax or discounts, consider issuing a Line Item Refund instead.
Q: What happens if I create a charge in a different currency than the customer’s existing subscriptions?
A: If there are uninvoiced charges on an account in different currencies, you will see an option to generate an invoice per currency when manually generating an invoice from the Admin UI.
Q: Can I apply a credit to a specific invoice?
A: Yes, you can navigate to the specific invoice in the Recurly Admin UI and apply the credit directly to that invoice.
Updated 5 months ago