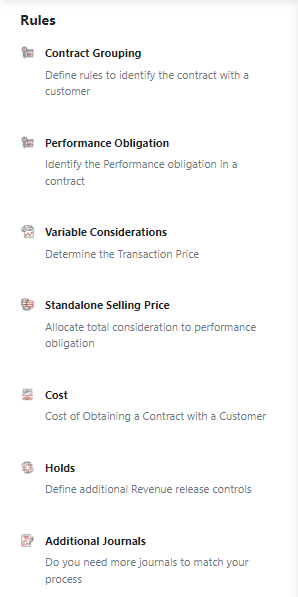
Rules
Efficiently manage your revenue recognition process with Recurly Revenue Recognition Advanced features and rules management, ensuring accuracy and compliance.
Overview
This feature is part of our product, Recurly Revenue Recognition Advanced. [Learn more here].
Prerequisites
- Familiarity with Recurly's basic functionalities.
- Access to Recurly Revenue Recognition Advanced module.
- Necessary permissions to configure rules and holds.
Please note:
- Once a Contract Grouping Rule is created, it cannot be deleted but can be inactivated.
- Approved SSP data cannot be deleted.
- Holds, once applied, can only be released based on the set criteria or manually by authorized personnel.
Key benefits
- Streamlined revenue recognition: Simplify the revenue recognition process with clear rules and functionalities, enabling an organized and efficient workflow.
- Contract flexibility: Define contract groupings, performance obligations, and variable considerations with ease to suit your business model.
- Automated calculations: Reduce manual errors and save time with automated calculations for costs and variable considerations.
- Enhanced control: Gain better control over revenue recognition through the Holds feature, ensuring accuracy and compliance.
- Insightful analysis: Utilize the SSP Analyzer tool for comprehensive insights, aiding in informed decision-making and strategy optimization.
Overview
In Recurly's revenue recognition, the Rules section is advanced and seamlessly integrated into the system. It offers tools for contract grouping, performance obligation management, standalone selling price determination, variable consideration handling, cost allocation, holds management and additional journals management. These tools allow you to craft a set of rules tailored to your specific needs. With these features, the Recurly revenue recognition system ensures you can efficiently define and uphold rules, guaranteeing accurate and compliant revenue recognition processes.
Rules functionalities
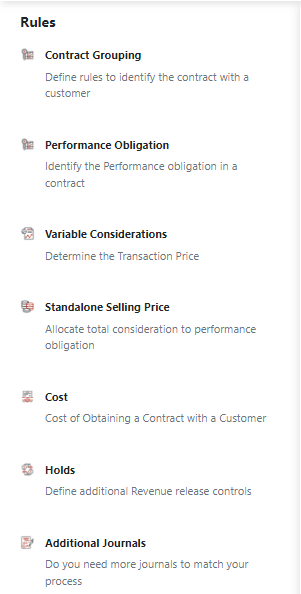
Contract grouping
This essential feature allows you to define specific criteria for grouping transactions into contracts, ensuring accurate and efficient revenue recognition.
How to configure contract grouping
-
Navigate to the Rules section and select "Contract Grouping."
-
Click on the “+” icon in the right menu to create a new grouping rule.
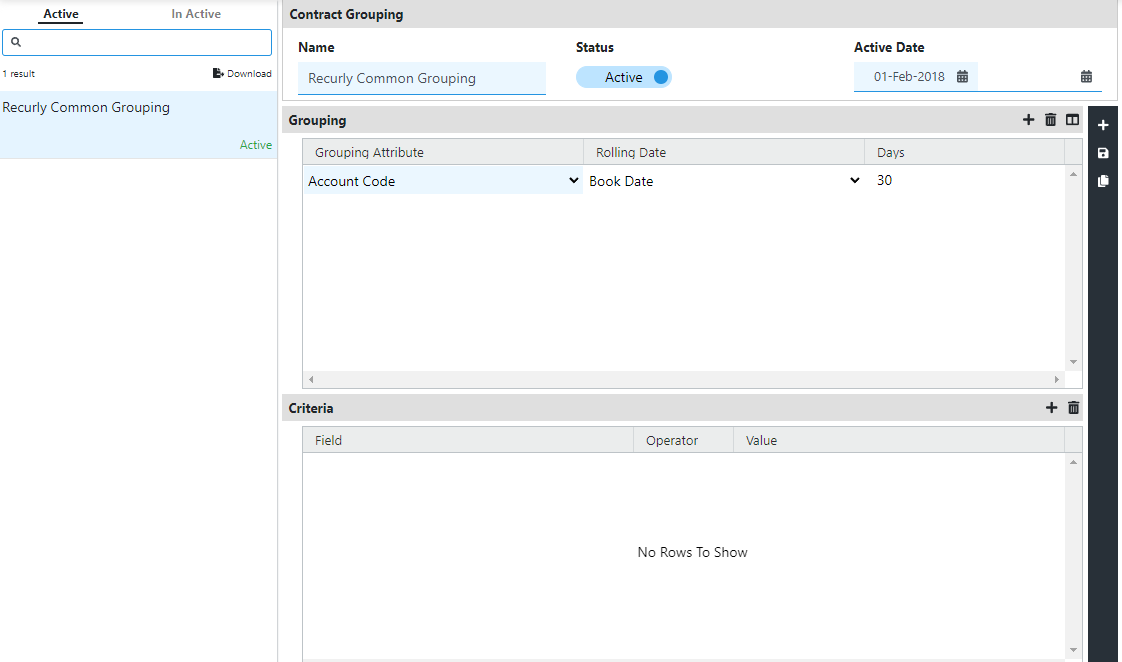
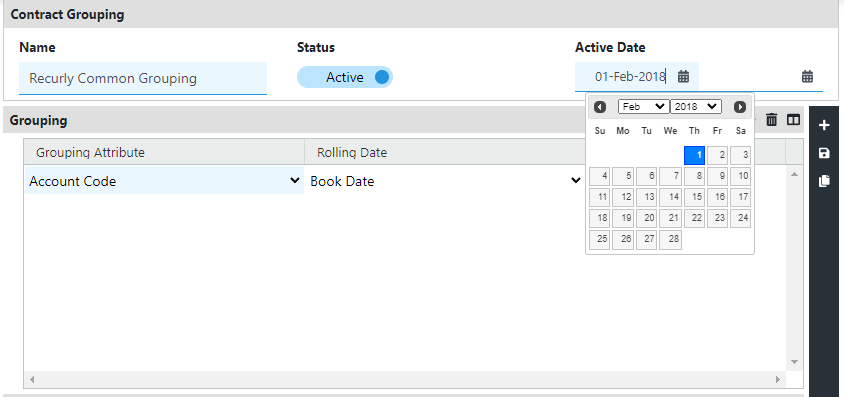
- Provide a name for the contract grouping and specify the active date.
- Under the "Grouping" section, click on the "+" button to add grouping criteria.
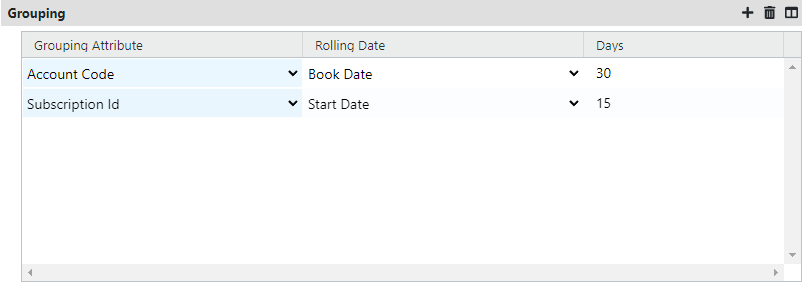
- Select the required grouping attribute(s) to define how contracts should be grouped.
- Specify the rolling date and the number of days for the grouping rule.
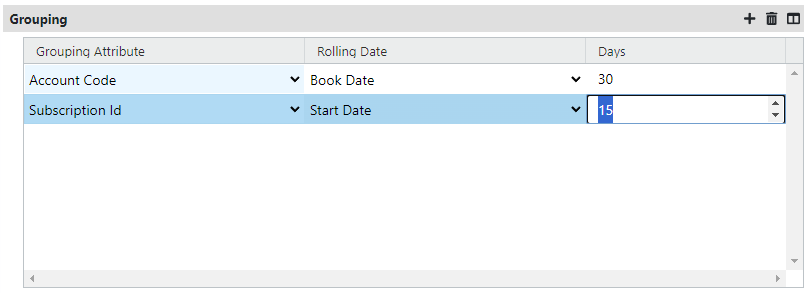
- Save your configuration.
How to inactivate Contract Grouping Rule
Note: Once a Contract Grouping Rule is created/configured, it cannot be deleted. However, you can choose to inactivate a grouping rule if needed.
To inactivate a grouping rule, follow these steps:
-
Go to the Contract Grouping section and select the grouping rule tab that you want to inactivate.
-
The current status of the grouping rule will be "active." Change the status to "inactive."

- Click on the Save icon to save the changes.
Points to Remember:
➔ Only the active grouping rules will be visible in the Contract Grouping section.
➔ Once a grouping rule is made inactive, it will be moved to the inactive tab for reference.
➔ The inactive grouping rule cannot be made active.
Performance obligation
In Recurly Revenue Recognition Advanced, the second step of ASC 606 / IFRS 15 compliance involves identifying and defining performance obligations. This process includes setting up recognition methods for each obligation and establishing rules for the items or transactions associated with them, ensuring accurate and consistent revenue recognition.
Adding POBs
-
Navigate to Rules → POB.
-
Click on the "+" button to add a new performance obligation.
-
Enter a unique name for the performance obligation.
-
Provide the active date for the new POB.

-
Select the appropriate waterfall type (WF Type) from the dropdown:
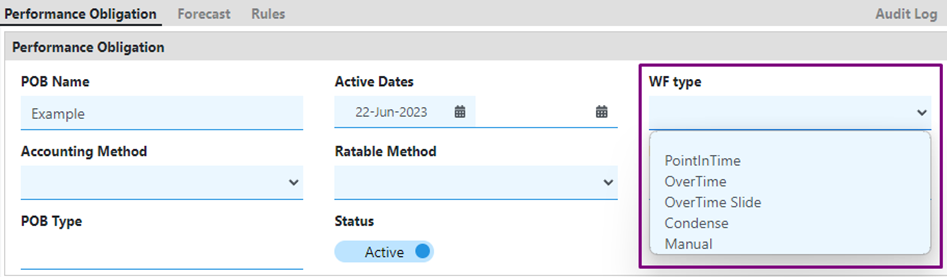
- PointInTime: Performance obligations recognized at a point in time.
- OverTime: Performance obligations recognized over the contract period.
- OverTime Slide: Performance obligations recognized over the contract period, with a delayed release date extending revenue recognition.
- OverTime Condense: Performance obligations recognized based on the release date, with revenue recognition adjusted based on event timing.
- Manual: Revenue realized based on manual input.
-
Choose the accounting method for the new POB from the dropdown options:
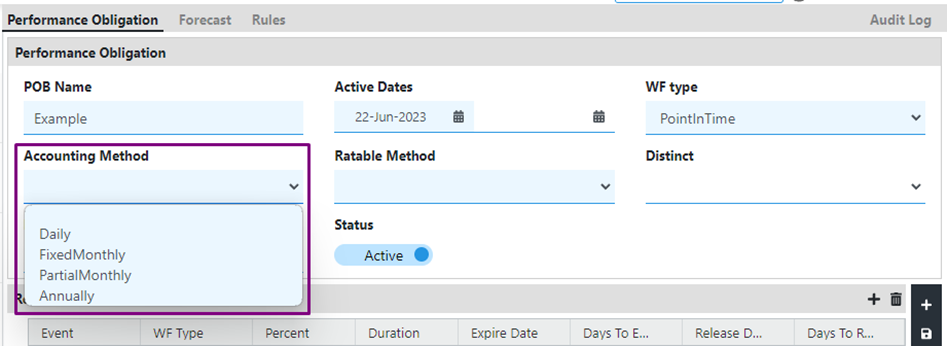
- Daily: Revenue recognized daily, based on the number of days in the contract.
- FixedMonthly: Revenue calculated in fixed amounts based on the number of months in the contract, with adjustments for start date.
- PartialMonthly: Revenue calculated partially for the first and last months of the contract, with equal recognition for the remaining months.
- Annually: Revenue calculated annually.
-
Select the ratable method from the dropdown options:
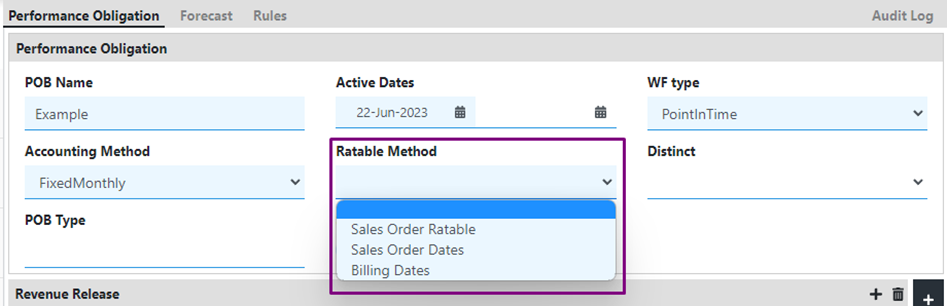
- Sales Order Ratable: Revenue amortized on a prorated basis, with catch-up in the current open period.
- Sales Order Dates: Revenue scheduled based on the start and end dates of the sales order lines.
- Billing Dates: Revenue scheduled based on the start and end dates of billing/invoice.
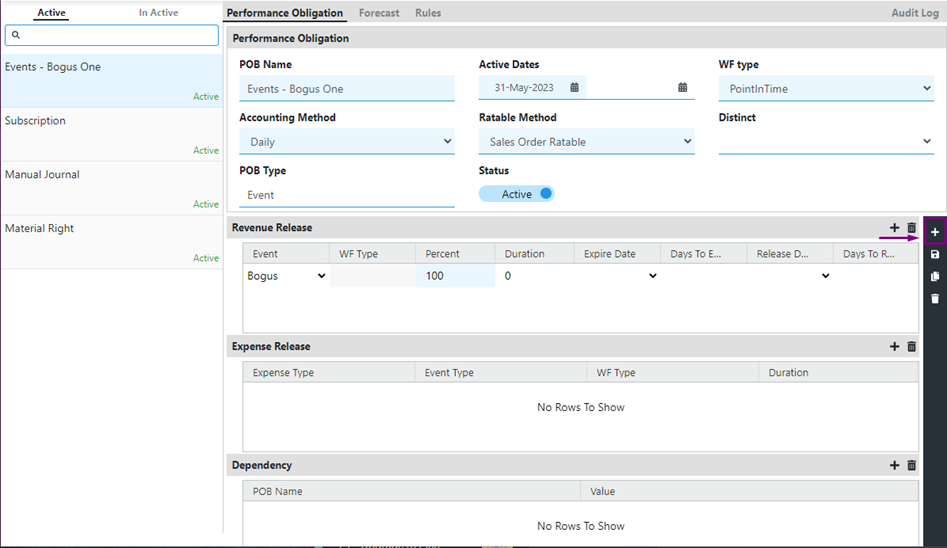
After completing step 1 – 6, save your changes and then your POB could look like this.

- You can choose how a date change in a contract affects the waterfall:
Default (Blank): The waterfall remains unchanged.
Cumulative Date Change: The entire waterfall is recalculated, considering both past and future payments. This ensures that the total amount is distributed accurately based on the new dates.
Prospective Date Change: Only future payments are adjusted to reflect the new dates. Past payments remain unaffected - In the POB configuration screen, locate the Revenue Release section.
- Click on the "+" button in the Revenue Release section to add a new release event.
- Follow these sub-steps to configure the release event:
- Select the desired event from the dropdown menu.
- Enter the percentage of revenue release applicable for this event.
- Follow these sub-steps to configure the release event:

Please note that these steps allow you to add multiple release events to a single POB, enabling accurate revenue recognition based on different events and their corresponding revenue release percentages.
Also, please note if the release event selected is Upon Booking or Upon billing, the percent should always be 100. There cannot be a combination of multiple release events in case of upon booking and upon billing.
- Save all changes.
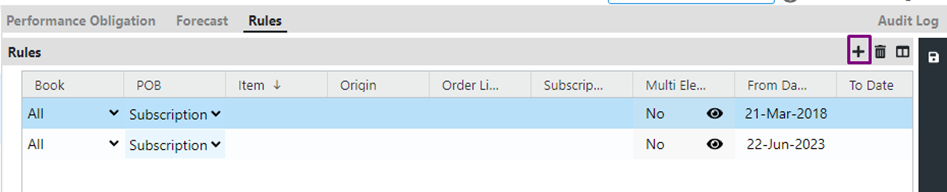
Adding POB rules
To access POB Rules, there are three methods available:
Method 1
-
Go to the Rules section in the navigation menu.
-
Click on "Rules" under the Performance Obligation menu.
Method 2
-
Open the desired POB.
-
Navigate to the "Rules" tab located at the top.
Please note you can view the rules of the POB by clicking on the POB and scrolling to the bottom of the page. You will not get an edit rule or add rule option here.
Once in the Rules section, follow these steps to add POB Rules:
-
Click on the "+" icon under the Rules section.
-
Select the specific POB to which the rule should be assigned.
-
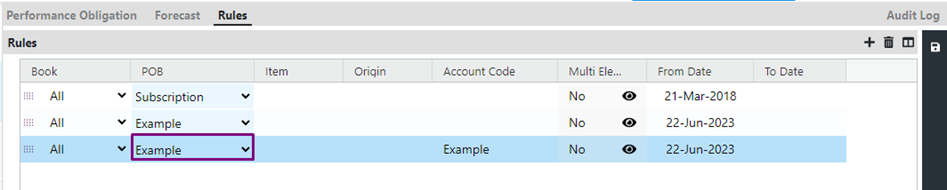
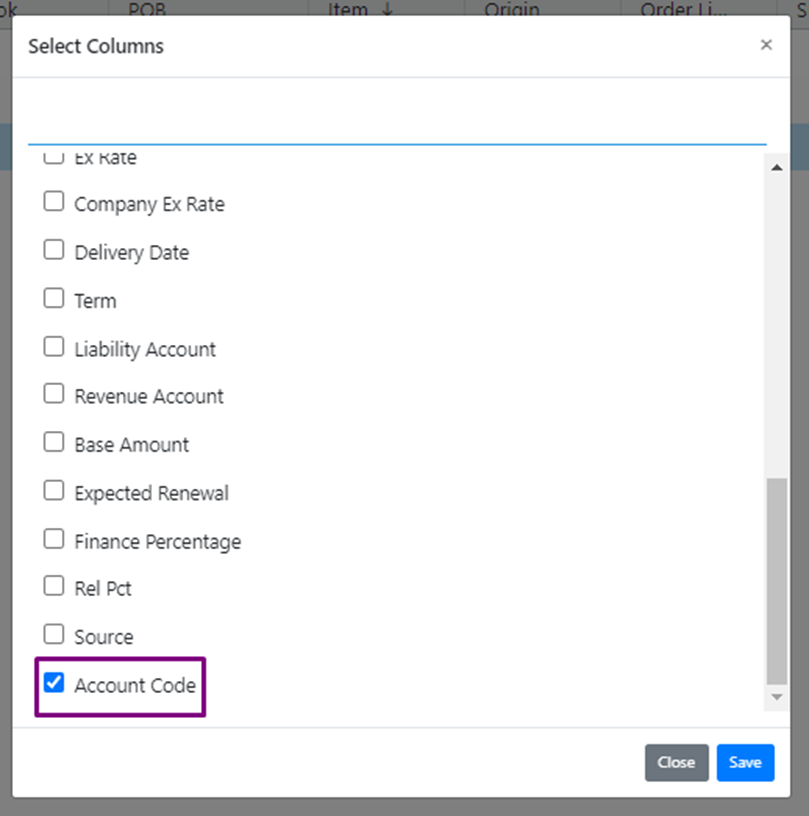
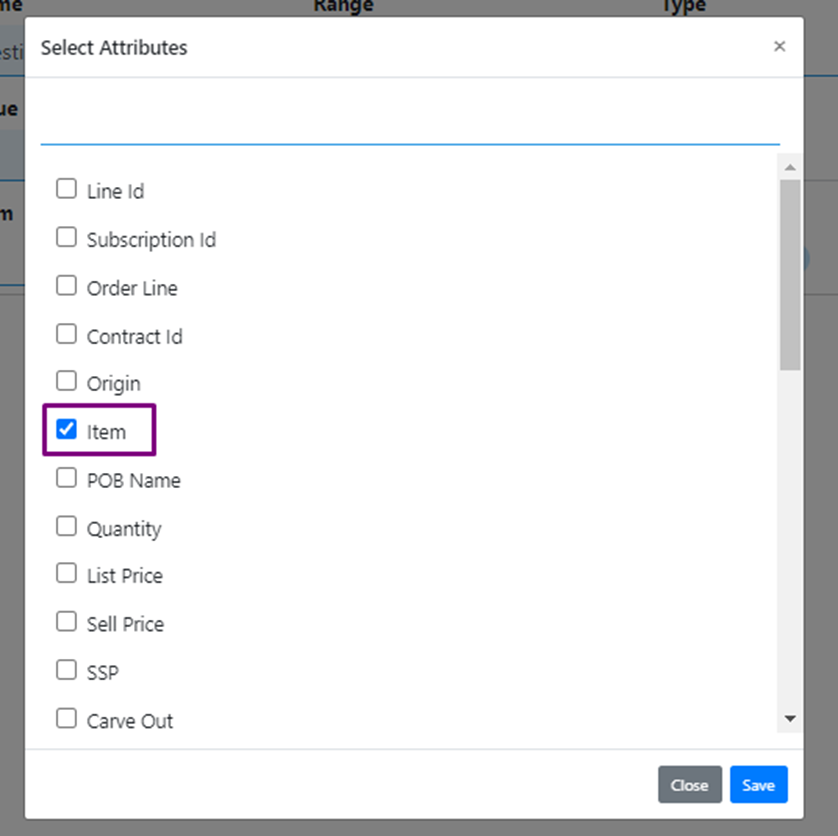
Define the attribute value used for recognizing the POB. For example, select the "Item" attribute. If the desired value is not available, click on the window-shaped button and select the attribute from the window that appears, then click on "Save." In this case, we have chosen "Account Code" as the attribute for POB recognition.

- Once the attribute is determined, enter the corresponding value that describes the POB and adjust the active date as necessary.

- Click on the "Save" icon to save the rule.

Notes:
- Avoid editing the default POBs, such as "Material right" and "manual journal."
- Multiple release events can be associated with a single POB, but the total release percentage must equal 100%.
- POBs require an assigned rule to function properly.
- You can change the hierarchy of POB rules by dragging and rearranging them using the drag icon.
- Remember to save any changes made to the rules or hierarchy.
- To delete a POB Rule, select the rule and click on the "Delete" icon. Click on the "Save" icon to confirm the deletion.

POB Forecasting
In most cases, revenue is recognized on the date the contract is booked or billed. However, for some contracts, revenue recognition is delayed until a specific external event occurs.
Forecast Management allows you to forecast revenue based on both external events and billing dates. Even if the exact date of an external event (like a product release) is unknown, you can still factor it into your forecast by assuming it will happen by the contract end date. This enables you to plan your revenue based on a predictable contract end date.
Steps for configuring the Forecast for POBs:
- Navigate to the required POB
- Click on Forecast. This will land you in the forecast page.
- Select the waterfall type for forecast.
Point in time
Overtime
Overtime Slide
Overtime Condense - Enter the percent of revenue you need to forecast based on this rule. At any given point, the forecast release should not be more than 100%.
- Select the “forecast on” date. This is the date on which revenue has to be forecasted. The system gives several forecasts on options like Book Date, Start date, End date, delivery date.
- Enter the no. of days for the forecast to start or end in the start day and end day. Accordingly the forecast would be done by the system. For example, When forecast on is Book date and if we give start day as 30, system will create forecast after Book date + 30 days
Standalone selling price
Setting up the Stand-Alone Selling Price (SSP) involves a streamlined process consisting of three key steps. Firstly, you will create the SSP by defining values, specifying pricing attributes, and configuring adjustments or discounts. Secondly, you will set the SSP Analyzer rules, establishing criteria for identifying and analyzing SSP variances, and customizing them to align with your business requirements. Lastly, you will prepare and upload the necessary data into the SSP Analyzer tool, ensuring accurate processing and analysis. By following these steps diligently, you can establish a robust SSP framework tailored to your products or services, enabling precise determination of stand-alone selling prices.
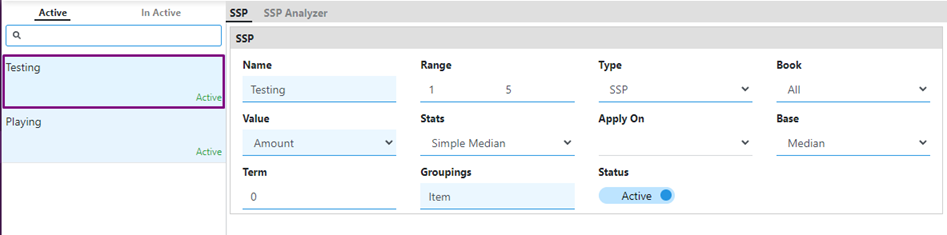
Creating the SSP
- Navigate to the Rules section and click on SSP Definition.
- Click on the "+" icon to create a new SSP.
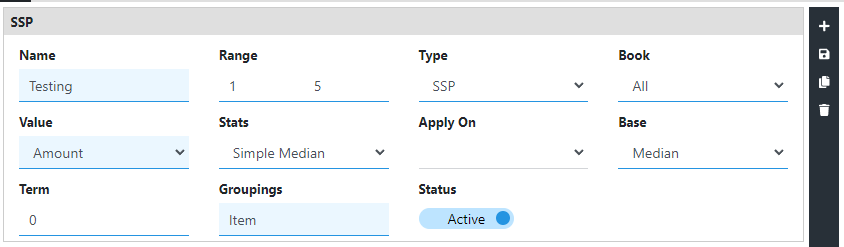
- Enter a name for the SSP.
- Leave the Range tab blank when uploading SSP data.
- Select the Type of SSP as SSP or RSSP.
Note: Select SSP, if you want to define standalone selling price and select RSSP when you want to define Residual standalone selling price.
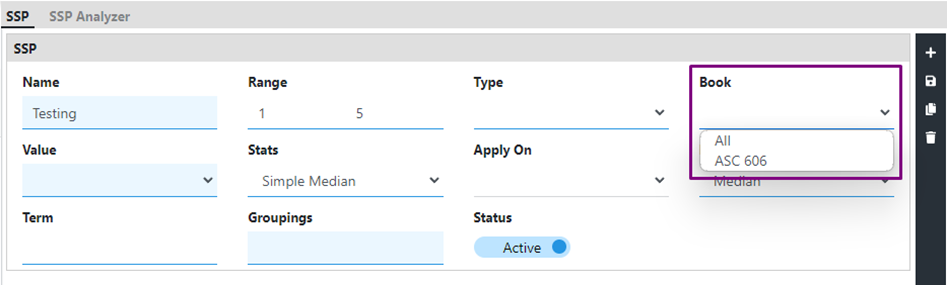
- Under the Books tab, choose the relevant Book for the SSP.
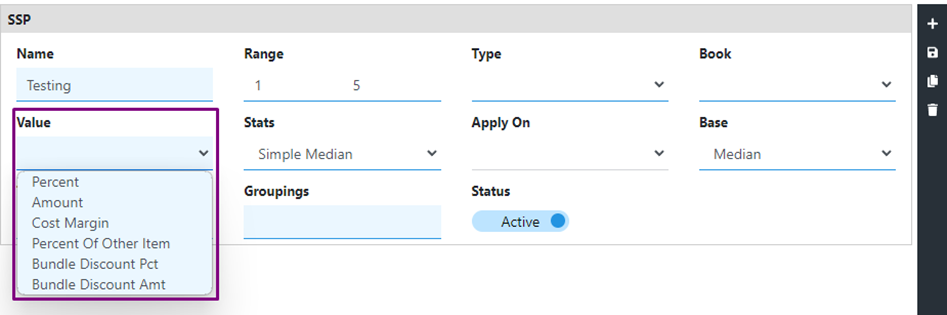
- Select the appropriate SSP value from the drop-down menu.
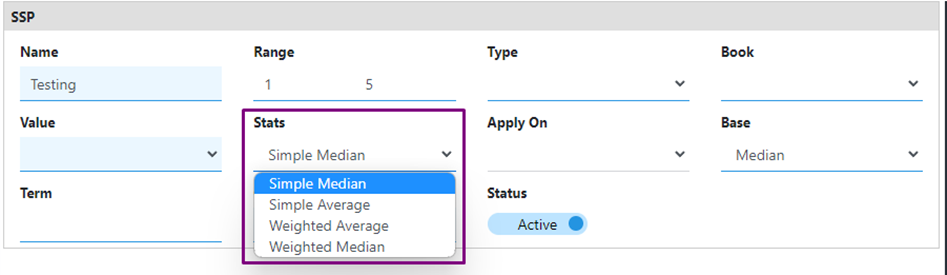
- Specify the SSP statistics as Simple Median, Simple Average, Weighted Median, or Weighted Average.
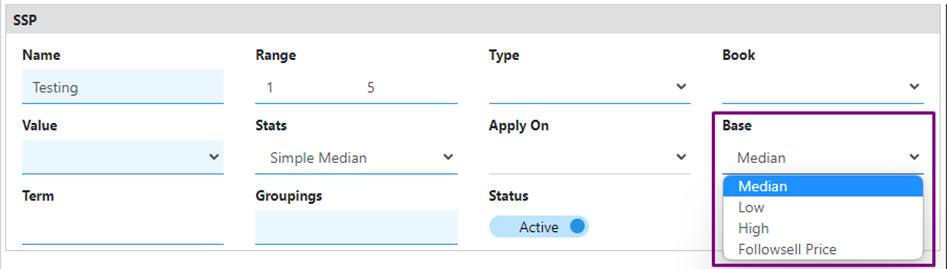
- Determine the SSP base as Low, Median, High, or Follow SellPrice.
- Under the Grouping tab, select the attribute that will define the SSP. For example, if you choose "item" as the attribute, the SSP will be based on items.
- Save the SSP configuration. The newly created SSP card will appear on the left side under active SSPs.
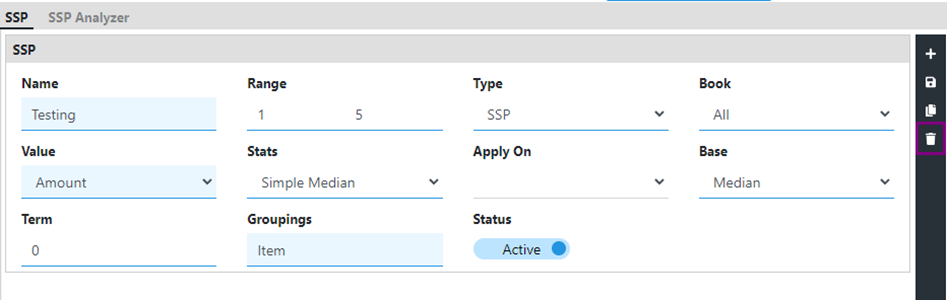
- To delete any SSP configured in Recurly Revenue Recognition Advanced, click on the delete icon located on the black menu bar.
Configuring the SSP Analyzer for data upload
- Navigate to the Rules section and click on SSP Analyzer, or click on SSP Analyzer at the top of the SSP page. In case of multiple SSP definitions, go to the required SSP card and click on SSP Analyzer.
- On the SSP Analyzer page, click on the “+” icon to create a new SSP Analyzer.
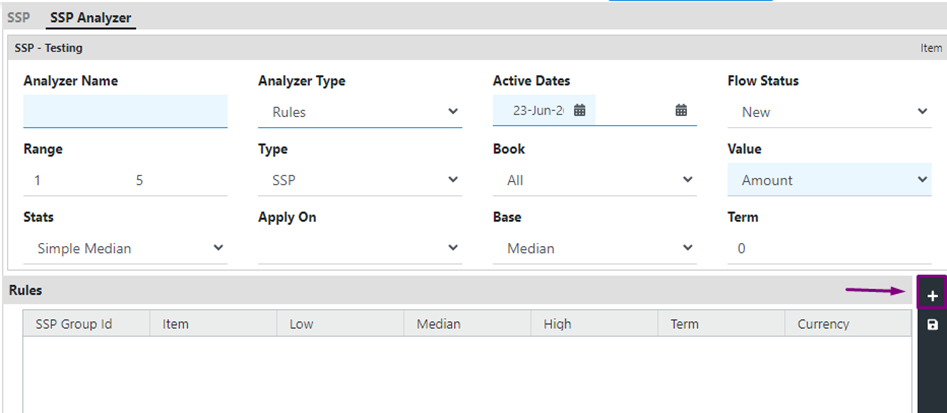
- Provide a unique name for the SSP Analyzer.
- Select the appropriate Analyzer Type: Rules. Choose "Rules" if you are uploading SSP data.
- Define the active dates, including the start and end date (if applicable), for the SSP data.
- Once you have configured the SSP Analyzer, click the Save icon to save your changes.
- The Flow Status will be displayed as "New" once the configuration is saved.

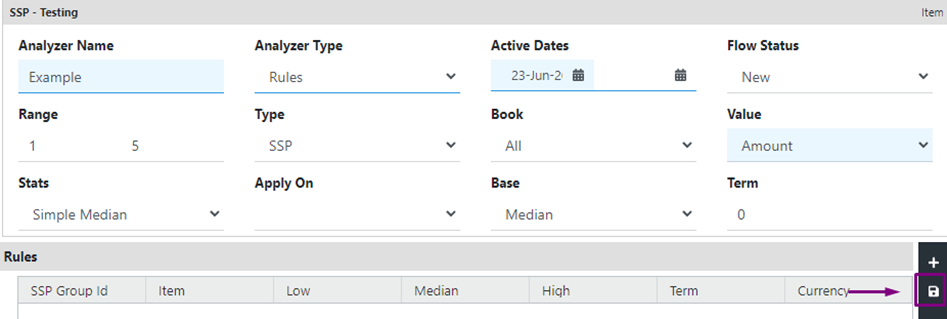
Preparing and uploading SSP data
-
Ensure that the information in the table corresponds to the selections made for the SSP configuration, maintaining consistency with the chosen value type (e.g., amount or percentage).

-
To upload the SSP data, click on the Upload icon.
-
In the SSP upload window, select the SSP file that needs to be uploaded and click Open.
-
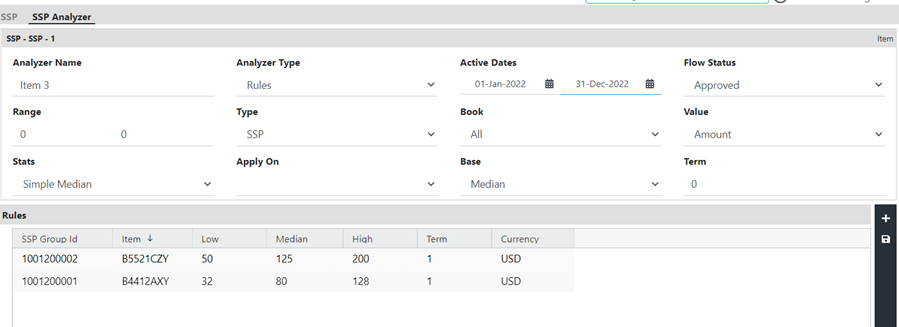
After the SSP file is uploaded, click on the Save icon.
-
The uploaded SSP data will be displayed under the Rules section in SSP Analyzer.
-
To approve the uploaded SSP data, click on the Approve icon. Note that approved data cannot be deleted.
-
The flow status will change to Approved once the SSP data is approved.
-
The SSP data will appear on the SSP Analyzer screen as shown below:
-
After the SSP data is approved, it can be downloaded by clicking on the Download icon.
Notes:
- If the SSP data needs to be deleted, it can only be done before approving it. Click on the Delete icon to remove the data. Once approved, the data cannot be deleted.
- If the approved SSP data will not be used, specify an end date so that the data will not be utilized beyond that date.
- Recurly Revenue Recognition Advanced allows you to provide validity for the uploaded SSP data by specifying the start and end dates for the approved data.
SSP Analysis by the system
If the Analyzer type under SSP analyzer is selected as “Analysis”, the system collects data based on the configuration done.
- Navigate to the Rules section and click on SSP Analyzer, or click on SSP Analyzer at the top of the SSP page. In case of multiple SSP definitions, go to the required SSP card and click on SSP Analyzer.
- On the SSP Analyzer page, click on the “+” icon to create a new SSP Analyzer.
- Provide a unique name for the SSP Analyzer.
- Select the appropriate Analyzer Type: Analysis.
- Define the active dates, including the start and end date (if applicable), for the SSP data.
Note: All the other fields like range, type, stats, value and base would be seen as configured while configuring the SSP. You cannot make any changes here.
- Once it is done, add criteria. Criteria means the data that has to be included while deriving the SSP values. In the below screenshot, you can see the criteria as greater than a certain book date.
- Once the criteria is defined, click on the analysis icon on the right hand side. Now, the system will collect all the data that matches the criteria and gives us the SSP breakup as per the grouping.
- As the SSP grouping was “Item”, the data collected is spread into different rows based on the grouping. This complete the data collection process.
- Now the SSP needs to be approved to use the same.
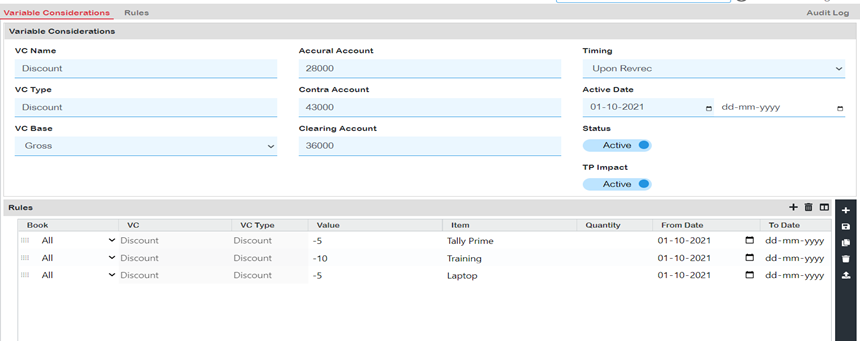
Variable considerations
In Recurly Revenue Recognition Advanced, the setup for automatically applying variable consideration (VC) estimates to transaction lines is done on the Variable Considerations page. Variable considerations refer to charges associated with discounts, rebates, refunds, credits, price concessions, incentives, performance bonuses, penalties, and other similar items that are determined by factors unrelated to the cost of producing goods or services. These amounts can be estimated using historical data and other calculations.
How to configure Variable Considerations
-
Go to Rules → Variable Considerations.
-
Click on the "+" button to create a new VC template.
-
Name the VC template.
-
Specify the VC type, which is used to group VC of similar types (e.g., favorable VC).
-
Ensure that the VC-related accounts in your ERP system are accurately reflected:
- Accrual Account: A liability account used for VC accrual.
- Contra Account: A revenue account for VC revenue.
- Clearing Account: A clearing account associated with VC.
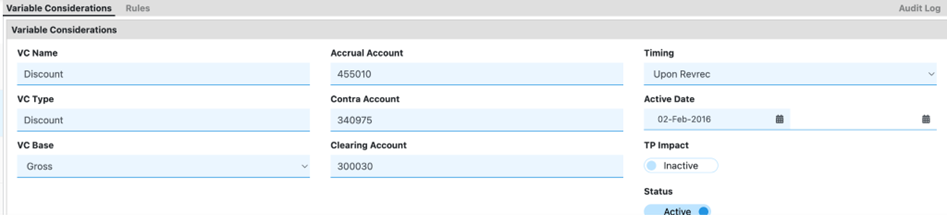
-
Define the timing for VC accrual.
-
Enter the active dates for the VC.
-
To inactivate a VC, toggle its status to "Inactive."
-
To activate a VC needed, toggle its status to "Active."
-
Click the "+" button in the rules section to assign VC rates or amounts to be applied on items.
-
For each VC rule, you can provide active dates for the VC items.
-
To remove VC rules or items, simply delete them.
Below is an example of a VC template:
Uploading files to VC
When working with Variable Considerations (VC) in Recurly Revenue Recognition Advanced, there are two options for importing data:
- Integrating Invoices from Recurly: If VC is applicable, you can integrate invoices from the Recurly platform into Recurly Revenue Recognition Advanced.
- Loading a Sales Order File: Alternatively, you can load a sales order file into the system for which VC is applicable.
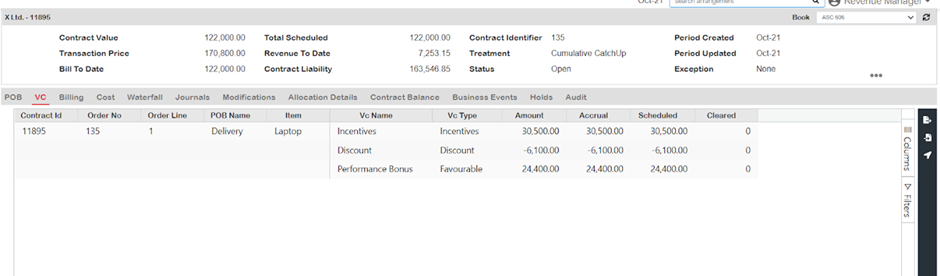
Once the data is collected and available in the system, Recurly Revenue Recognition Advanced automatically calculates VC based on the configured rules. The calculated VC amounts will be visible in the system, as shown in the provided screenshot.
With Recurly Revenue Recognition Advanced, VC estimates are automatically applied to transactions based on the VC rules defined during the setup process, streamlining the calculation and application of VC amounts.
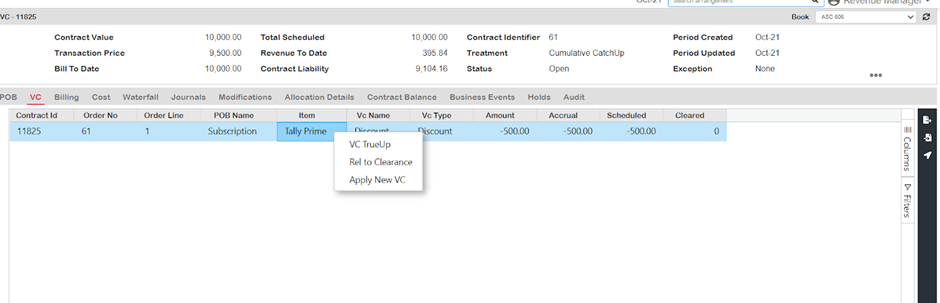
In the revenue workbench of Recurly Revenue Recognition Advanced, you have the flexibility to manually modify the application of variable consideration. To do this, simply right-click on the specific item you wish to change while in the VC tab. The options available for adjustment can be seen in the provided image.
Any changes made to the variable consideration will be accurately reflected in the Revenue Workbench. If there are any adjustments or updates needed for the variable consideration, they can be performed through VC true-up or by initiating clearance to release the updated information.
Notes:
- The transaction price displayed in the Revenue Workbench reflects the price after the adjustments for variable consideration.
- The revenue to date shown in the Revenue Workbench is the cumulative sum of revenue, allocations, and favorable variable considerations scheduled for the respective period.
- The Revenue Workbench provides visibility into the waterfall analysis for variable consideration, showcasing the breakdown and impact of variable consideration on revenue recognition.
- The VC Accrual represents either the amount calculated by the system or the liability that will be cleared once the actuals are incorporated into the process.
Cost
Recurly Revenue Recognition Advanced includes functionality to account for costs. There are two options for managing costs within the system: manual loading of costs or automated calculation based on predefined formulas. The Rules page, specifically the Cost section, is used to define the Cost Type and Cost Rules.
How to configure a cost type
- Navigate to Rules and select Cost from the menu.
- Enter the 'Cost Type' to specify the type of cost you are defining.
- Determine the cost treatment based on the following options:
- Point in time: Recognize the cost in the month it is incurred.
- Follow Revenue: Recognize the cost according to the revenue recognition pattern over the contract period.
- Set the cost keys by clicking on the field and selecting the appropriate options from the pop-up menu. Note that selecting cost keys is optional.
- If you need the Recurly Revenue Recognition Advanced tool to calculate the cost amount, use the "Formula on" feature. Type "Line.SellPrice" (case sensitive) to apply cost rules based on a percentage of the sell price.
- Specify a unique account number for the debit account ('Dr account number') and the credit account ('Cr account number'). These account numbers will be compared with the Sales Order number.
- If your incremental cost needs to be amortized and capitalized, activate the "Cost Capitalize" option.
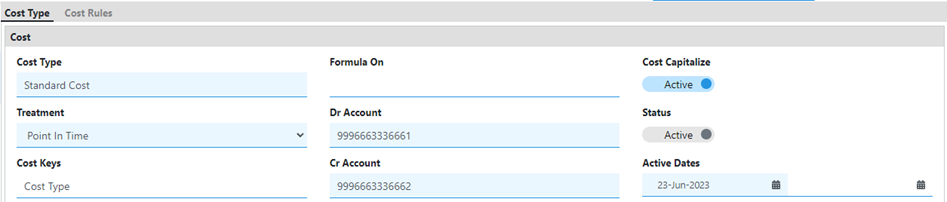
- Finally, click on the Save icon to save your cost configuration.
To add rules to the cost configuration in order to apply the cost formula to specific contract lines, such as the item "Macbook," follow these steps:
- Under the cost rules section, click on the "+" button to add a new cost rule.
- Select the book for which the cost should be applied. This ensures that the cost rule is associated with the correct book.
- In the "Item" column, enter the name "Macbook" to specify that this cost rule should be applied to contract lines related to the item "Macbook."
- In the "Value" column, enter the percentage of the sell price that should be treated as cost for the specified item.
- Click on the save button to save the cost rule.
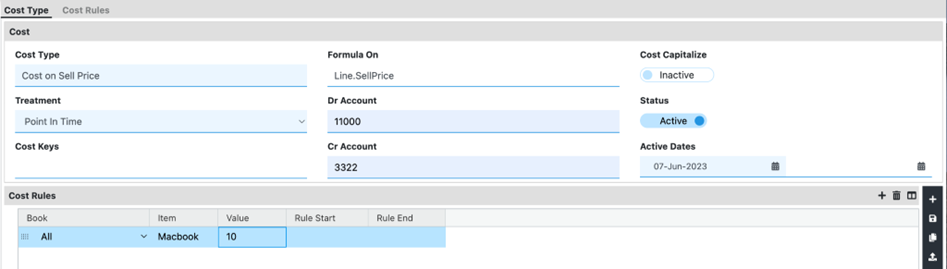
Note: If your cost calculation is based on any other attribute other than “item”, go to the mapper and select the required fields.
Calculation of cost using a cost file
-
Prepare a Cost file that includes the necessary columns reflecting the cost attributes defined in the system. Ensure that the cost type specified in the file matches the cost type already defined in the system.
-
Navigate to the Transactions page in Recurly Revenue Recognition Advanced.
-
Click on the "Upload" icon to upload the Cost file.
-
Choose the Cost file from your local system by clicking on "Browse" or "Choose File" and select the appropriate file.

-
Once the file is selected, click on "Open" to initiate the upload process.
-
The system will process the uploaded Cost file and calculate the cost based on the configuration specified in the Cost Rules. It will apply the calculated cost to the respective contract lines, even if the cost is not explicitly assigned to the item or POB in the contract.
By utilizing the Cost file upload functionality, you can streamline the process of calculating costs based on predefined rules and attributes, enabling accurate cost allocation in your revenue recognition calculations.
Holds
In Recurly Revenue Recognition Advanced, the Holds feature allows for holding revenue recognition based on specific conditions set by management.
There are two types of holds available: Contract Level hold and Element Level hold.
Contract Level Hold:
- A Contract Level hold applies to the entire contract.
- It prevents revenue recognition for the contract until the hold condition is met.
- The hold condition could be a specific event, date, or any other criteria defined by the management.
- Once the hold condition is satisfied, revenue recognition for the contract can proceed.
Element Level Hold:
- An Element Level hold applies to individual revenue elements within a contract.
- It allows for holding revenue recognition for specific elements until the hold condition is met.
- Each revenue element can have its own hold condition.
- The hold condition could be based on the fulfillment of certain criteria or the occurrence of specific events.
- Once the hold condition for an element is satisfied, revenue recognition for that particular element can proceed.
The Holds feature in Recurly Revenue Recognition Advanced provides flexibility in managing revenue recognition by allowing for temporary holds based on defined conditions. It ensures that revenue recognition aligns with the requirements and policies set by management, providing accurate and compliant financial reporting.
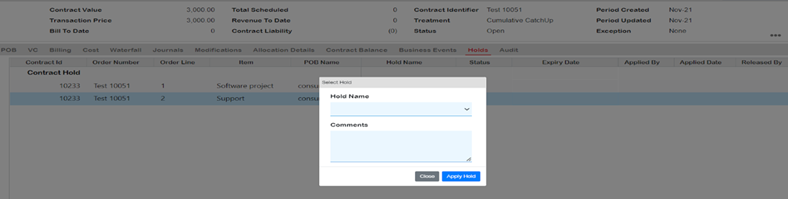
How to apply holds
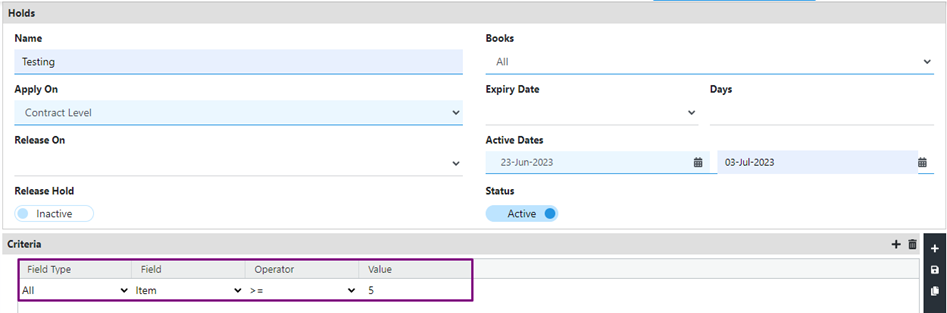
- Navigation: Go to Rules → Holds
- Name: Enter a name for the hold, such as "Delivery Hold."
- Apply on: Select whether the hold should be applied at the Contract level or Element level.
- Release on: Select an event based on which the hold can be released. Note that this option is inactive for a contract level hold.
- Books: Select the books to which the hold configuration should apply. You can select all or specific books.
- Expiry Date: Choose the date on which the hold will expire and will no longer be applied.
- Days: Enter the number of days after which the hold will no longer apply.
- Active Dates: Specify the date or period during which you want the hold to be active.
- Release Hold: Choose one of the following options:
- Active: When the release hold is active, revenue cannot be scheduled and revenue will not be transferred to the general ledger even if you try to release revenue manually.
- Inactive: When the release hold is inactive, you can schedule revenue and revenue will be transferred to the general ledger when you try to release revenue manually.
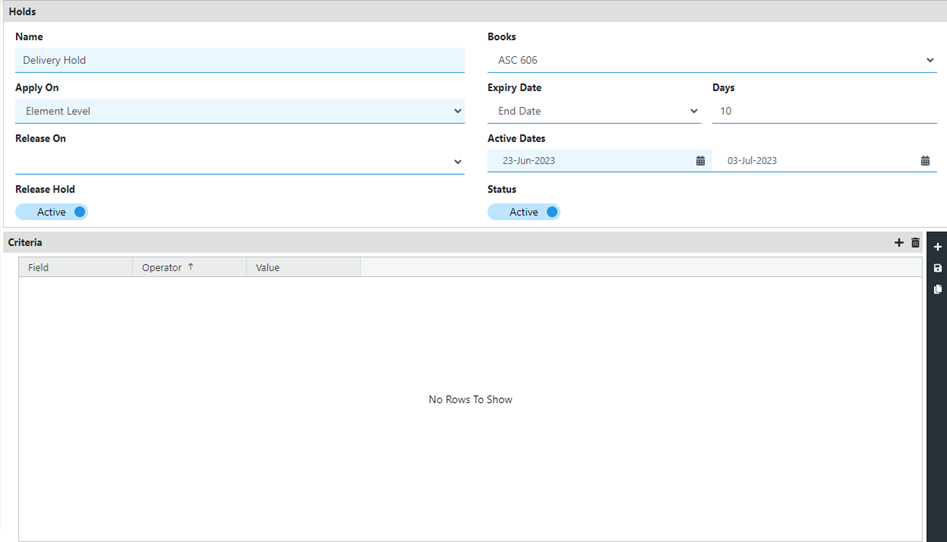
- Criteria: This section allows you to define criteria for applying the hold to a contract or element. It includes the following columns:
- Field type: Specify the field type, such as "All" or a specific field.
- Field: Choose the field on which the hold criteria will be based.
- Operator: Select the operator to define the comparison, such as "=", "<", ">", etc.
- Value: Enter the value against which the field will be compared, such as "Damaged" (text) or a specific number.
Applying and releasing holds (functional scenarios)
-
Create a hold at the contract level by filling in the mandatory fields and selecting a criteria based on which the hold will apply. For example, set the criteria as "quantity equal to greater than 5."
-
Upload the sales order (SO) file that satisfies the hold criteria.
-
Open the contract in the revenue workbench.
-
Go to the "Hold" tab in the contract view.

-
Right-click on each order line that needs to have the hold released.
-
A dialog box titled "Release Line Hold" will appear.

-
Click on the dialog box to release the hold on the selected order line.
-
The released hold will be reflected in the waterfall view, showing the updated revenue recognition.

-
It's also possible to configure holds at the element level, providing more flexibility in managing revenue recognition.

-
If holds are configured at the element level, you can follow the same process to release them manually.
Applying hold on element level manually
-
Go to the "Rules" function and click on "Hold."
-
Select "Element Level" from the drop-down list.
-
Choose "Apply on" as "Element Level" for Line Hold.
-
Click on the Save icon to save the configuration.
Now, to apply the hold on an element level manually:
-
Upload a contract that does not satisfy the element level hold criteria.
-
Go to the Revenue Workbench and open the contract.
-
Navigate to the "Hold" tab in the Revenue Workbench. At this point, no hold will be applied.
-
Once the hold screen appears, right-click on the order line that needs to have the hold applied.
-
A dialogue box titled "Apply Line Hold" will appear.

-
Click on "Apply Line Hold," and another dialogue box will appear.
-
Choose a predefined hold from the options and add comments explaining why the hold is being applied. Note that you can apply the hold even if it does not satisfy the criteria set for the hold.
-
Click on the appropriate buttons to confirm and save the applied hold.
Notes:
- In the "Hold" tab of the Revenue Workbench, you can see the information about when and who applied the line hold.
- Holds can also be applied to partial revenue. For example, if 50% of the revenue for a contract has been released, you can apply a hold on the remaining 50% and release it at a later time. The same process mentioned above can be used to apply holds on partial revenue in the Revenue Workbench manually.
Additional Journals
How to apply Additional Journals
Recurly Revenue Recognition Standalone comes with a feature to generate journals for any special purpose requirement based on the billed amount, adjustment waterfall values and/or revenue waterfall values by using the feature Additional Journals.
Navigation: Go to Rules → Additional Journals
Additional Journals Based on Billing
- Name: Enter a unique name for the additional journal.
- Books: Choose the books in which the journal is to be posted - example; Primary, Secondary or All.
- JE Type: Select the JE type as Document. If the user needs to create an additional Journal based on the billed amount, then choose “document” as value for the JE type. In addition to the billed amount, users may be able to create journals based on any calculated columns in the document/billing record.
- Select the POB Type for which the additional journals are to be applied. This selection would bring in additional journals only if the subscription belongs to the selected POB type. If, instead, the additional journals are required for Cost/Expenses, then the cost type must also be selected.
- In the Amount field select the data type for the amount required in the journal entry. This feature is available only when the additional journals JE type selected is Document. As you can see below, the drop down under amount will display all the data type amounts for the document’s attributes .
This screenshot is displaying all the document attributes of data type “amount” defined in the instance.
- Enter the debit and credit account information for the additional journals.
- Enter the active date. Choose the beginning and ending date that the JE should be active. You can leave the end date blank if you want the JE to be applied forever.
- Auto Reverse is an option available to reverse the JE passed in the next period of the contract. It is available only when the JE type is Document.
- Retirement is available when additional journals are configured for cost type. This will create additional journals at the end of the contract period.
Note: The POB type and cost type are exclusive from each other and cannot be selected at the same time.
Additional Journals for Revenue waterfall amount
- Name: Enter a unique name for the additional journal.
- Books: Choose the books in which the journal is to be posted - example; Primary, Secondary or All.
- JE Type: Select the JE type as Revenue Waterfall. If the JE type is Revenue waterfall, the JE will be posted in the contract for the amounts in the Revenue waterfall. This can be applied only based on POB type. If the additional journal to be applied for all the contracts, then please leave the POB type blank.
- Enter the debit and credit account information for the additional journals.
- Enter the active date. Choose the beginning and ending date that the JE should be active. You can leave the End date blank if you want to apply for the JE forever.
Additional Journals for Adjustment waterfall amount
- Name: Enter a unique name for the journal to be applied.
- Books: Choose the books in which the journal is to be posted - example; Primary, Secondary or All
- JE Type: Select the JE type as Adjustment Waterfall. If the JE type is Adjustment waterfall, the entries will be posted in the adjustment waterfall. Adjustment waterfall refers to the waterfall that arises due to the carve ins and carve outs at the time of allocation. Hence, this is applicable only when the merchant has allocations.
- Enter the debit and credit account values for the additional configured journals.
- Enter the active date. Choose the beginning and ending date that the JE should be active. You can leave the End date blank if you want to apply the JE forever.
Note: Adjustment waterfall additional journals do not get an option to choose POB type and they do not have an option for auto reverse.
Updated 2 months ago