Edit a customer subscription
Step-by-step instructions for merchants to modify any aspect of an active subscriber’s contract—from status and contact info to billing cadence, pricing, add-ons, shipping, and cancellation—while preserving continuity.
Overview
The Edit a Customer Subscription screen in Recurly Commerce empowers you to manage every facet of an individual subscriber’s contract in real time: update their status, contact details, next-billing date, frequency, pricing, discounts, add-ons, shipping and more, or pause, skip, cancel, and even re-activate—all without code.
Prerequisites & limitations
- The subscriber must already have an active contract.
- Email address changes require Recurly support intervention.
Definition
Editing a subscription contract lets you tailor an individual customer’s upcoming renewals and deliveries—updating their billing schedule, quantities, product selections, pricing, discounts, shipping, and status—while existing subscribers continue uninterrupted.
Key benefits
- Immediate adjustments: Apply changes on the spot for any single subscriber’s contract.
- Subscriber retention: Pause, skip, or modify schedules to keep customers engaged and satisfied.
- Personalized service: Offer one-off add-ons, custom discounts, and gifting directly on their contract.
Key detail
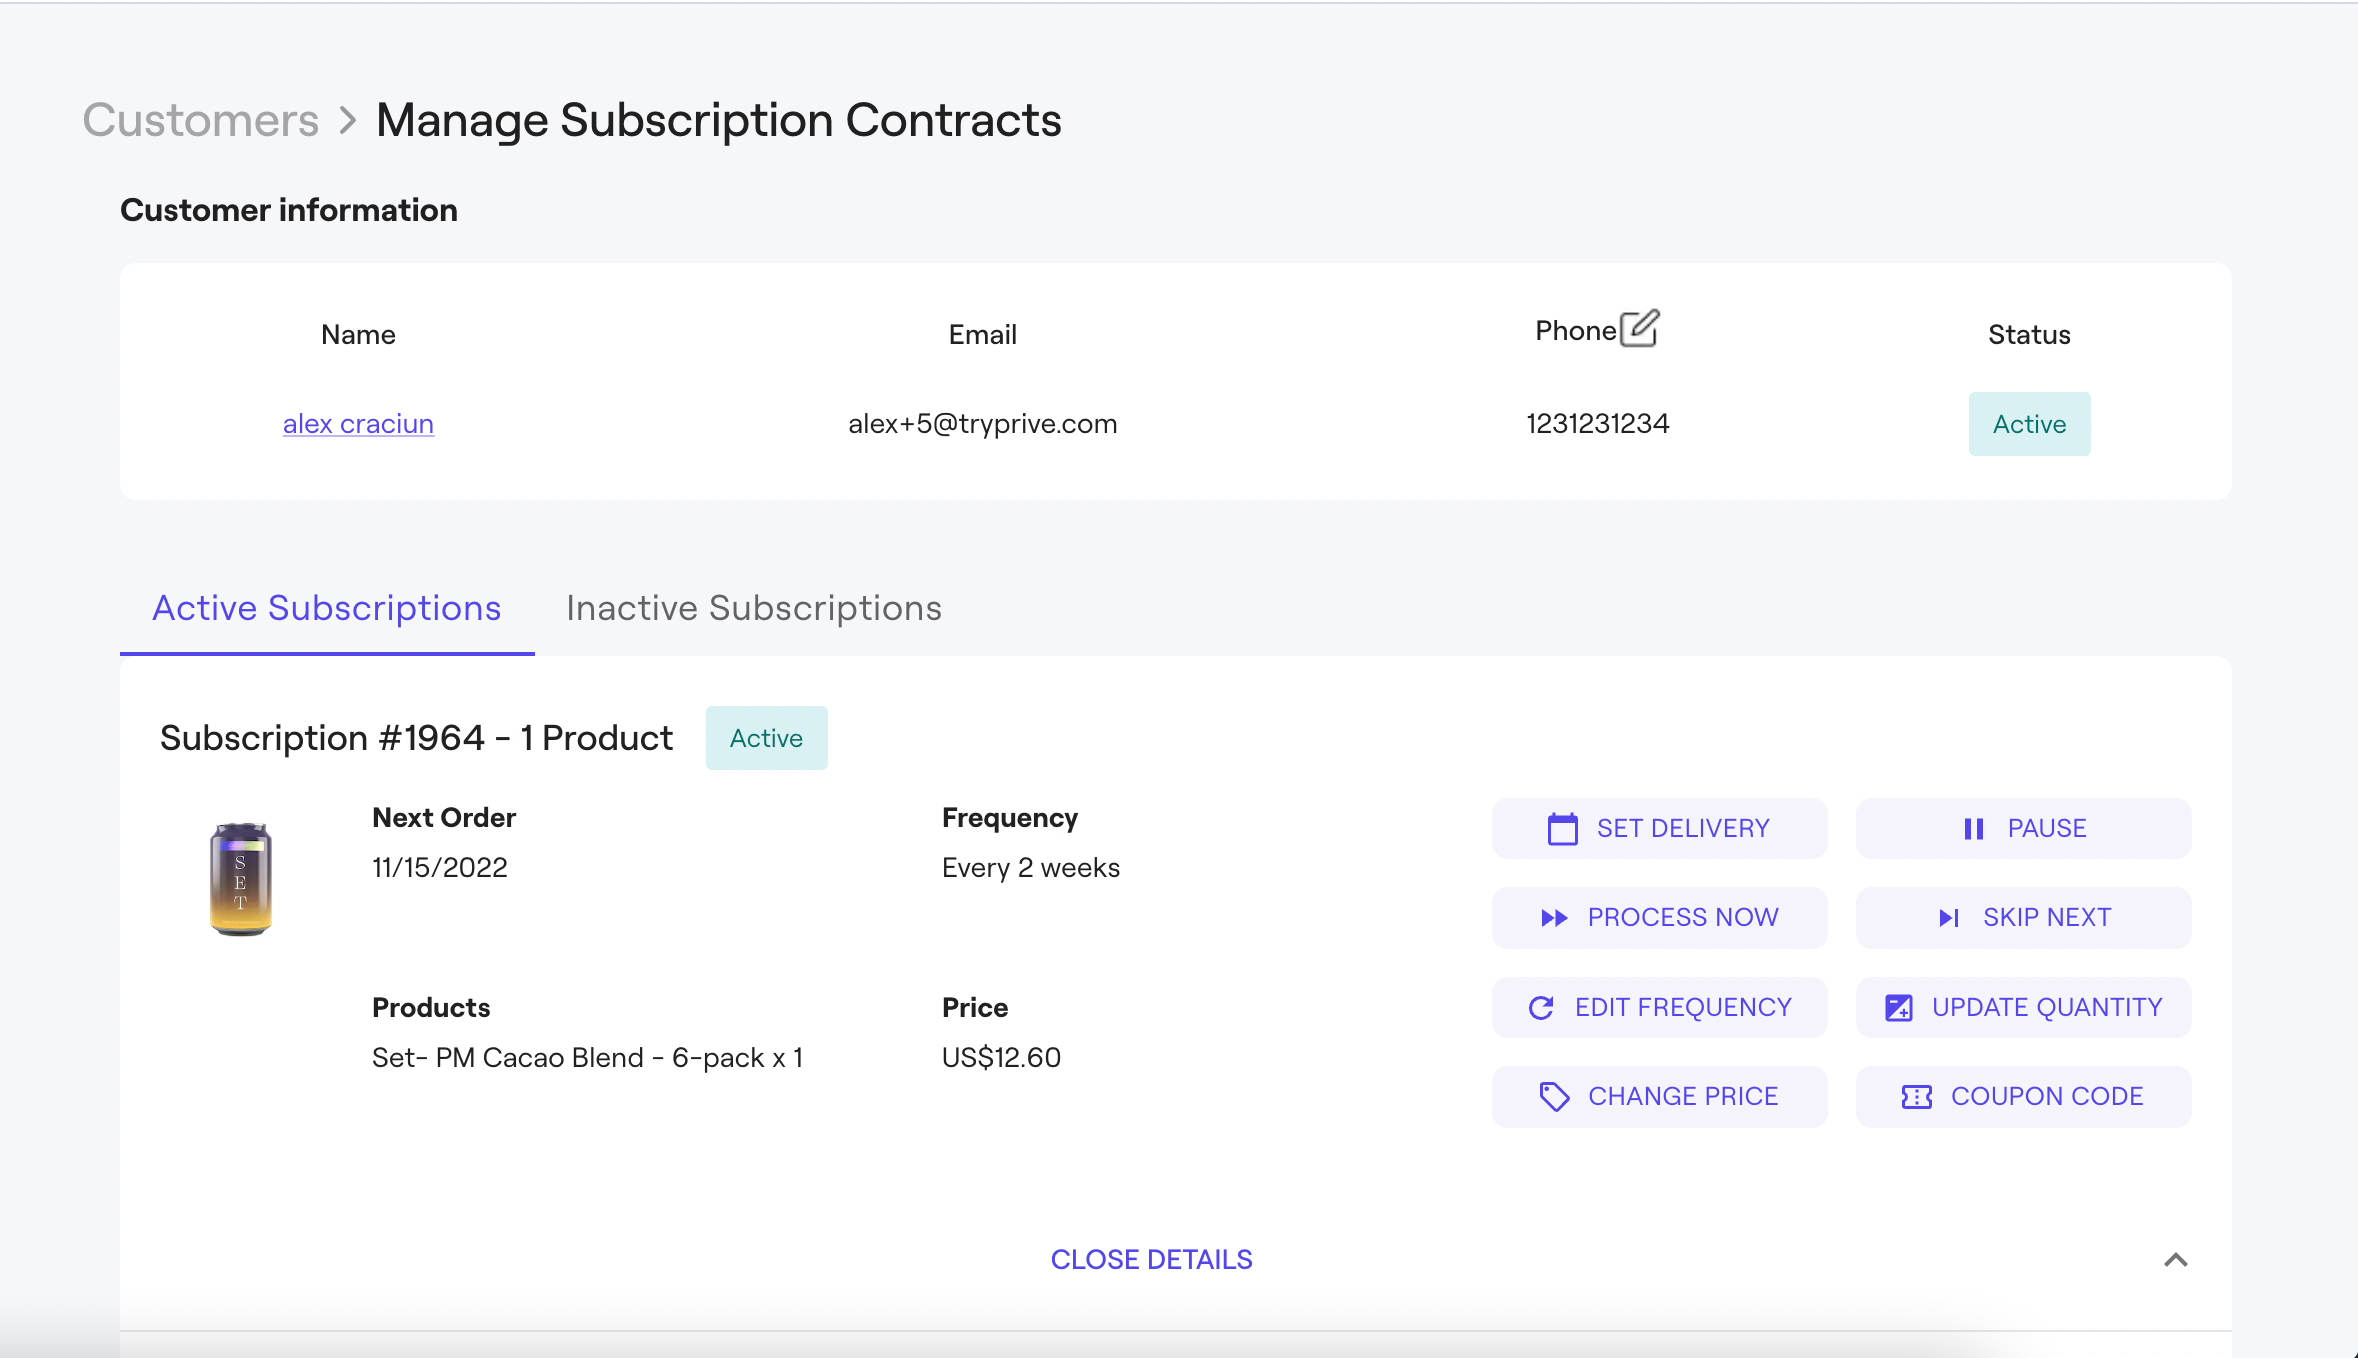
Accessing a subscriber’s contract
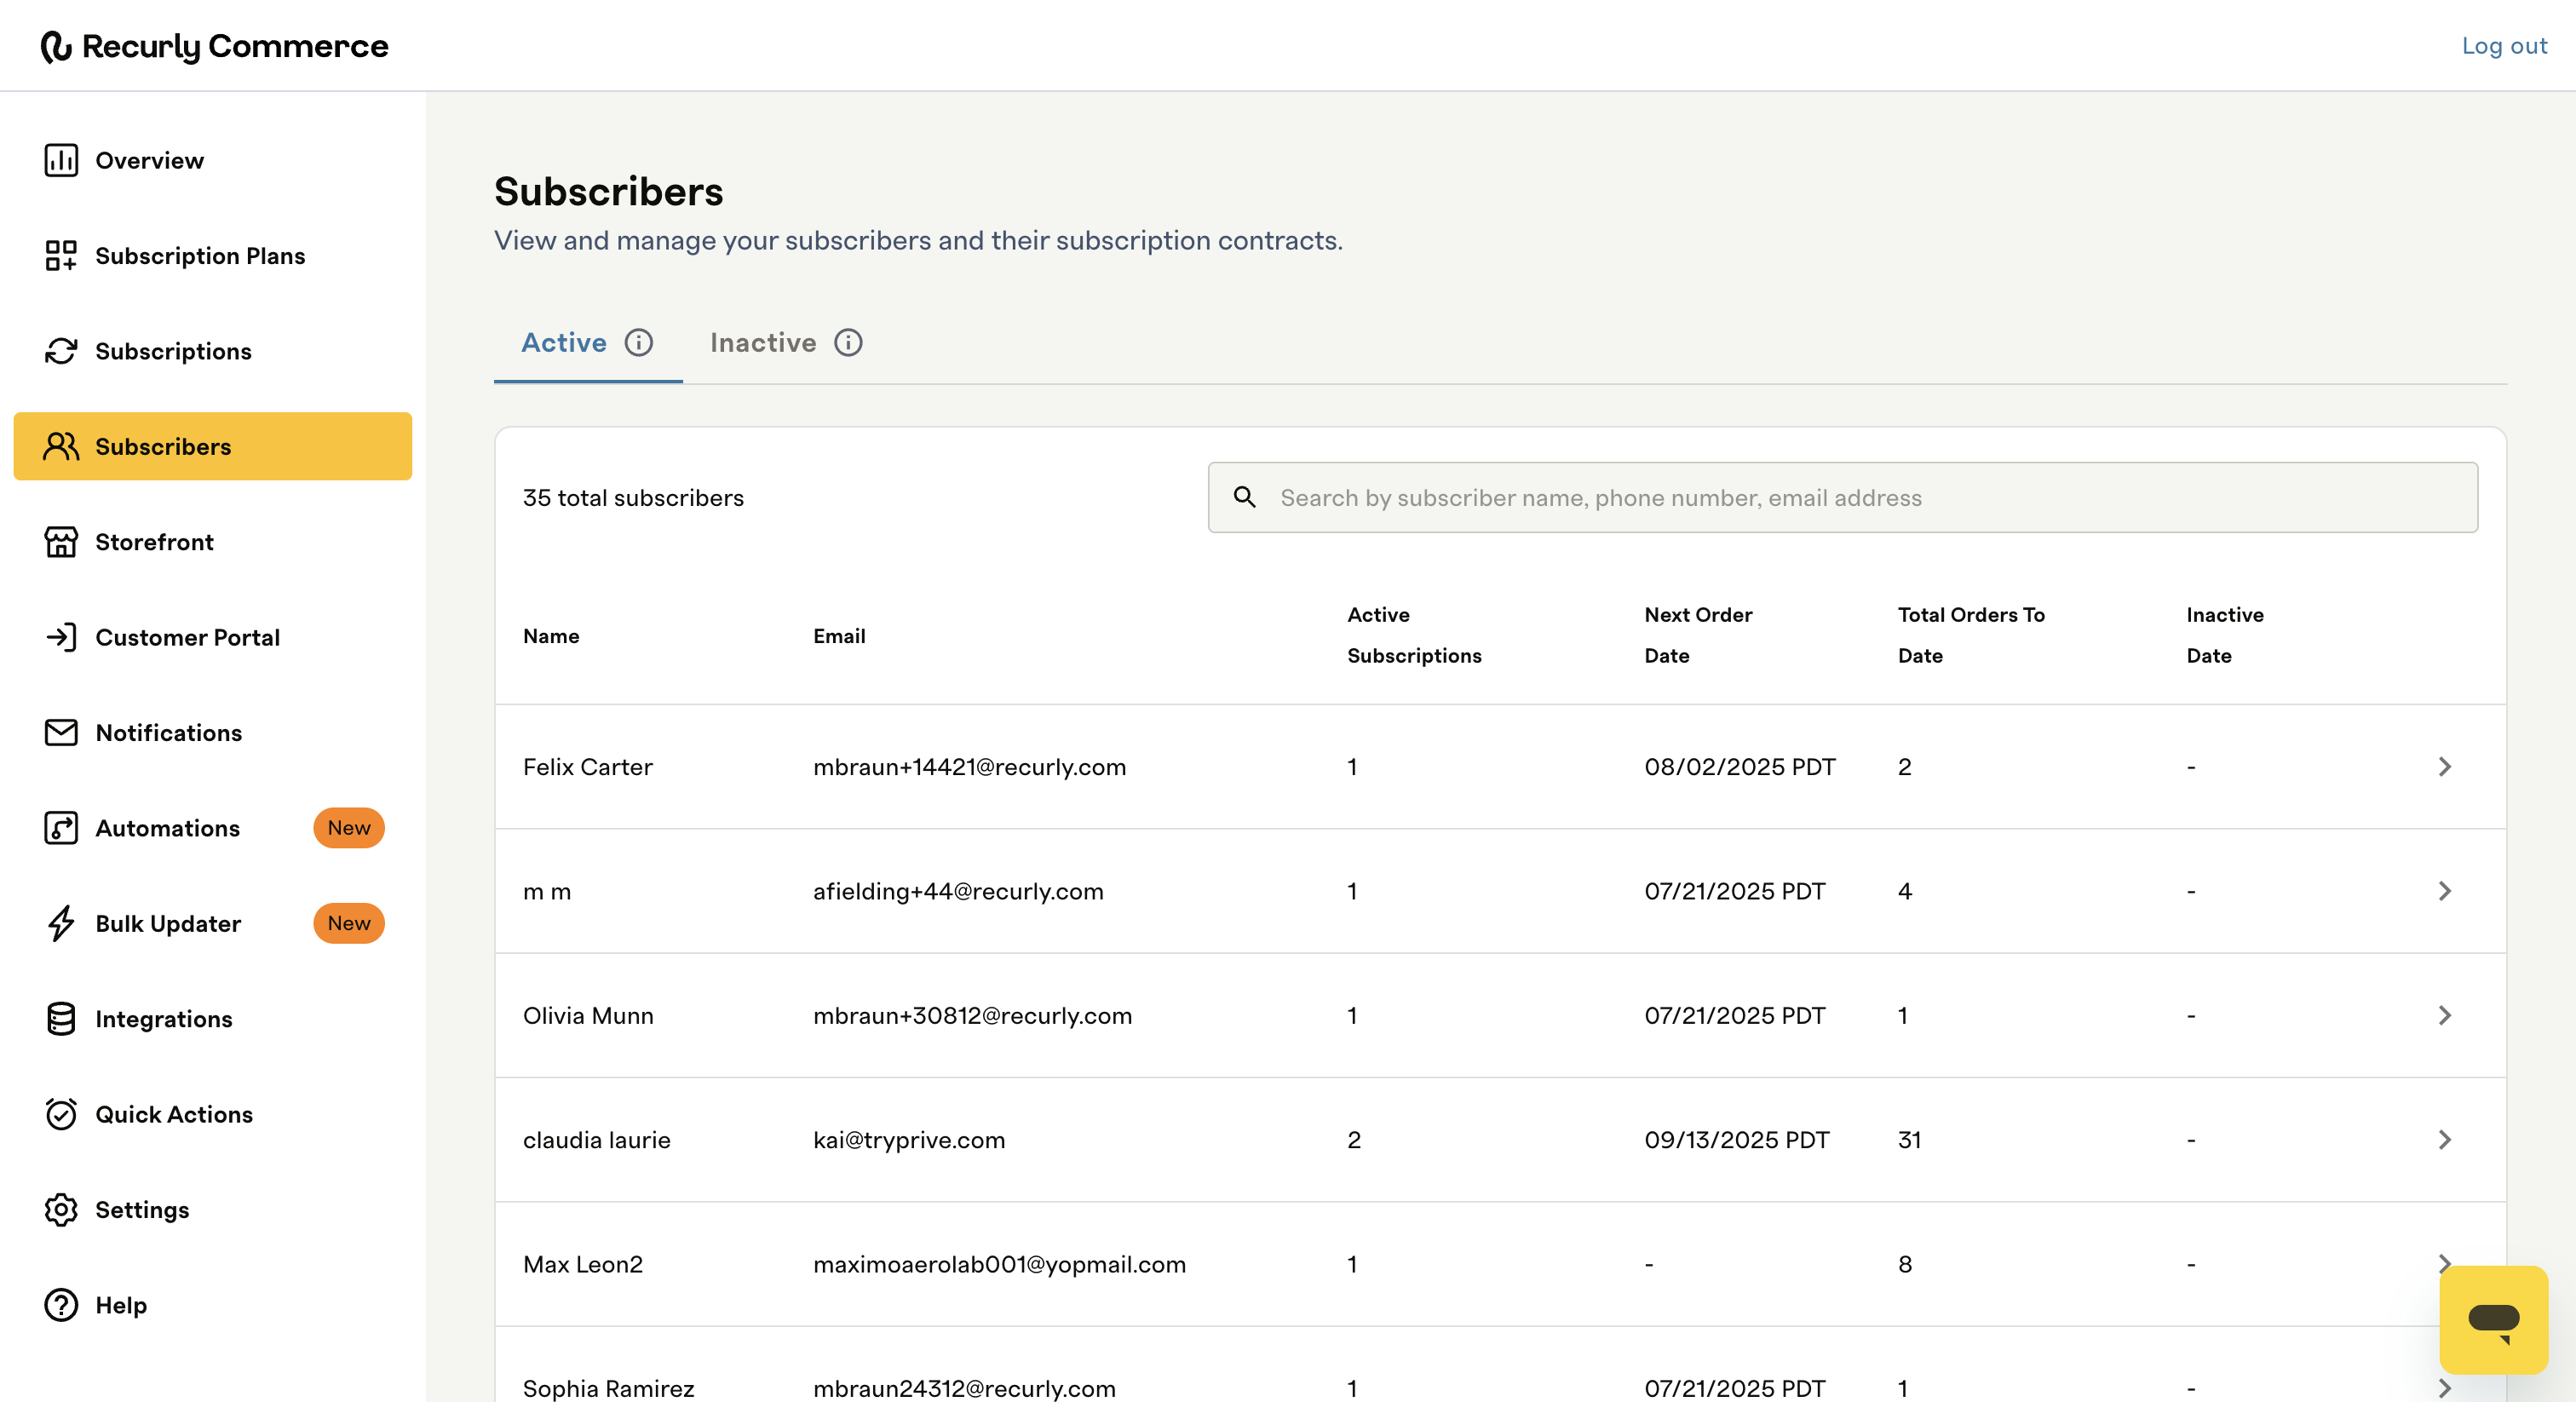
- Go to Customers → Active (or Inactive) tab.
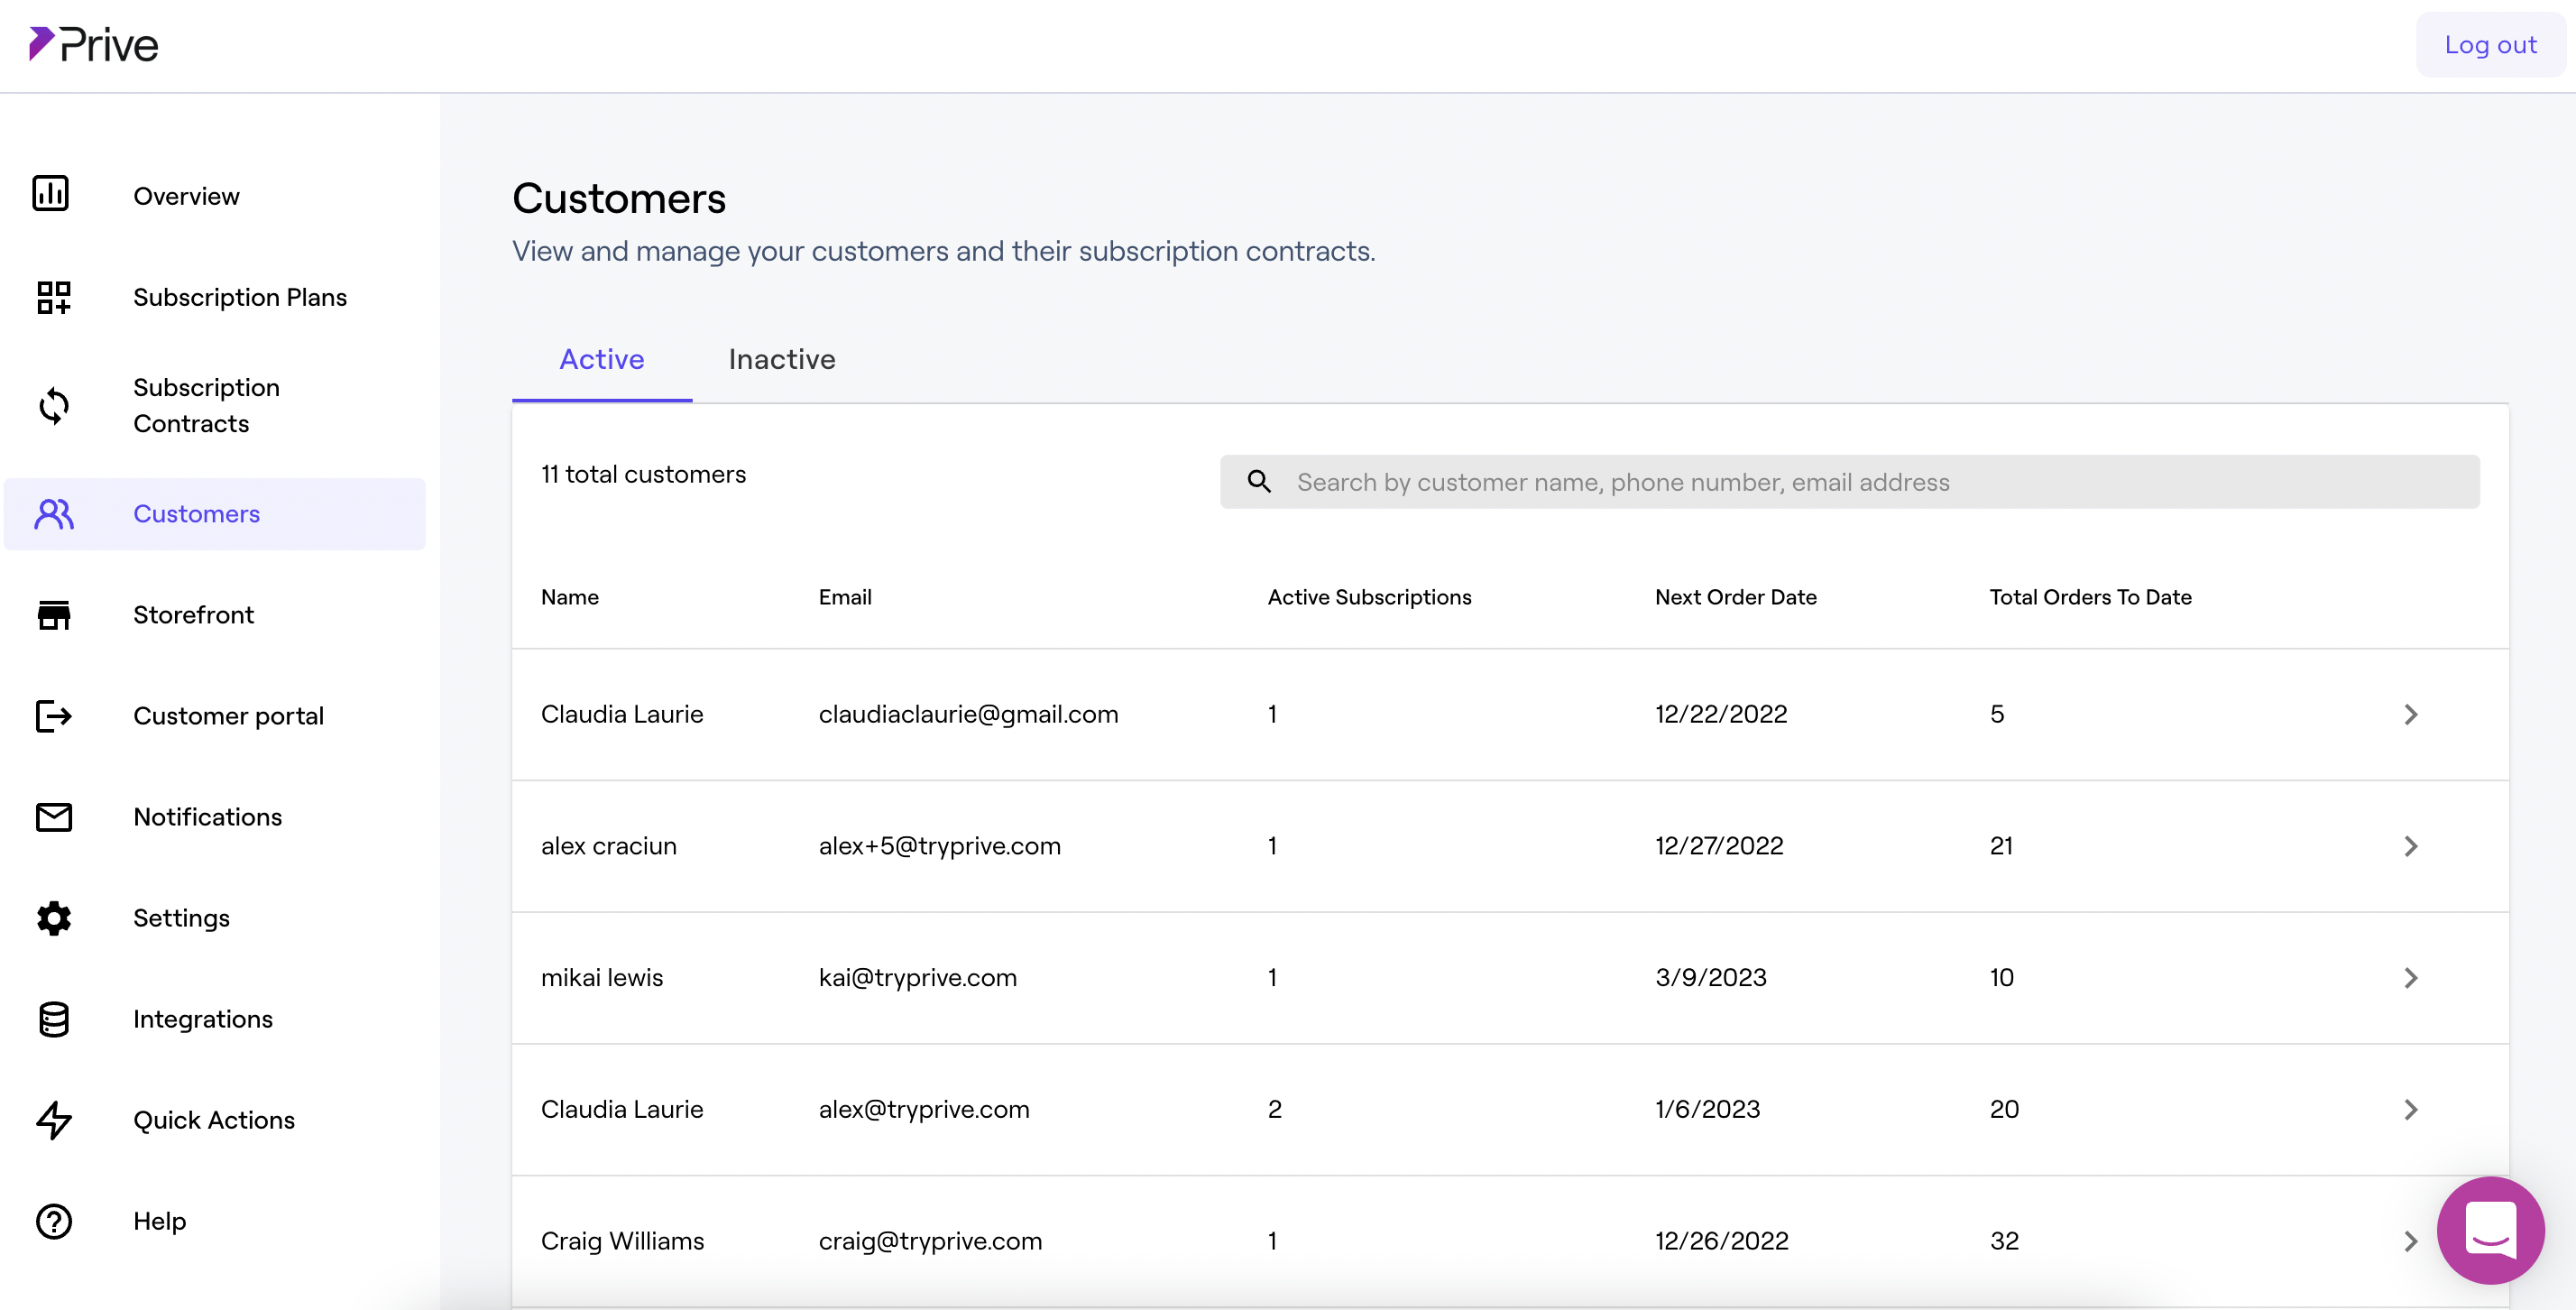
- Find the subscriber in the list and click anywhere on their row.
- The contract detail page opens, showing name, email, phone and status badge.
Statuses:
- Active: This means the contract is active with no issues found.
- Inactive: This means the contract is cancelled.
- (Click the “Reactivate” button to reactivate a subscription contract)
- Failed (in dunning): This means the contract’s payment method is currently being re-tried through a process called dunning.
- (Pause and unpause the contract to stop dunning and bring the contract back to an active state)
Edit Phone Number
- In the contract header, click the ✎ icon beside Phone.
- Enter the new number and click Save.
Edit email
Change a subscriber’s email address.
- Navigate to Subscribers.
- Locate and select the subscriber.

- Click Change beside the email field.

- Enter the new email address and click Update.
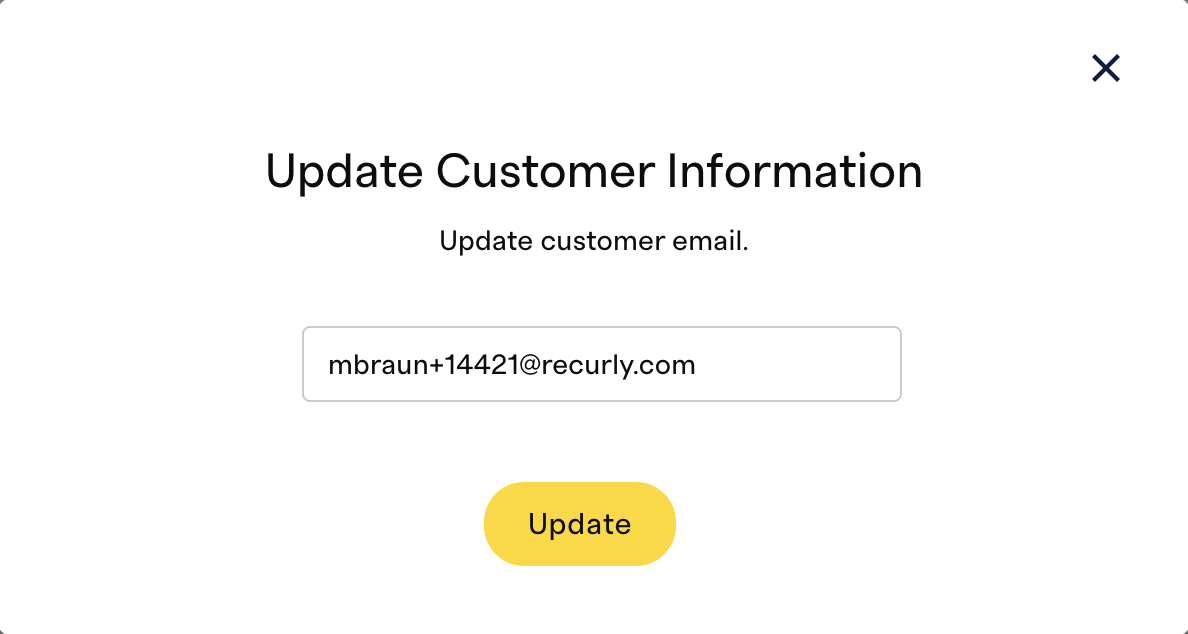
- The change is applied immediately.
Set delivery / renewal date
Adjust when this subscriber’s payment method is charged—and all future renewals follow.
- Click Set Delivery.

- Select your new billing date.
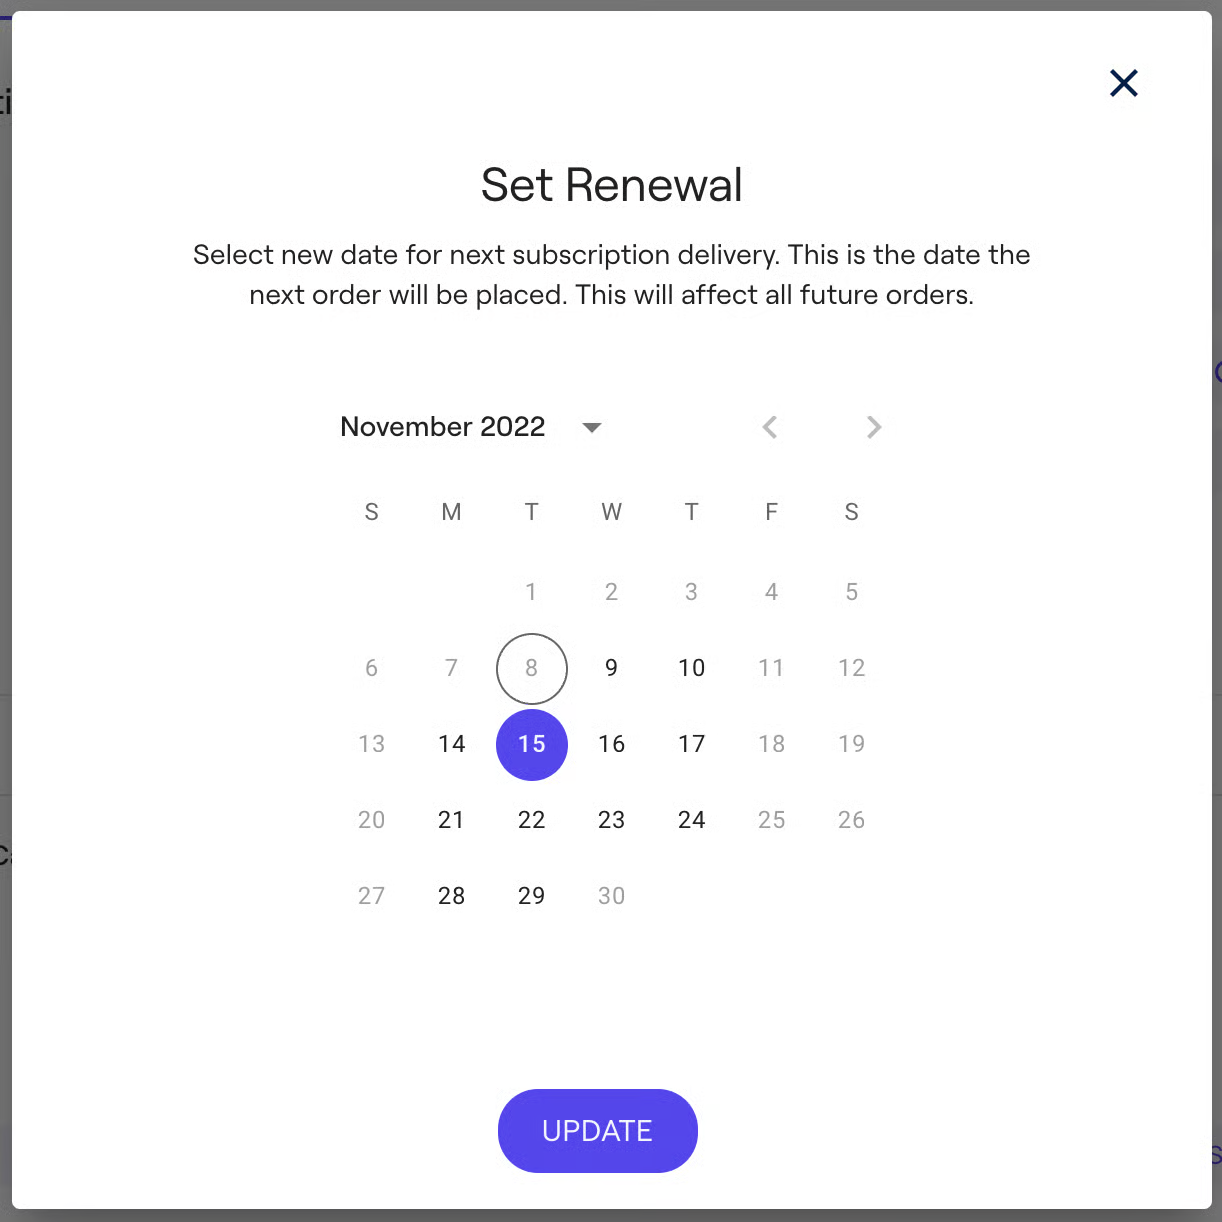
- Click Update to apply.
Process now
Charge the subscriber immediately—no waiting for the next scheduled date.
- Click Process Now to trigger an on-demand payment.

Edit frequency
Change how often this subscriber is billed going forward.
- Click Edit Frequency.

- Choose a new cadence from the list of your configured options.
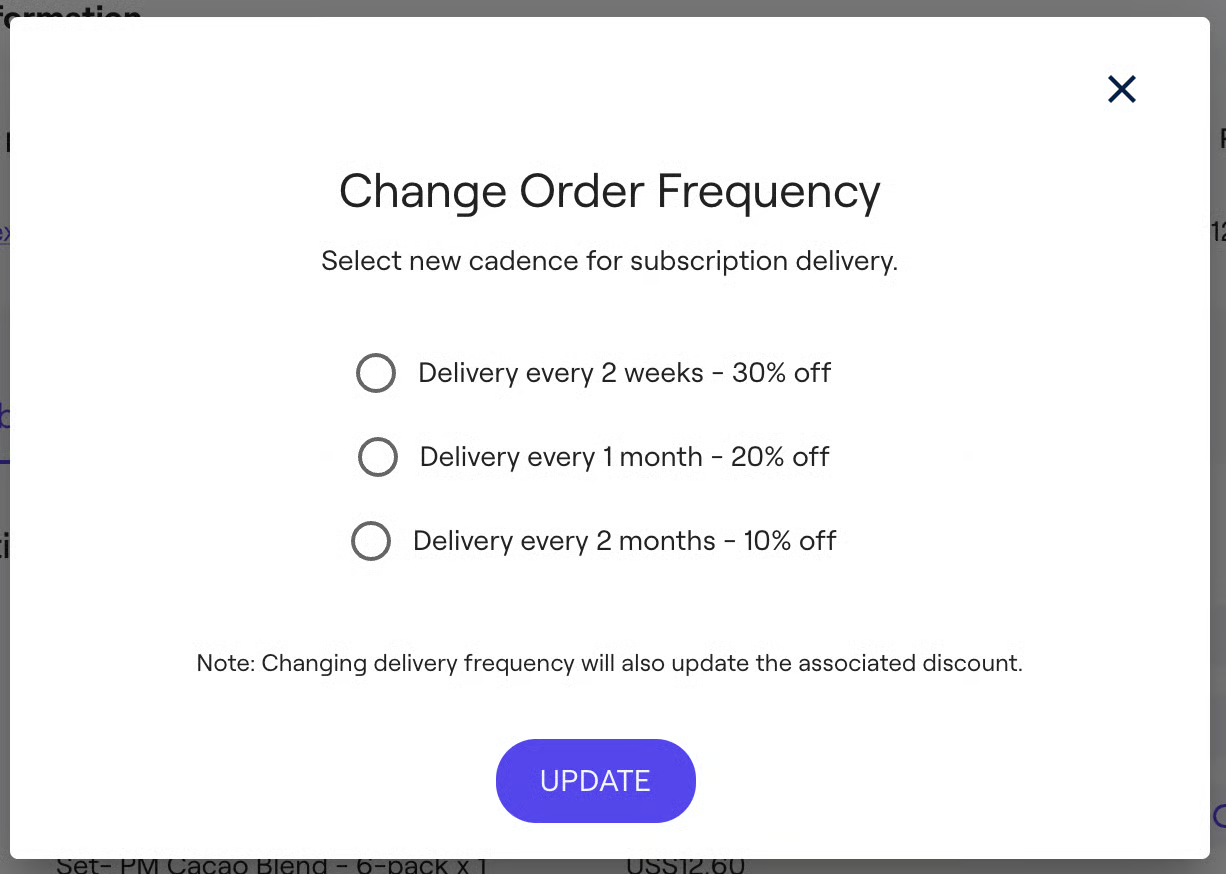
- Click Update to save—it applies to all upcoming renewals.
Change price
Update the per-renewal cost for this subscriber’s contract—future renewals will charge the new amount without affecting any other subscribers.
- Click Change Price.

- Enter the new subscription price for this contract only.
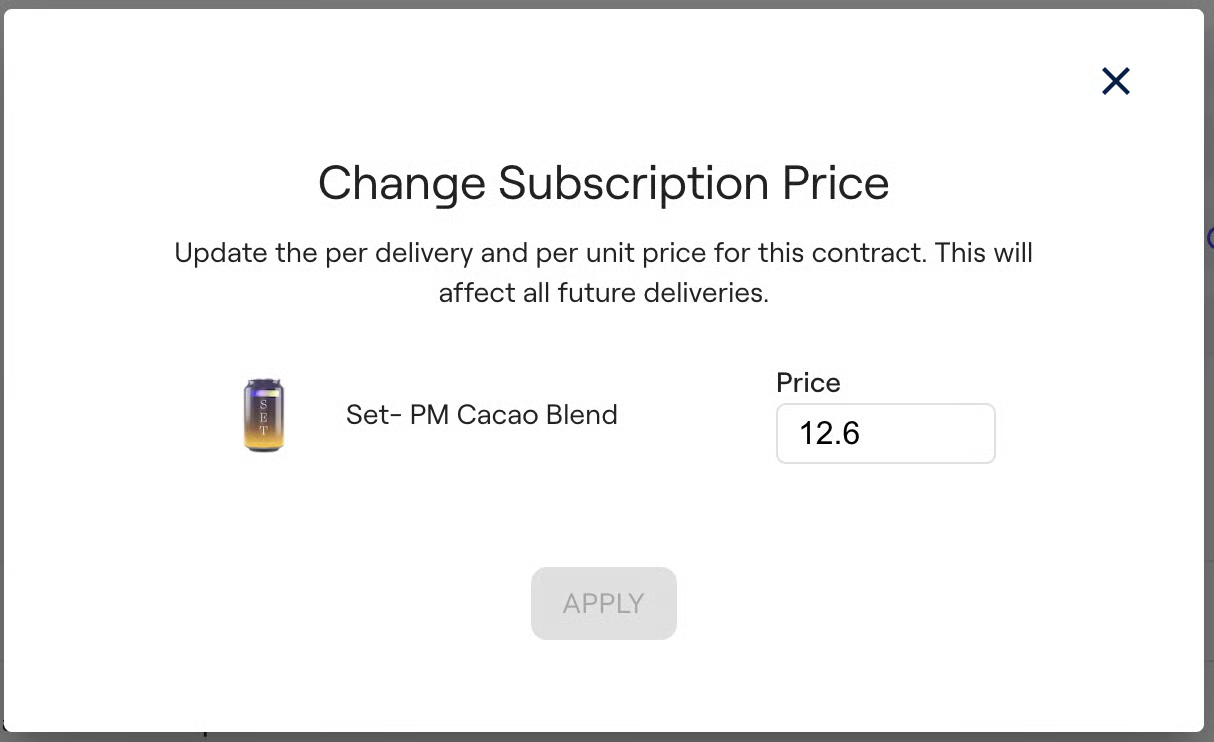
- Click Apply to confirm the new price.
Pause contract
Temporarily halt a subscriber’s renewals—either indefinitely or for a predefined number of deliveries.
- Click Pause.

- Choose between pausing indefinitely or specifying a number of upcoming deliveries (if your plan supports it).
Skip next
Skip one or more upcoming orders without cancelling the subscription; the schedule will pick up after the skipped delivery.
- Click Skip Next.

- Select the orders you want to skip.
- Click Confirm—all future renewals resume once those orders have been skipped.
Update quantity
Adjust the number of items your subscriber receives on each renewal.
- Click Update Quantity.

- Enter the new quantity for all future deliveries.

- Click Apply to save the updated quantity.
Apply coupon / discount code
Attach a Shopify coupon code directly to a subscriber’s contract to apply promotional pricing on all future renewals.
- Click Coupon Code.

- Enter a valid Shopify coupon code.
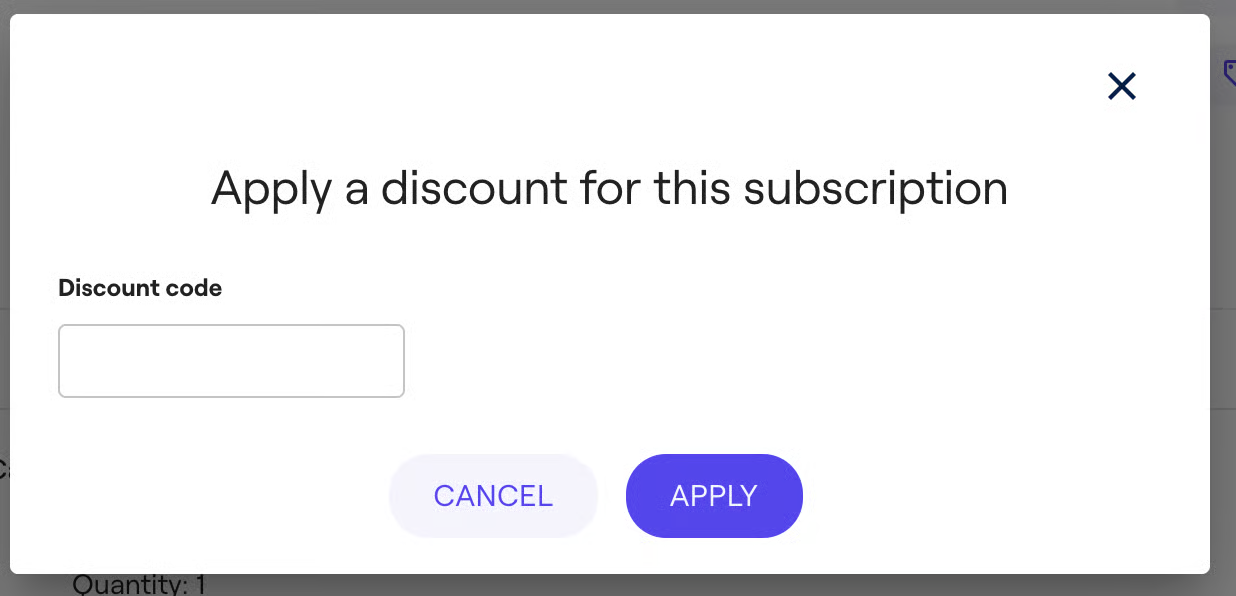
- Click Apply to activate the discount for this subscription contract.
Swap product
Replace the current subscription item with a different SKU you’ve pre-configured in your plan’s swap list.
- Click Swap Product.

- Select a replacement SKU from the enabled swap list.
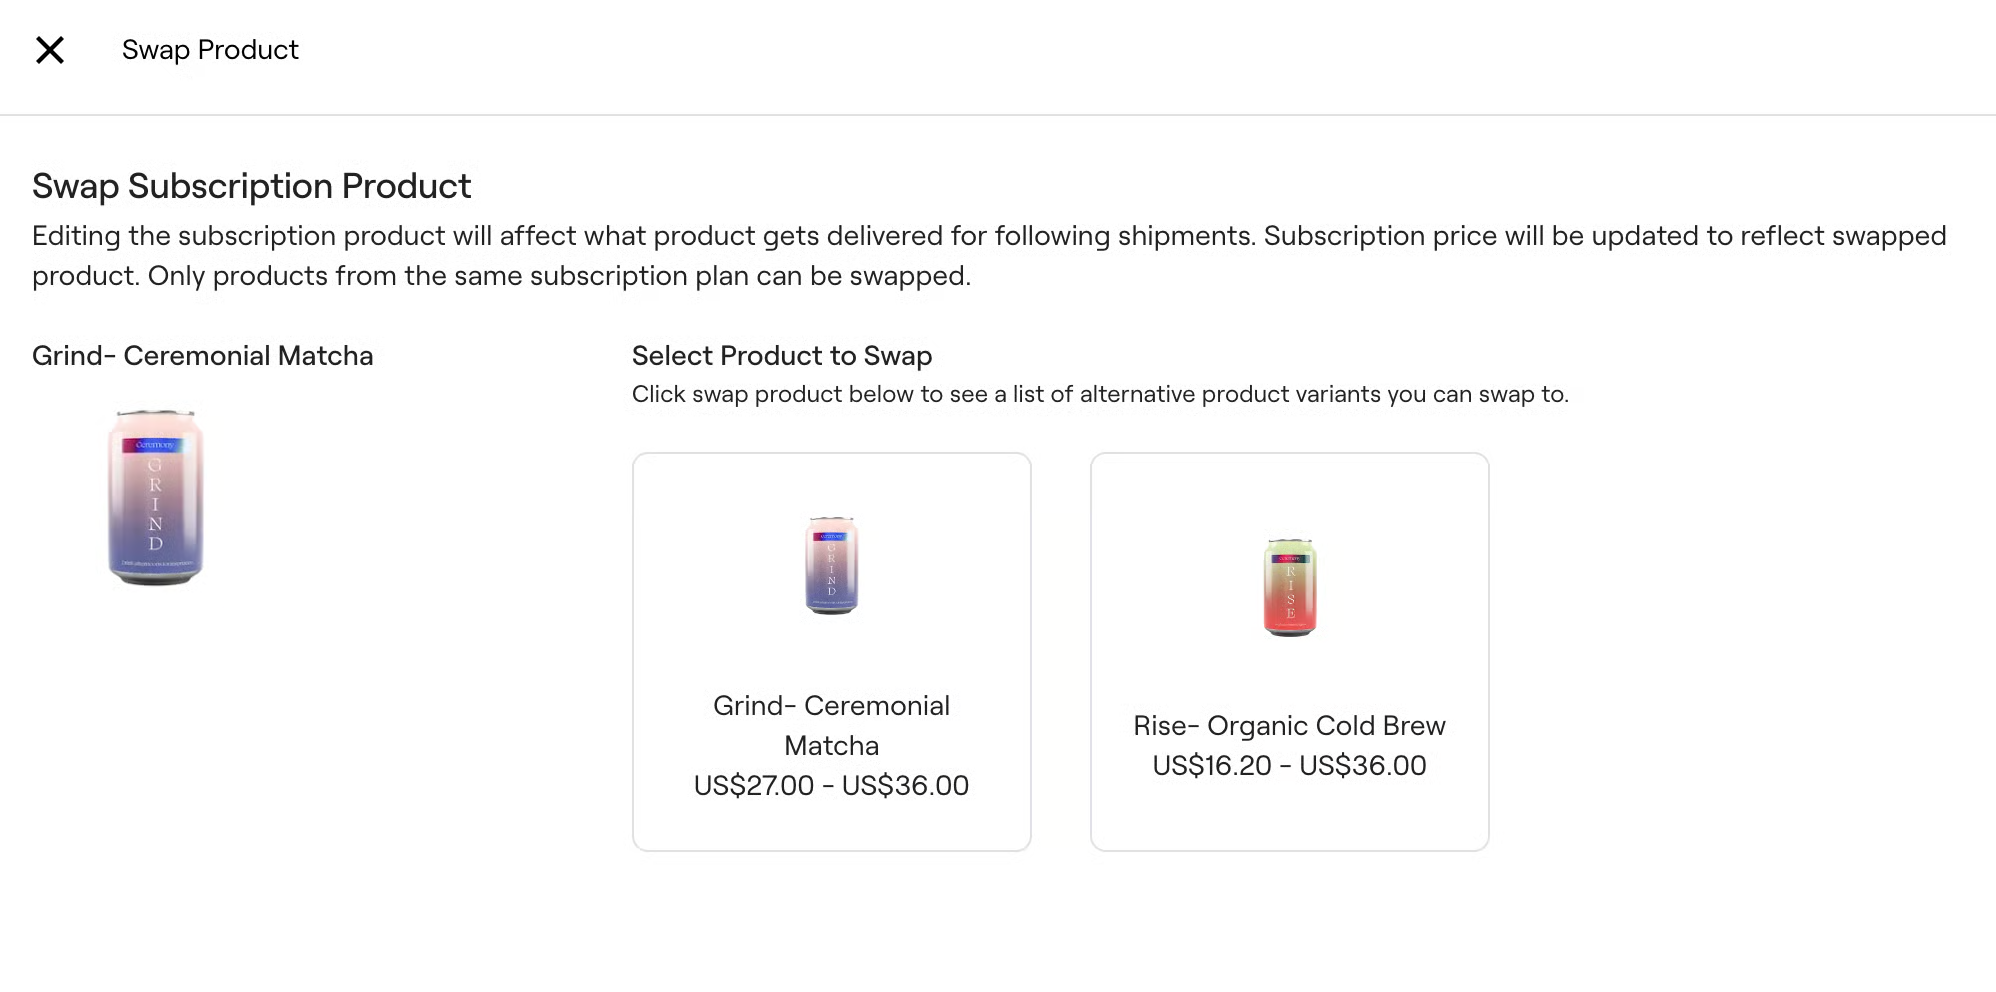
- Click Swap & Save to update the contract.
Add-on subscription product
Include an extra product on every delivery to boost order value and subscriber satisfaction.
- Click Add-on Subscription Product to all Deliveries.

- Choose the add-on SKU to include on each renewal.
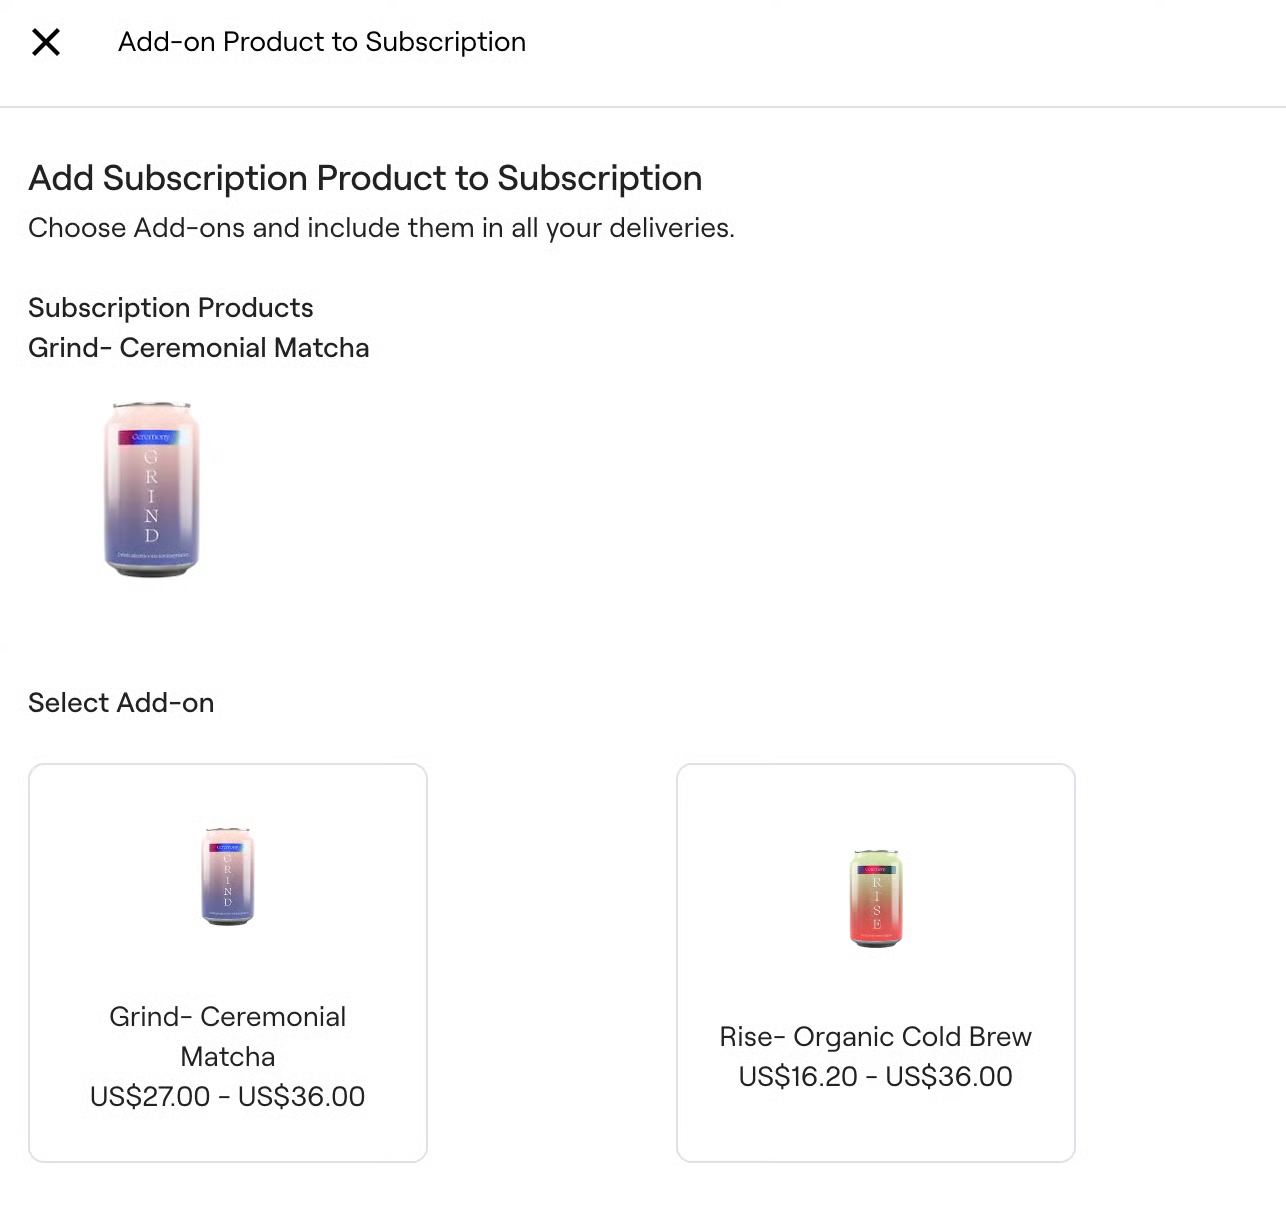
- Save your changes to lock in the add-on for all future deliveries.
One-time add-on product
A subscription product will be added once to a specific renewal/delivery of choice.
- Click Select One-Time Add-On.

- Select the SKU and specify which upcoming renewal.
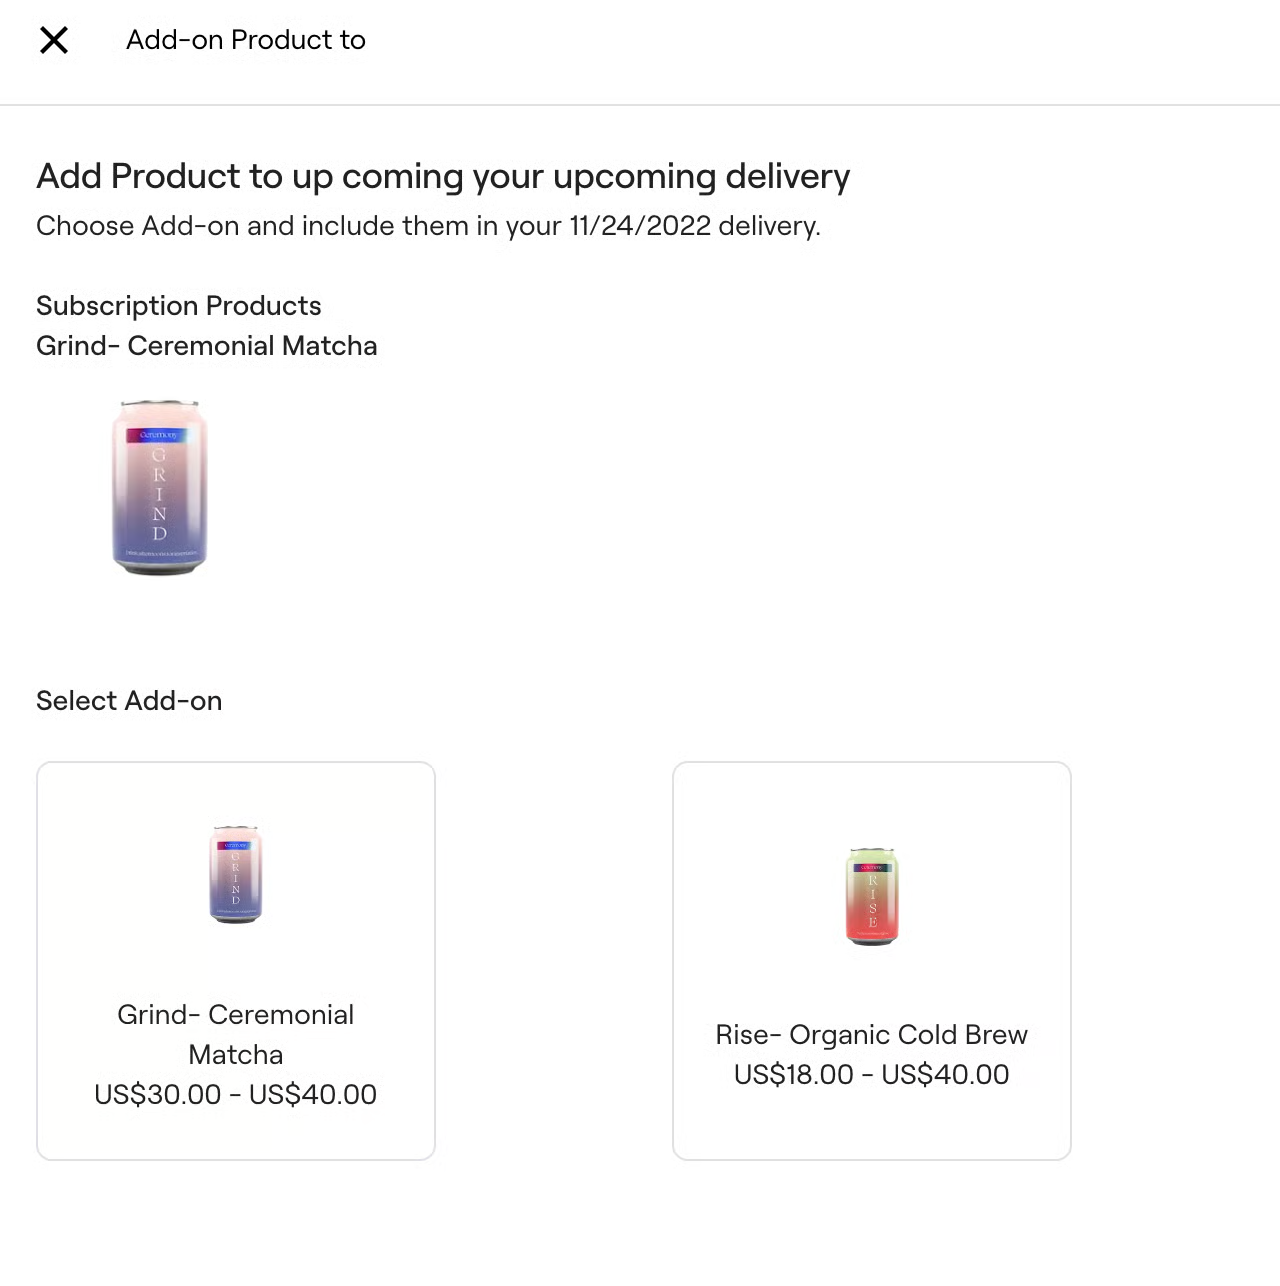
- Save your changes.
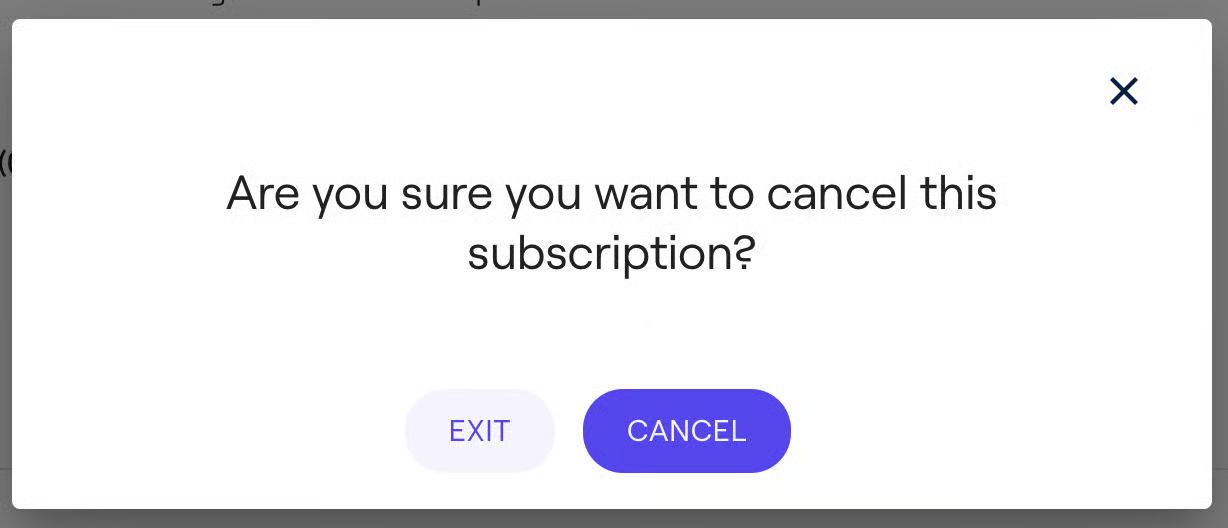
Cancel subscription
Cancelling the subscription will immediately stop all subsequent renewals/deliveries in the contract and push the contract status to an “inactive” state.
- Click Cancel Subscription.

- Confirm in the pop-up to stop all future renewals and set status to Inactive.
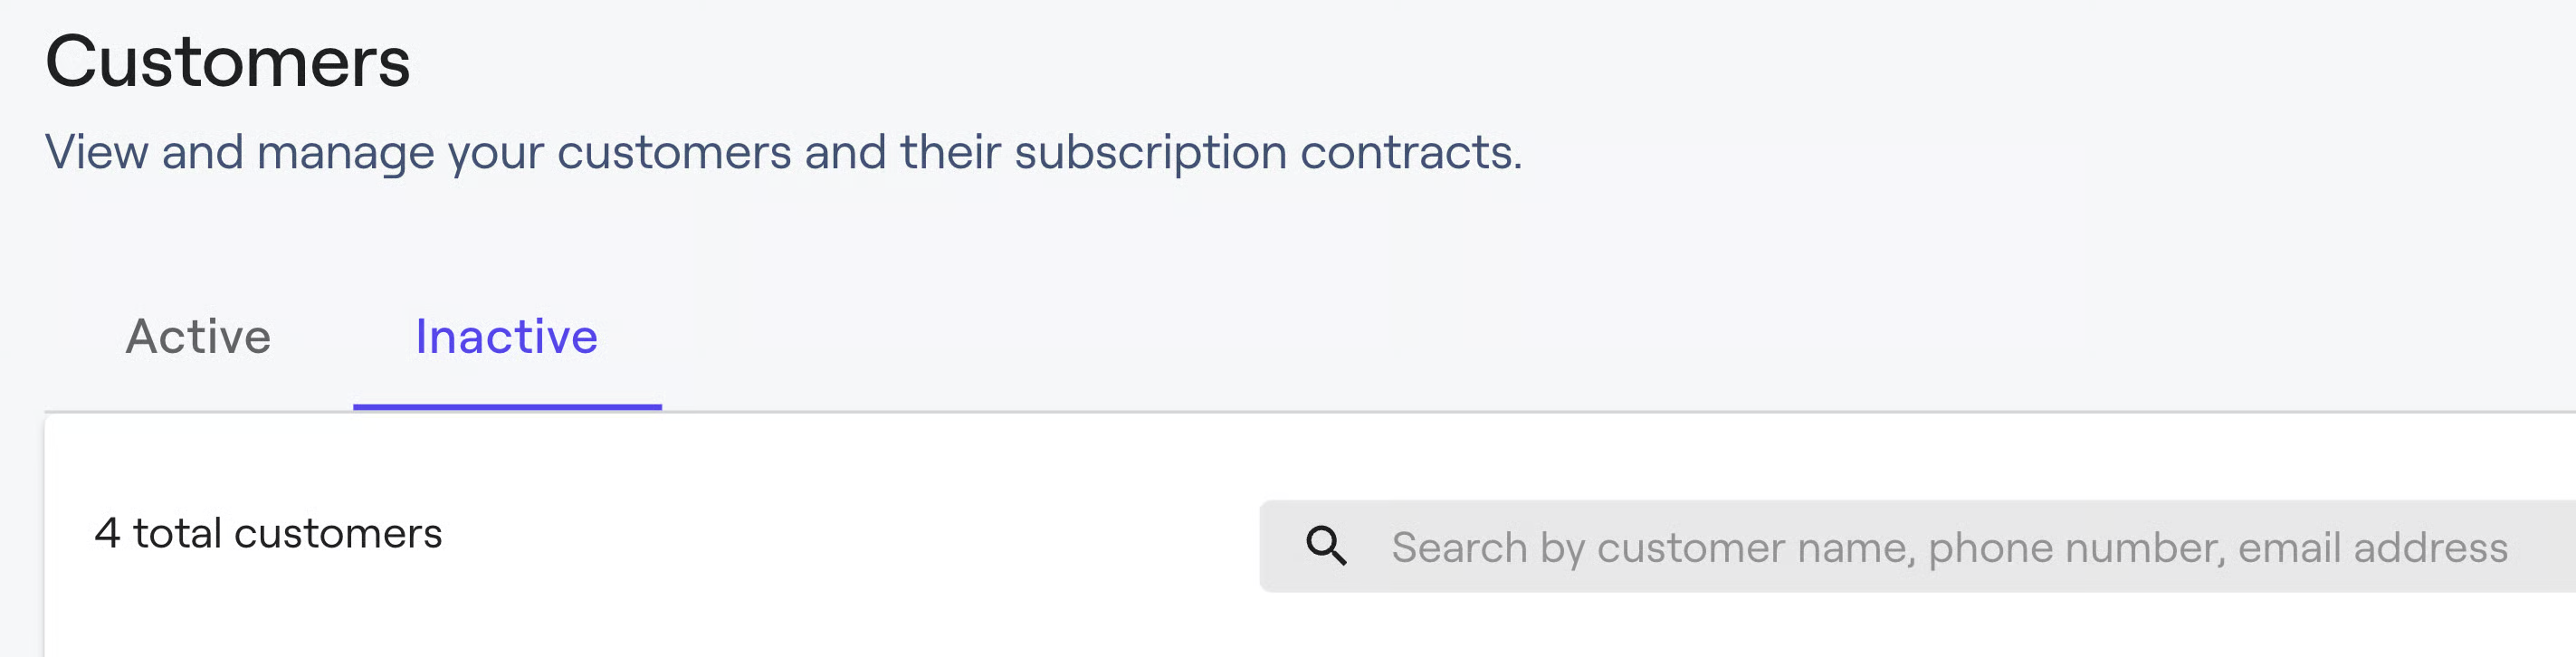
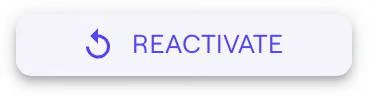
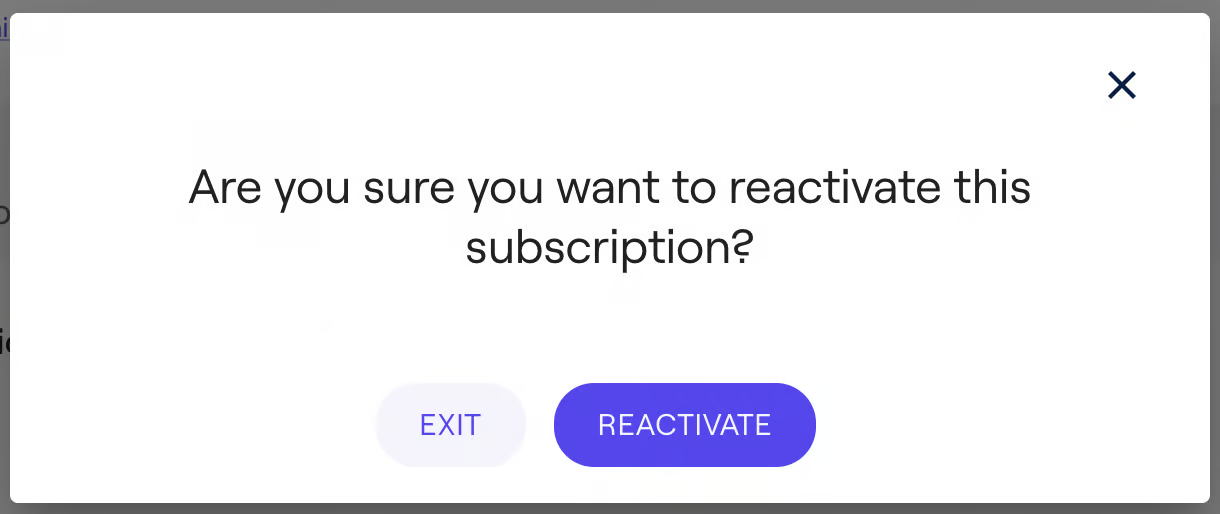
Reactivate subscription
Bring a cancelled subscription contract back to life in three easy steps:
- Switch to the Inactive tab in the Customers section and find the subscriber.
- Click Reactivate next to their contract.
- Confirm the action in the pop-up. Their status will immediately revert to Active, and they’ll reappear in the Active list.
Update shipping information
Adjust the subscriber’s delivery address on file to ensure future orders ship to the correct location:
- In the Shipping Information panel, click Edit.
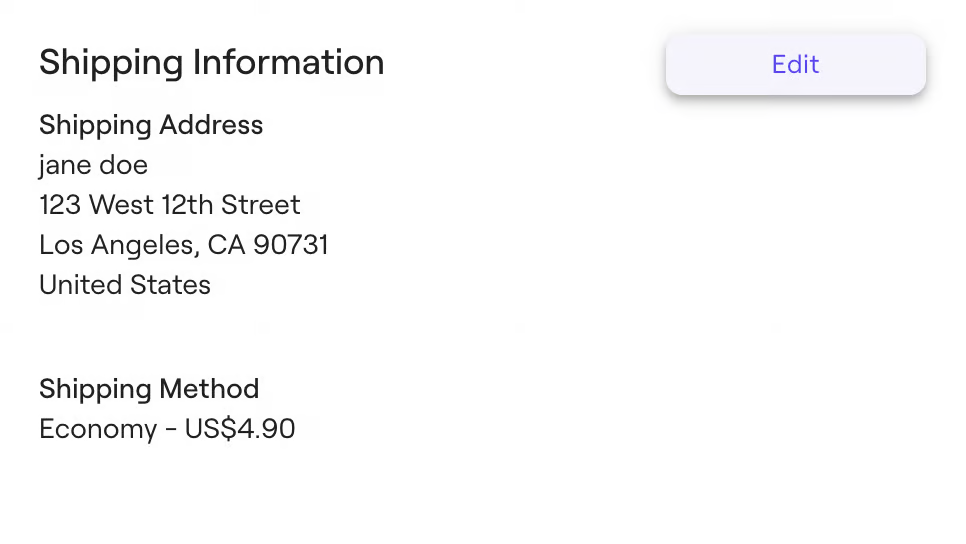
- Modify any of the fields—name, street address, city, state, postal code, or country—to the new values.
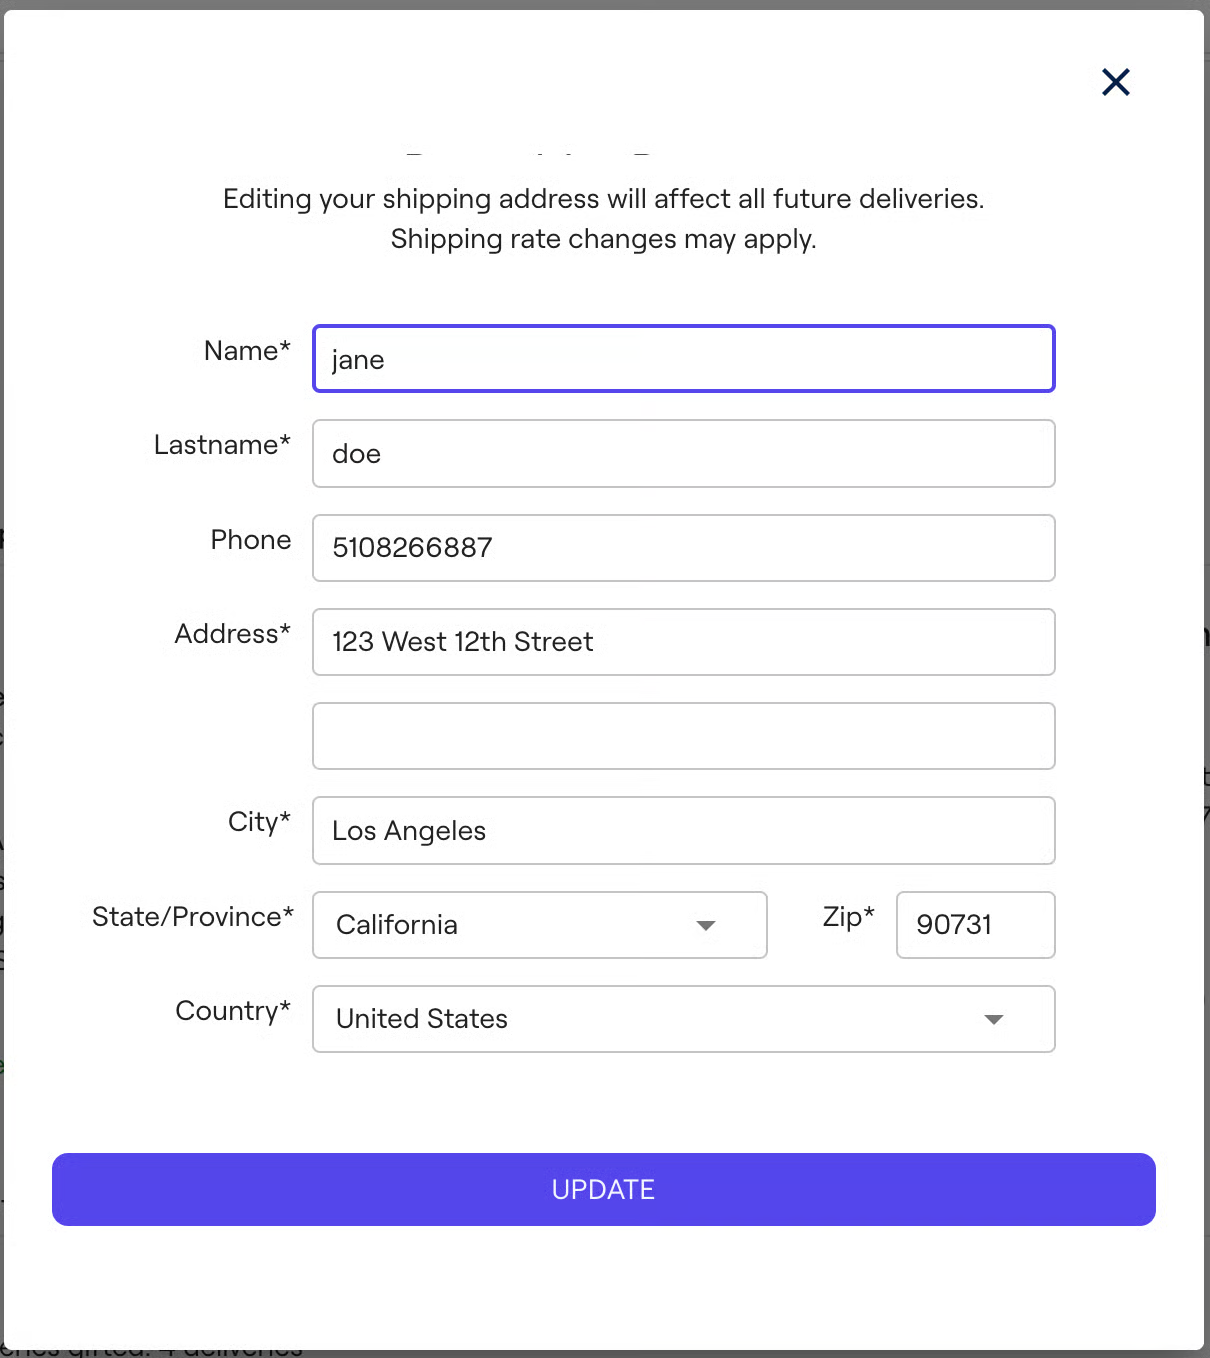
- Click Update to save the new shipping information. All future renewals and deliveries will use this updated address.
Update billing information
When a customer needs to change their payment method on file, trigger a secure reset through Shopify Payments:
Note: For security and PCI compliance, merchants cannot directly edit a customer’s payment details. You must send a reset link.
- In the Billing & Shipping section, click Send reset email.
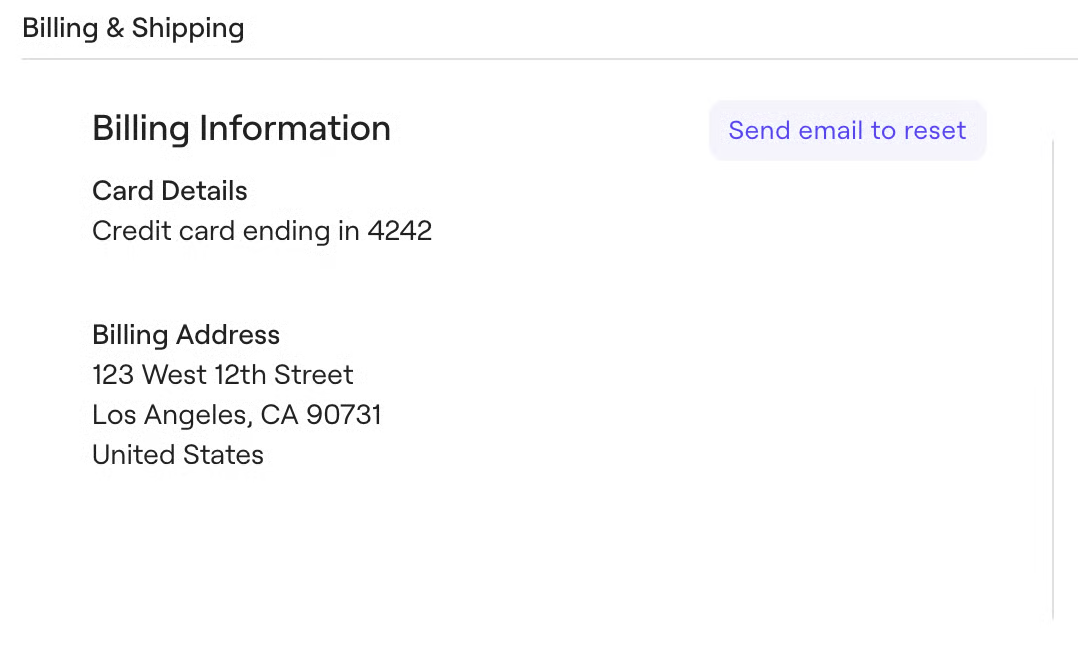
- The subscriber receives an email with a link to update their payment details via the Shopify Payments gateway.

- Once the customer completes the update in Shopify, Recurly Commerce automatically syncs the new billing information into the subscription contract.

Note: This reset process ensures you never handle raw payment data directly, keeping both you and your customers secure.
Create a New Subscription Contract
Use this flow to add a brand-new contract for a customer who already has at least one active subscription under their email:
- Navigate to Subscriptions → Create Contract in the top right corner.
- Complete the contract form—select the customer, plan, start date, and any options—then click Create.

Note: Shopify merges all subscriptions by email. To issue a separate contract under the same store account, the customer must checkout with a different email address.
Still need help? Contact [email protected].
Updated 3 days ago