
Adjustments - export
Unveil detailed insights with the Adjustments Export feature.
Overview
Required plan
This feature or setting is available to all customers on any Recurly subscription plan.
Definition
Recurly's Adjustments Exports allow you to closely monitor the invoiced and uninvoiced adjustments associated with your accounts. This export encompasses every invoiced charge and credit adjustment and even offers the option to include uninvoiced adjustments that are presently on the account. You can access the Adjustments export by visiting the Exports page found under the "Analytics" tab on your Recurly site.
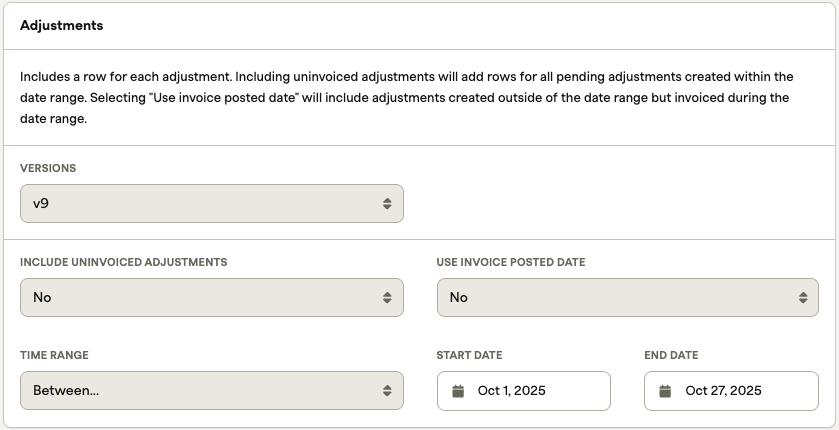
Filters
Versions Filter
- The Versions filter allows you to select the version that is most appropriate for your needs. This is based on the Version changelog at the bottom of this page.
Options Filter
You are granted two distinct options for exporting data:
- Include uninvoiced adjustments
- By default, the export primarily includes invoiced adjustments. However, upon selecting this option, you can view both charges and credits that haven't been invoiced as of yet, within a specified date range. These adjustments bear a 'pending' status and are placed at the commencement of the export document.
- Use invoice posted date
- Ordinarily, the export utilizes the adjustment's creation date rather than the invoice date. Consequently, an older uninvoiced charge or credit that was created within a set date range but invoiced later will not be reflected in the export. To counter this, choose this option to instead use the invoice posted date for a comprehensive view. Note that the creation date determines the presence of uninvoiced adjustments in the export as they lack an associated invoice date.
Time Range Filter
Utilize this feature to visualize charge and credit adjustments initiated in a specified timeframe. The "adjustment_created_at" date in the export is the default parameter used to filter results. In case you wish to filter adjustments based on the invoice creation date, simply opt for the "Use invoice date" option.
- The Time range filter (dropdown) allows you to view data within a specific period such as last month, year to date or a custom date range. The Start Date and End Date will automatically update based on the value selected in the Time range filter. You can also choose "Between..." in the dropdown, which will allow you to enter a customized date range.
Exports table
To help you identify and organize information effectively, the export provides a structured table that contains the following columns:
| Column Name | Example | Description | Data type (max size) |
|---|---|---|---|
| uuid | b964b5439c2548a489b3a136e75aee9f | Unique internal identifier for the adjustment. Equivalent to line_item_uuid in the deprecated Invoices export. | varchar(32) |
| account_code | 123122E | Account code being charged for this invoice. | varchar(50) |
| subscription_id | 1fed8d153fcf4ea2a1d55ff2eebd51b7 | Subscription UUID associated with this adjustment on the invoice. | varchar(32) |
| invoice_id | 4bdb2171cebe4ecfb0cb129bd1a65746 | Unique internal identifier for the invoice. This is called the 'id' in the Invoices - Summary export or 'uuid' for the invoice in the API. | varchar(32) |
| adjustment_status | invoiced or pending | Current status of the adjustment. Pending adjustments are charges or credits on an account that have not been applied to an invoice yet. Invoiced adjustments will always have an invoice associated with them. | string |
| adjustment_type | charge or credit | Charges are positive adjustments that debit the account. Credits are negative adjustments that credit the account. | varchar(10) |
| adjustment_created_at | 2012-02-19 12:01:33 PST | Creation date of the adjustment. This date will equal the billed_date of the invoice in most cases, but will be older than the billed_date if the adjustment was created on the account a period of time before it was invoiced. The adjustment_created_at date will never be after the invoice's billed_date. | timestamp |
| adjustment_start_at | 2012-02-19 12:01:33 PST | Bill cycle start date for a specific adjustment. Equivalent to line_item_start_date in the deprecated Invoices export. | ´timestamp |
| adjustment_end_at | 2012-02-19 12:01:33 PST | Bill cycle end date for a specific adjustment. Equivalent to line_item_end_date in the deprecated Invoices. | timestamp |
| adjustment_description | Gold Plan | Description for a specific adjustment. This is automatically generated for all plan adjustments. This is custom for one-time custom charges and credits. Equivalent to line_item_description in the deprecated Invoices export | varchar(255) |
| adjustment_quantity | 1 | Quantity of the adjustment. | numeric |
| adjustment_currency | USD | Currency of the adjustment. | varchar(3) |
| adjustment_amount | 100 | Adjustment amount, before discounts or taxes. | numeric |
| adjustment_total | 50 | The total amount of the adjustment after discounts and taxes [(quantity x price) + discount + tax]. Equivalent to line_item_total in the deprecated Invoices. | numeric |
| adjustment_taxable | 0 or 1 | 0 indicates adjustment is not taxable, 1 indicates adjustment is taxable. | boolean |
| adjustment_discount | 5 | The discount applied to the adjustment that comes from the specific coupon redemption in adjustment_coupon_code. | numeric |
| adjustment_tax | 5 | The tax amount for the adjustment. | numeric |
| adjustment_accounting_code | X100 | Internal accounting code for a specific adjustment. This value will only populate if you define an accounting code for the adjustment. Accounting codes can be defined for all adjustments. Plan set-up fees and plan free trial charges will inherit the plan's accounting code. Equivalent to line_item_accounting_code in the deprecated Invoices export. | varchar(25) |
| adjustment_product_code | gold | Product code for a specific adjustment. This will populate automatically with the plan code or add-on code if the adjustment is for a subscription. This will populate for custom charges and credits (origin = debit or one_time) if a value was set when the adjustment was created. Equivalent to line_item_product_code in the deprecated Invoices export. | varchar(50) |
| adjustment_tax_code | P0000000, physical | Tax code is a field associated with the adjustment that we send to Avalara for tax calculations. If you are using Recurly's EU VAT feature, you can use values of 'unknown', 'physical', or 'digital'. If you have your own Avalara AvaTax account configured, you can use Avalara tax codes to assign custom tax rules. | varchar(50) |
| adjustment_origin | plan, plan_trial, setup_fee, add_on, debit, one_time, credit, carryforward | The original source for an adjustment. A credit created from an original charge will have the value of the charge's origin. Equivalent to line_item_origin in the deprecated Invoices export. (plan = subscription fee, plan_trial = trial period 0 amount charge, setup_fee = subscription setup fee, add_on = subscription add-on fee, debit = custom charge through the UI or Adjustments API, one_time = custom charge through the Transactions API, credit = custom credit, carryforward = the charge that zeros out a negative invoice and should be ignored) | varchar(20) |
| tax_type | usst, vat, ca, au, nz | Tax type for the adjustment. Will be "vat" for EU VAT, "usst" for U.S. Sales Tax, or the 2 letter country code for country level tax types like Canada, Australia, New Zealand, Israel, and all non-EU European countries. | varchar(6) |
| tax_region | NY, FR, GST, VAT | The tax region for the adjustment. For U.S. Sales Tax, this will be the 2 letter state code. For EU VAT this will be the 2 letter country code. For all country level tax types, this will display the regional tax, like VAT, GST, or PST. | varchar(15) |
| tax_rate | 0.09 | Tax rate applied to the adjustment. | numeric |
| tax_amount | 5 | The tax amount for the adjustment. This column is the same as the adjustment_tax column, but tax_amount may be missing a few values for merchants who have used Recurly's older VAT feature (pre-2015). Merchants who used the old VAT feature should use the adjustment_tax column for older reports. | numeric |
| country_juris | united states, germany, australia | Country tax jurisdiction of the adjustment. This will be the full name of the country in lowercase. | string |
| country_rate | 0 | Country tax rate of the adjustment. This is the tax rate that corresponds to the country_juris and country_amount. | numeric |
| country_amount | 0 | Country tax amount of the adjustment. This is the tax amount that corresponds to country_rate and country_juris. | numeric |
| state_juris | california, ontario | State or province tax jurisdiction of the adjustment. This will be the full name of the state or province in lowercase. | string |
| state_rate | 0.065 | State or province tax rate of the adjustment. This is the tax rate that corresponds to the state_juris and state_amount. | numeric |
| state_amount | 0.33 | State or province tax amount of the adjustment. This is the tax amount that corresponds to state_rate and state_juris. | numeric |
| county_juris | san mateo | County tax jurisdiction of the adjustment. This will be the full name of the county in lowercase. | string |
| county_rate | 0.01 | County tax rate of the adjustment. This is the tax rate that corresponds to the county_juris and county_amount. | numeric |
| county_amount | 0.05 | County tax amount of the adjustment. This is the tax amount that corresponds to county_rate and county_juris. | numeric |
| city_juris | san francisco | City tax jurisdiction of the adjustment. This will be the full name of the city in lowercase. | string |
| city_rate | 0.1 | City tax rate of the adjustment. This is the tax rate that corresponds to the city_juris and city_amount. | numeric |
| city_amount | 0.05 | City tax amount of the adjustment. This is the tax amount that corresponds to city_rate and city_juris. | numeric |
| special_juris | san francisco | Special tax jurisdiction of the adjustment. This will be the full name of the jurisdiction in lowercase. | string |
| special_rate | 0.1 | Special jurisdiction tax rate of the adjustment. This is the tax rate that corresponds to the special_juris and special_amount. | numeric |
| special_amount | 0.05 | Special jurisdiction tax amount of the adjustment. This is the tax amount that corresponds to special_rate and special_juris. | numeric |
| adjustment_refund | TRUE, FALSE | TRUE indicates that the adjustment is a refund of a charge. FALSE indicates that the adjustment was a standard charge. | boolean |
| original_adjustment_uuid | b964b5439c2548a489b3a136e75aee9f | Value is the uuid of the previous related adjustment. Will only have a value if the adjustment is a credit created from a previous credit, or if the credit was created from a charge refund. | varchar(32) |
| invoice_number | 1291 | Invoice number of the invoice the adjustment was on. | string |
| invoice_state | paid | Current state of the invoice the adjustment was on. State can be: pending, processing, past_due, paid, or failed. Equivalent to invoice_status in the Invoices - Summary export. | varchar(20) |
| adjustment_coupon_code | 1monthfree-K09SC9R8 | The coupon code that discounted the adjustment. | string |
| invoice_billed_date | 2012-02-19 12:01:33 PST | Creation date of the invoice. Equivalent to date in the deprecated Invoices export. | timestamp |
| invoice_closed_at | 2012-02-19 12:01:33 PST | Date invoice was paid or failed. | timestamp |
| invoice_net_terms | on-receipt, net-10, net-30, net-60 | Identifies the net_terms agreement associated with the invoice. All automatic collection invoices are due 'on-receipt'. Manual collection invoices can have terms of net-10, net-30, net-60, or a custom net day amount. | numeric |
| invoice_po_number | AE12523 | For manual invoicing, this identifies the Purchase Order number associated with the invoice. This value must be entered by the merchant at the time the invoice is created or it will not exist. | varchar(50) |
| invoice_collection_method | automatic or manual | Identifies whether the invoice fees are collected via manual or automatic invoicing. An automatic invoice means a corresponding transaction is run using the account's billing information at the same time the invoice is created. Manual invoices are created without a corresponding transaction. The merchant must enter a manual payment transaction or have the customer pay the invoice with an automatic method, like credit card, PayPal, Amazon, or ACH bank payment. | string |
| invoice_type | invoice_type | The original invoice will have a type of 'purchase'. Any refunds or voids will create a negative invoice to cancel out the original. This negative invoice will have a type of 'refund'. | string |
| account_name | JJ Smith | First and last name from account. | text |
| account_country | US | The 2 letter country code for the country of the customer's address on the invoice. This will come from the Billing Address or the Account Address depending on your tax settings and the invoice collection method. | varchar(2) |
| account_vat_number | IE124211145 | VAT registration number for the customer on the invoice. This will come from the VAT Number field in the Billing Info or the Account Info depending on your tax settings and the invoice collection method. | varchar(20) |
| adjustment_plan_code | basic | The plan code for the plan associated with the subscription. This value will exist for plan fee, setup fee, add-on fee and free trial adjustments. This value will not exist for custom charges, custom credits, or open amount refund credits. | varchar(50) |
| original_invoice_number | 1002 | If the row is an adjustment on a refund invoice, this value will exist and show the invoice number of the purchase invoice the refund was created from. | string |
| invoice_due_on | 2012-02-19 12:01:33 PST | The due date of the invoice. | timestamp |
| adjustment_subtotal | 50.25 | The adjustment amount after discounts, but before taxes. | numeric |
| adjustment_credit_reason_code | general, service, promotional, refund, write_off, gift_card | The credit reason code of the adjustment. This is a new attribute with Recurly defined values the merchant can choose from when creating custom credits, or Recurly will set when issuing credits. This column will be null until Recurly's Credit Invoices feature is enabled on your Recurly site. | string |
| adjustment_refundable_amount | 50.25 | The refundable amount of the charge adjustment, which is the adjustment total, including discounts and tax, minus all credit adjustments issued against it. This column will be null until Recurly's Credit Invoices feature is enabled on your Recurly site. | numeric |
| shipping_method_code | usps-overnight | The Shipping Method code used when the Shipping Method was created. | varchar(50) |
| item_code | item123 | The Item Code maps to the user-specified unique ID of the item that was sold on this adjustment. Reference this page for more on items. | varchar(50) |
| item_id | 1234567899876543210 | The Item ID maps to the system-generated unique ID of the item that was sold on this adjustment. | string |
| external_sku | abc123 | The External SKU mapps to the user-specified SKU of the item that was sold on this adjustment. | varchar(50) |
| tax_inclusive | true | Indicates whether the price includes tax. | boolea |
| business_entity_code | 123456789 | Indicates business entity code. | string |
| adjustment_api_id | e28zov4fw0v2 | Adjustment API ID | string |
| price_segment_id | e30zov45fw0v2 | Maps to product price segment id | string |
| price_segment_code | gold | Maps to product price segment code | string |
| custom_field | Appears only if a custom field is configured and enabled to be visible in the export. The column name in the export reflects the label defined in the custom field configuration. | string |
Column Name
- uuid - Is not populated when using Vertex tax service
Changelog
Version Change Log
Version 9 - 10/14/2025
- Addition of price_segment_id and price_segment_code.
Version 8 - 2/5/2025
- Addition of adjustment_api_id.
Version 7 - 7/25/2023
- Integrated an additional column to indicate business_entity_code.
Version 6 - 1/17/2022
- Introduced a column designated for Charge Custom Field Objects, custom field columns will always appear at the end of exports, including the following versions
Version 5 - 3/30/2022
- Integrated an additional column to indicate tax_inclusive.
Version 4 - 2/13/2020
- A new column for external_sku added to facilitate Item Charges.
Version 3 - 11/21/2019
- Added columns specifying item_code and item_id for Item Charges.
Version 2 - 5/2/2019
- Introduced a column to denote shipping_method_code.
Updated 4 days ago