UPI AutoPay integration guide
Create subscriptions via Purchase API using UPI AutoPay with a VPA and Ebanx sandbox simulation.
Overview
This guide shows you how to use the Purchase endpoint to create new subscriptions using the UPI AutoPay payment method. We’ll also illustrate how to work with the Ebanx sandbox simulator.
Prerequisites & limitations
- Familiarity with Recurly’s V3 API, Webhooks, and basic REST concepts
- Completed the Quickstart Guide
- An Ebanx gateway account with UPI AutoPay is enabled
- Ebanx does not support Free Trials when using App Deep Links. Users accessing checkout flows through Mobile should not be offered a free trial option.
Definition
Creating Purchases refers to the process of generating new customer accounts alongside subscriptions in a single, consolidated call to the Recurly Purchase endpoint. This streamlines checkout experiences by bundling all required resources into one request.
Creating Purchases
UPI Supports 3 modes:
- VPA (Legacy)
- QR Code
- App Deep Links (Intent)
RBI is moving towards QR Code for Web and App Intent (Deep Links) for mobile usage in the future. It is not recommended to utilize VPA if you are integrating as a new merchant.
Legacy VPA Mode
Step 1: Generate a UPI AutoPay Payment Request
Use a supported client library or our payment_gateway_references payment object in your API implementation. Our client libraries help you build out our APIs easily and process transactions faster. To specify UPI AutoPay, you will send set your reference_type enum to upi_vpaand ensure you are passing the customer's VPA as the token value.
See our UPI AutoPay documentation for details on all required fields.
Send a request to the create purchase endpoint on Recurly’s API, including:
- Customer account data (e.g., code, name, billing info, phone number, email address, VPA)
- Subscriptions (with plan codes)
- Customer VPA (example: customerid@bankname)
Example payload:
“billing_info“: {
“payment_gateway_references“: [
	{
	“token”: “upi-vpa-value”,
	“reference_type“: “upi_vpa“
	}
],
QR Code and App Intent Mode
Step 1: Generate a UPI AutoPay Payment Request
Use a supported client library or our type and authentication_method fields in your API implementation. Our client libraries help you build out our APIs easily and process transactions faster. To specify UPI AutoPay, you will send set your type enum to upi-autopay and ensure you are passing the authentication mode as the authentication_method value.
Authentication method will have two options:
Param: authentication_method
- QR Code:
qr-code - App Deep Links (Intent):
app-deep-links
When selecting which mode to use, you will want to identify how your consumer is accessing your checkout page by looking at browser and OS data.
- If they are on a mobile device, select App Deep Links
- If they are on a desktop, choose QR code
- You will also want to ensure you are aware of which OS the consumer is using, as this will be important when displaying certain App deep links to the user. For example, iOS does not support generic UPI deep links, so those should be omitted for iOS users.
Example JSON Payload using QR Code authentication
{
  "currency": "INR",
  "account": {
    "code": "bdumonde",
    "first_name": "Benjamin",
    "last_name": "Du Monde",
    "email": "[email protected]",
    "billing_info": {
      "first_name": "Benjamin",
      "last_name": "Du Monde",
      "type": "upi-autopay",
      "authentication_method": "qr-code",
      "address": {
        "street1": "44/1 Bharat Apartment 4C 5th Main Road",
        "city": "Bengaluru",
        "region": "KA",
        "postal_code": "560041",
        "country": "IN",
        "phone": "1234679099"
      },
      "gateway_code": "gateway-code"
    }
  },
  "subscriptions": [
    { "plan_code": "coffee-monthly" }
  ]
}
Code Examples
Below are example calls in different languages:
purchase = {
  currency: "INR",
  account: {
    code: "bdumonde",
    first_name: "Benjamin",
    last_name: "Du Monde",
    email: "[email protected]",
    billing_info: {
      first_name: "Benjamin",
      last_name: "Du Monde",
      type: "upi-autopay", # Omit for VPA usage
      authentication_method: "qr-code",  # qr-code or app-deep-links; omit for VPA usage
      address: {
        street1: "44/1 Bharat Apartment 4C 5th Main Road",
        city: "Bengaluru",
        region: "KA",
        postal_code: "560041",
        country: "IN",
        phone: "1234679099"
      },
      gateway_code: "gateway-code",
      payment_gateway_references: [    # Omit for QR or App Intent flows
        {
          token: "vpa-value",
          reference_type: "upi_vpa"
        }
      ]
    }
  },
  subscriptions: [
    { plan_code: "coffee-monthly" }
  ]
}

invoice_collection = @client.create_purchase(body: purchase)
const purchaseReq = {
currency: "INR",
account: {
code: "bdumonde",
first_name: "Benjamin",
last_name: "Du Monde",
email: "[email protected]",
billing_info: {
first_name: "Benjamin",
last_name: "Du Monde",
type: "upi-autopay", // Omit for VPA usage
authentication_method: "qr-code", // qr-code or app-deep-links; omit for VPA usage
address: {
street1: "44/1 Bharat Apartment 4C 5th Main Road",
city: "Bengaluru",
region: "KA",
postal_code: "560041",
country: "IN",
phone: "1234679099"
},
gateway_code: "gateway-code",
payment_gateway_references: [ // Omit for QR or App Intent flows
{
token: "vpa-value",
reference_type: "upi_vpa"
}
]
}
},
subscriptions: [
{ plan_code: "coffee-monthly" }
]
};
const invoiceCollection = await client.createPurchase(purchaseReq);purchase = {
"currency": "INR",
"account": {
"code": "bdumonde",
"first_name": "Benjamin",
"last_name": "Du Monde",
"email": "[email protected]",
"billing_info": {
"first_name": "Benjamin",
"last_name": "Du Monde",
"type": "upi-autopay", # Omit for VPA usage
"authentication_method": "qr-code", # Choose qr-code or app-deep-links; omit for VPA usage
"address": {
"street1": "44/1 Bharat Apartment 4C 5th Main Road",
"city": "Bengaluru",
"region": "KA",
"postal_code": "560041",
"country": "IN",
"phone": "1234679099"
},
"gateway_code": "gateway-code",
"payment_gateway_references": [ # Omit list for QR or App Intents
{
"token": "vpa-value",
"reference_type": "upi_vpa"
}
]
}
},
"subscriptions": [
{"plan_code": "coffee-monthly"}
]
}
invoice_collection = client.create_purchase(body=purchase)// 1. Build Address
Address address = new Address();
address.setStreet1("44/1 Bharat Apartment 4C 5th Main Road");
address.setCity("Bengaluru");
address.setRegion("KA");
address.setPostalCode("560041");
address.setCountry("IN");
address.setPhone("1234679099");
// 2. Build PaymentGatewayReference (omit for QR or App Intent flows)
PaymentGatewayReference paymentRef = new PaymentGatewayReference();
paymentRef.setToken("vpa-value");
paymentRef.setReferenceType("upi_vpa");
// 3. Build BillingInfo
BillingInfo billingInfo = new BillingInfo();
billingInfo.setFirstName("Benjamin");
billingInfo.setLastName("Du Monde");
billingInfo.setType("upi-autopay"); // Omit for VPA usage
billingInfo.setAuthenticationMethod("qr-code"); // qr-code or app-deep-links; omit for VPA usage
billingInfo.setAddress(address);
billingInfo.setGatewayCode("gateway-code");
// 4. Build Account
Account account = new Account();
account.setCode("bdumonde");
account.setFirstName("Benjamin");
account.setLastName("Du Monde");
account.setEmail("[email protected]");
account.setBillingInfo(billingInfo);
// 5. Build Subscription
SubscriptionPurchase subscription = new SubscriptionPurchase();
subscription.setPlanCode("coffee-monthly");
// 6. Build and submit Purchase
Purchase purchase = new Purchase();
purchase.setCurrency("INR");
purchase.setAccount(account);
purchase.setSubscriptions(List.of(subscription));
InvoiceCollection collection = client.createPurchase(purchase);var purchaseReq = new PurchaseCreate()
{
Currency = "INR",
Account = new AccountPurchase()
{
Code = "bdumonde",
FirstName = "Benjamin",
LastName = "Du Monde",
Email = "[email protected]",
BillingInfo = new BillingInfoCreate()
{
FirstName = "Benjamin",
LastName = "Du Monde",
Type = "upi-autopay", // Omit for VPA usage
AuthenticationMethod = "qr-code", // qr-code or app-deep-links; omit for VPA usage
Address = new AddressInfo()
{
Street1 = "44/1 Bharat Apartment 4C 5th Main Road",
City = "Bengaluru",
Region = "KA",
PostalCode = "560041",
Country = "IN",
Phone = "1234679099"
},
GatewayCode = "gateway-code",
PaymentGatewayReferences = new List<PaymentGatewayReferenceInfo>() // Omit for QR or App Intent flows
{
new PaymentGatewayReferenceInfo()
{
Token = "vpa-value",
ReferenceType = "upi_vpa"
}
}
}
},
Subscriptions = new List<SubscriptionPurchase>()
{
new SubscriptionPurchase() { PlanCode = "coffee-monthly" }
}
};
InvoiceCollection collection = client.CreatePurchase(purchaseReq);street1 := "44/1 Bharat Apartment 4C 5th Main Road"
city := "Bengaluru"
region := "KA"
postalCode := "560041"
country := "IN"
phone := "1234679099"
address := recurly.Address{
Street1: &street1,
City: &city,
Region: ®ion,
PostalCode: &postalCode,
Country: &country,
Phone: &phone,
}
// Omit for QR or App Intent flows
token := "vpa-value"
referenceType := "upi_vpa"
paymentRef := recurly.PaymentGatewayReferenceCreate{
Token: &token,
ReferenceType: &referenceType,
}
firstName := "Benjamin"
lastName := "Du Monde"
billingType := "upi-autopay" // Omit for VPA usage
authMethod := "qr-code" // qr-code or app-deep-links; omit for VPA usage
gatewayCode := "gateway-code"
billingInfo := recurly.BillingInfoCreate{
FirstName: &firstName,
LastName: &lastName,
Type: &billingType,
AuthenticationMethod: &authMethod,
Address: &address,
GatewayCode: &gatewayCode,
PaymentGatewayReferences: []recurly.PaymentGatewayReferenceCreate{paymentRef}, // Omit for QR or App Intent flows
}
accountCode := "bdumonde"
email := "[email protected]"
account := recurly.AccountPurchase{
Code: &accountCode,
FirstName: &firstName,
LastName: &lastName,
Email: &email,
BillingInfo: &billingInfo,
}
planCode := "coffee-monthly"
currency := "INR"
purchaseReq := recurly.PurchaseCreate{
Currency: ¤cy,
Account: &account,
Subscriptions: []recurly.SubscriptionPurchase{
{PlanCode: &planCode},
},
}
collection, err := client.CreatePurchase(ctx, purchaseReq)
if err != nil {
// handle error
}Tip: Many more parameters are available. See the Create Purchase reference to learn more.
Processing the Responses
Using VPA mode will not require any response handling, while QR Code and App Links will require some logic to display the authentication opportunity to the consumer.
Depending on what authentication mode you've chosen up front, you'll want to handle the user experience differently.
- For Web For desktop usage, implement a QR code display method with a copy/paste option that allows users to interact directly with the code on screen.
- For Mobile usage, you will need to identify the mobile OS and provide a way for users to select a link (which can be obfuscated by showing an icon or button if you wish) to launch an app from their phone.
Legacy VPA Mode
Step 2: Process the purchase response
A successful purchase returns an InvoiceCollection, which contains any charge or credit invoices generated by the request. If the purchase fails, you’ll receive an error response indicating what went wrong. UPI AutoPay transactions will be in a Scheduled state, and the Invoice will be Pending.
UPI AutoPay uses enrollment with the consumer's bank to allow consumers to authenticate their identity and authorize payments in their mobile apps. This process usually takes only a few minutes, and will auto-cancel if the consumer does not respond to the push notification on their phone.
This initial call will return different behavior in production than in sandbox.
In Production: You will receive confirmation of a pending transaction, or an error message if a required field was missing.
QR Code Authentication
Step 2: Process the purchase response
A successful purchase returns an InvoiceCollection, which contains any charge or credit invoices generated by the request. If the purchase fails, you’ll receive an error response indicating what went wrong. UPI AutoPay transactions will be in a Scheduled state, and the Invoice will be Pending.
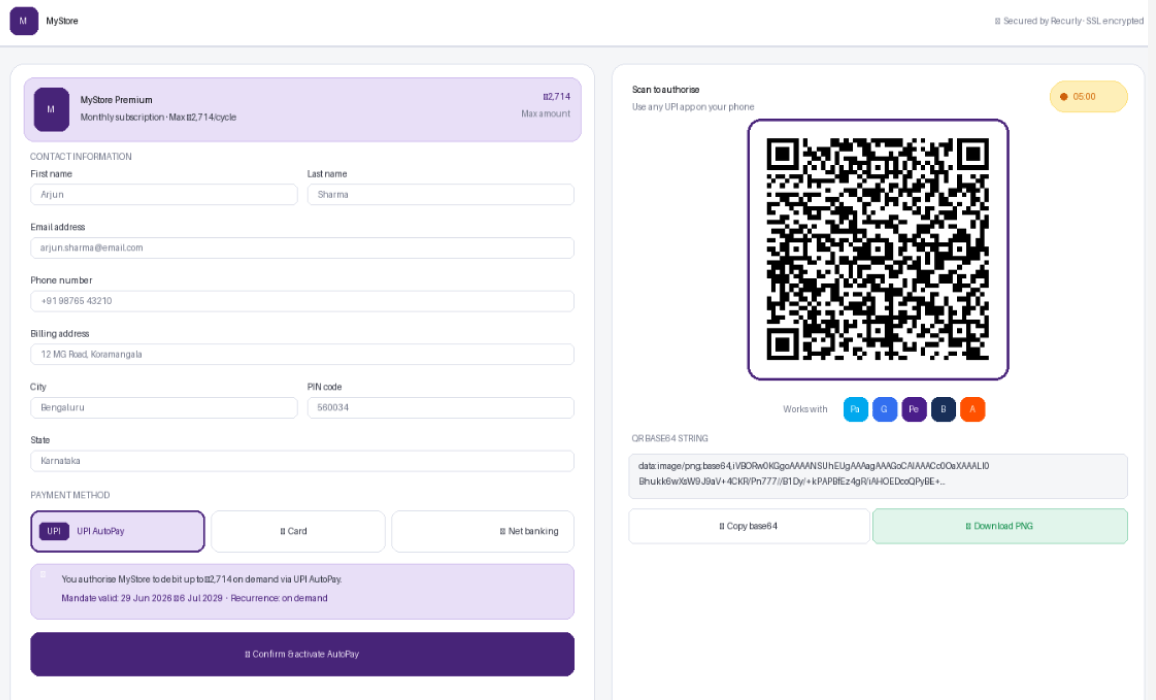
Using QR Code authentication mode will return the following JSON object, which you will need to render and create a method to copy.& paste (or download) the link (both is recommended) for the consumer. Consumers may choose to copy/paste or download the QR Code string into their app, or scan the actual QR rendered with their phone camera.
The value string will be a Base64 QR string. The type will display what the string represents -- for QR codes you will see qr_code.
"next_action": {
	"type": "qr_code",
	"value": "0004569821...*12345"
},
Recommendation is to set a timer (~ 5 minutes) to present some urgency in scanning and finishing their enrollment.
Example is below:
App Intent / Deep Links Authentication
Step 2: Process the purchase response
A successful purchase returns an InvoiceCollection, which contains any charge or credit invoices generated by the request. If the purchase fails, you’ll receive an error response indicating what went wrong. UPI AutoPay transactions will be in a Scheduled state, and the Invoice will be Pending.
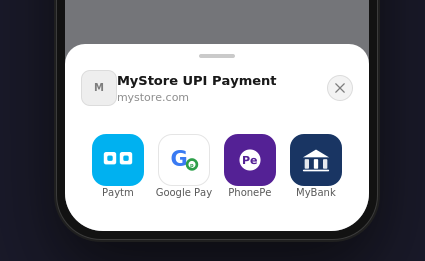
Using App Intent with Deep Links authentication mode will return a list of link types for the consumer to choose from. The next_action object returns an array of values -- see the following JSON example. You will need to render and create a method to click each link (whether by creating buttons, or selecting based on gateway recommendations (see below).
The value string will be an array of app deep links to present to the user. The type will display what the string represents -- for App Intent you will see app_deep_links.
"next_action": {
    "type": "appp_links",
    "values": [
        "gpay://upi/mandate?pa=merchant%40pspbank&pn=M...INR&mc=621",
        "phonepe://mandate?pa=merchant%40pspbank&pn=M...INR&mc=621",
        "paytmmp://mandate?pa=merchant%40pspbank&pn=M...NR&mc=621",
        "upi://mandate?pa=merchant%40pspbank&pn=M...INR&mc=621"
    ]
},
Gateway Recommendations for deep link display and management:
- The generic app link (upi://mandate?...) can only be used on Android. If your user is on iOS, do not display the generic app link (prefixed by
upi). - iOS does not support generic UPI links correctly (prefixed by
upi), so if you identify your user is coming from an iOS device, omit the generic UPI link. - Create a modal that appears from the bottom with buttons, example below:
For All Authentication Modes. (VPA, QR, and App Intent)
In Sandbox: You will need to load the return_url value that represent the gateway's simulated UPI Enrollment process with the consumer's App. You may render this in a modal for testing purposes or redirect to your liking.
- Once within the simulator, you can simulate approvals, cancellations, and declines of the enrollment itself.
- If you choose to simulate an enrollment, ensure you have all proper webhooks set up at Ebanx. See the Ebanx Gateway setup page for more information.
Step 3: Verify and finish
After a successful purchase, you can confirm the details via the Recurly Admin UI or by calling Recurly’s API to list your new account, subscription, or invoice.
Step 4: Listen for webhooks
After a successful signup, there will be several webhooks you should listen to in order to ensure you are enabling access to features on in your environment, and disabling access should a consumer decide to cancel their subscription from within their mobile banking application.
It is recommended that you listen for at least the three webhooks below, and additional context is available on the Ebanx gateway and UPI AutoPay pages respectively. Since consumers can cancel, pause, and resume subscriptions within the UPI App, it is extremely important to listen for these events.
Sandbox behavior
VPA Enrollment
In Step 2, Sandbox return_url behavior is outlined, but requires a bit more explanation. You may render this URL in whatever way you wish (modal, full redirect, etc.) however it is not recommended to put an immense amount of effort into it as this is not a production workflow.
To help with simulating a consumer's bank app, the gateway has provided a simulation site which can "pretend" to ferry along an enrollment signup and transaction authorization.
Step 1: Upon visiting the return URL, you can click Accept Agreement or choose another option.
Step 2: You're done!
QR or App Intent Enrollment
This initial call will return different behavior in production than in sandbox.
In Production: (next_action.typeand next_action.value) represent the QR code value that you will need to render on your checkout page for the consumer to scan and continue authorizing the payment.
In Sandbox: (next_action.type and next_action.value or next_action.values) will be present, but you will need to load the return_url value that represent the gateway's simulated UPI QR Code or Links that simulates interaction with the consumer's App. You may render this in a modal for testing purposes.
Sandbox Behavior for QR Codes and App Intents
In Step 2, Sandbox return_url behavior is outlined, but requires a bit more explanation. You may render this URL in whatever way you wish (modal, full redirect, etc.) however it is not recommended to put an immense amount of effort into it as this is not a production workflow.
To help with simulating a consumer's bank app, the gateway has provided a simulation site which can "pretend" to ferry along an enrollment signup and transaction authorization.
Step 1: Upon visiting the return URL, immediately navigate to Go to enrollment simulator.
Step 2: Approve the enrollment (for a success use case) by choosing 'Accept Agreement'. You may also deny the use case to test a consumer declining the enrollment request. This will result in a 404 page or an Ebanx page. This is normal.
Step 3: Return to the original simulator URL and click Authorized = YES on page, to simulate a successful initial authorization for payment. This will result in a mostly blank page with a confusing response. Unfortunately, this is the limitation of the third party simulator, but is normal.
Step 4: You're done!
Confirming High Amount Renewals in Sandbox
When processing with UPI, any amount over 15K INR, a push notification would go to the consumer in a Production environment. In Sandbox, you will need to follow these instructions:
- Search for the Pending Payment in the Ebanx dashboard (Navigate to 'Payments' and choose the Pending Payment), click on the associated payment (or search via the Reference/ Hash), and choose the action you wish to take (Cancel or Confirm).
- Confirming the payment will create a Approval in Recurly.
- Cancelling will cause the payment to decline and the invoice to enter dunning.
Next steps
Now that you can create new subscriptions, explore payment method guide to explore other use cases and limitations related to the UPI AutoPay payment method.
Updated 23 days ago