Automated invoicing
Automate your invoicing process with Recurly, ensuring timely, accurate, and professional invoices for every transaction.
Overview
Required plan
This feature or setting is available to all customers on any Recurly subscription plan.
Definition
Automated Invoicing in Recurly simplifies the billing process by automatically creating, sending and collecting invoices when a customer signs up for a subscription or a charge is invoiced. This feature allows for extensive customization options, enabling businesses to maintain a consistent and professional appearance across all customer interactions.
Key benefits
-
Efficiency and time savings: Automates the invoicing process, eliminating manual effort and reducing the risk of errors, which allows your team to focus on more strategic tasks.
-
Customization and professionalism: Offers extensive customization options for invoices, enabling businesses to maintain a consistent and professional appearance in all customer billing communications.
-
Compliance and tax management: Facilitates compliance with various tax regulations, including EU VAT, by allowing for precise configuration of tax-related invoice notes and address information, helping to ensure that your invoicing practices align with relevant laws and regulations.
Default Values
Customize your invoices with default terms and notes for your customers. These site level defaults can be overridden with custom invoice specific messages whenever you generate an invoice through the Admin or API.
The default value for all automatic and manual invoices is "On-Receipt". This means that the invoices are due immediately upon creation. For automatic invoices, collection will be attempted immediately using the payment method on file. For manual invoices, the invoice will become past due immediately upon creation.
Terms
Terms configuration applies to all invoices. Learn more about terms for manual invoices here. For information about terms for automatic invoicing, click here.
Terms and Conditions
Terms and Conditions is a notes section available to you for any details you would like to add. The section is ideal for notes about payment or contract terms. The title cannot be changed at this time. The section will only show on an invoice if there is text in the field.
Customer Notes
Customer Notes is another notes section available to you for any details you would like to add. This section is ideal for notes on invoice details or including a special message for the customer, like "thanks for your business". This section will only show on an invoice if there is text in the field and does not display a section title. Customer Notes are displayed at the bottom of the invoice in larger font than the Terms and Conditions.
Invoice Notes Example


VAT Reverse Charge Notes
If you are using Recurly's EU VAT feature for tax collection in the European Union, you will see a notes section called "VAT Reverse Charge Notes" that shows when a customer provides a valid VAT number and is located in a different country than your own. The notes will be pre-filled with a general statement that no VAT was applied to the invoice and the customer may be responsible for VAT. Merchants can edit this default message with any messaging they would like, as well as edit the section for custom invoice specific messages. To edit the default message, go to the Tax Settings page under Configuration > Taxes > Tax Settings button in the top right corner.
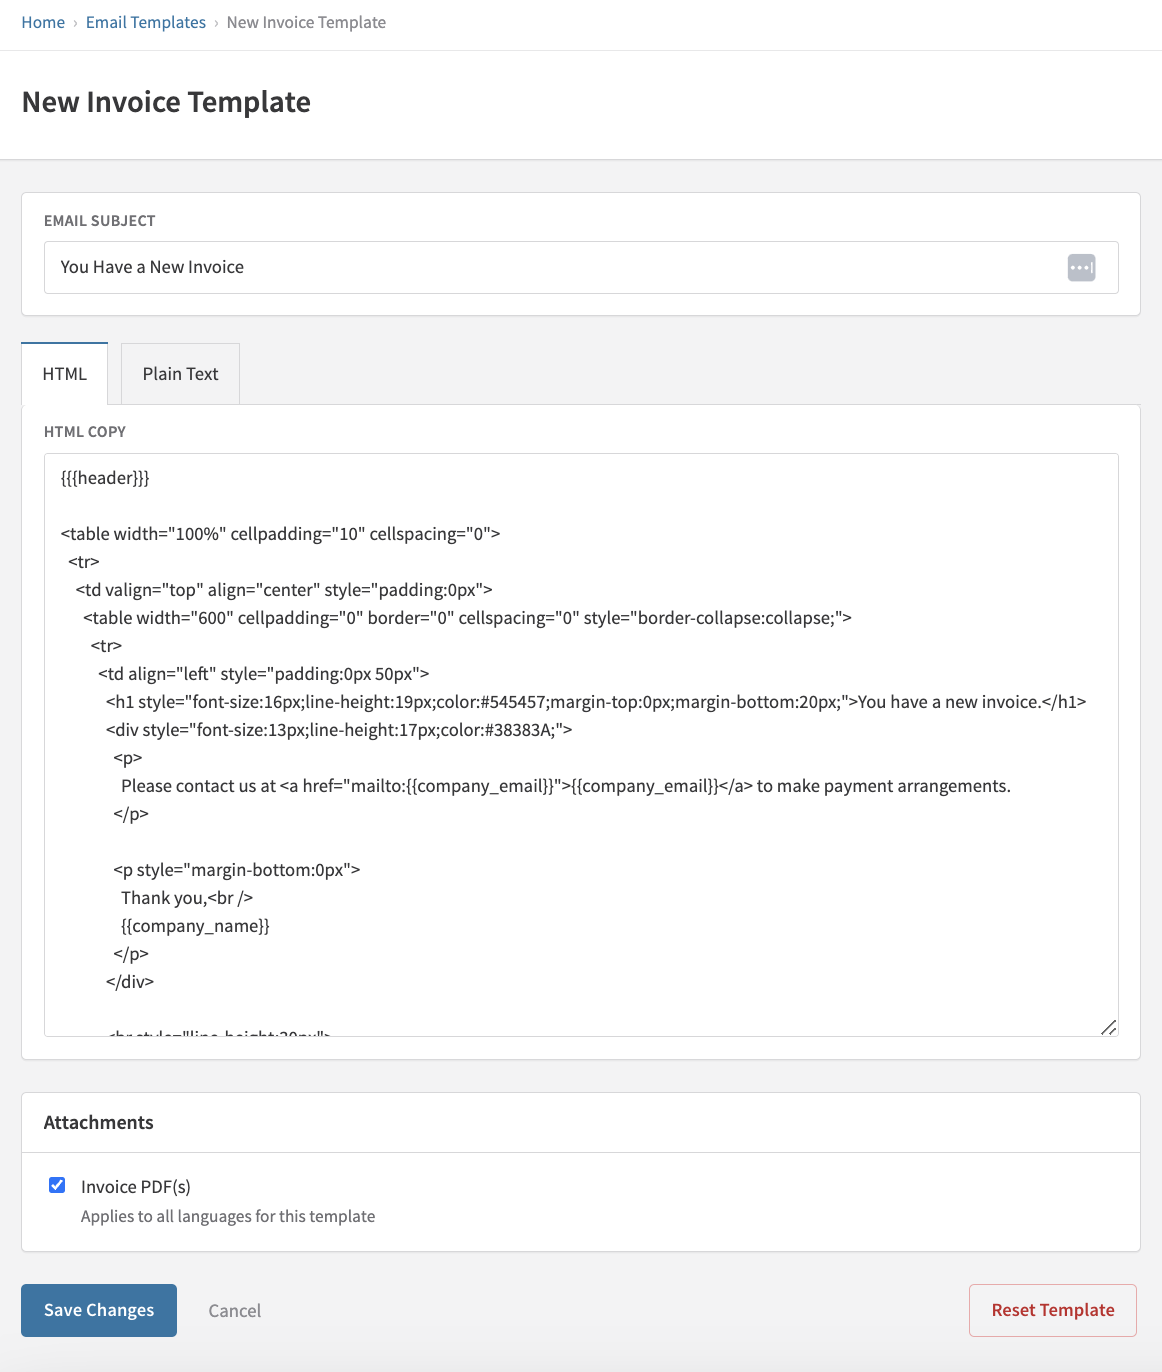
Email Settings
Invoices are sent in the body of Recurly's email templates. You can choose to attach a PDF of the invoice to the emails by enabling PDF attachments when editing an email individual email template. This setting will appear at the bottom of the email template "edit" page. There are 7 email templates that mention an invoice. Enabling PDF attachments will attach a PDF to all 7 templates.
Email Templates that support invoice PDF attachments:
- New Subscription
- New Invoice (Manual Invoice feature only)
- Invoice Past Due (Manual Invoice feature only)
- Payment Confirmation
- Payment Declined
- Payment Refunded
- Payment Voided
Bill To Address
Select "Use Account Info Address for all Invoices" to force all customer invoices to use the Account Info Address, regardless of their payment method. To do this, go to Configuration > Taxes > Tax Settings and enable "Use Account Information Address for all Invoices" and save the page. The invoice address is displayed on the invoice in the "Bill To" section and is the address used for any tax calculations.

Example invoice using Invoice Settings configurations

This feature is useful for merchants who:
- Want to display a shipping or mailing address on the invoice
- Need to calculate taxes based on a shipping or mailing address
When Account Info Address does not exist:
- Automatic collection invoices will default back to the Billing Info, including Billing Info Address, Name, and VAT Number.
- Manual collection invoices will still use Account Info, resulting in no address on the invoice.
Modification Enforcement
Some merchants may prefer to have their customers current on all payments before allowing a subscription upgrade or downgrade. Recurly allows this to be configured on your Invoice Settings page through two different options:
Require paid invoice and successful transaction on upgrades
Using this setting will ensure that any time a customer upgrades, or is upgraded through the admin console, the account has no past due invoices and the upgrade invoice is paid. An upgrade is defined as any increase in subscription price from changing the base price, changing the quantity, adding add-ons, or changing to a more expensive plan.
When a customer attempts to upgrade, Recurly will first check to see if there are any automatic collection invoices on the account. If so, Recurly will attempt collection on those past due invoices first. If they cannot be successfully collected, the upgrade will be blocked and the customer will get the following error: "Your account is currently past due, please update your billing information before changing your subscription." If the past due invoices are collected successfully, or the account didn't have any past due invoices, Recurly will attempt to collect on the upgrade. If the upgrade transaction declines, the upgrade will be blocked. If the upgrade transaction is successful, the upgrade will go through.
If you're using the API, please be sure to offer your customers a way to update their billing information in this scenario so that they can proceed.
Require paid invoice to downgrade
When downgrading an existing subscription, require that all invoices have been successfully paid in order to complete the downgrade. A downgrade is defined as any decrease in subscription price from changing the base price, decreasing the quantity, removing add-ons, or changing to a less-expensive plan. If any invoice is past due, the subscription will be kept on the original plan, and an error will be provided to the customer; "Your account is currently past due, please update your billing information before changing your subscription."
Notes
- If you use this setting your customers will NOT be allowed to downgrade if they have a past-due payment.
- These settings only apply for immediate upgrade or downgrades. At bill date or term renewals will be allowed to be applied to an account even with an unpaid invoice.
Integration Notes
This section provides important information to consider when integrating Recurly’s Automated Invoicing feature with your existing systems and processes.
API Integration
- Recurly provides a robust API that allows you to integrate Automated Invoicing directly into your existing systems. Be sure to review the Recurly API Documentation for detailed information on how to set up and manage this integration.
Webhooks
- Recurly supports webhooks, which are automated messages sent from Recurly when a specific event happens (e.g., a new invoice is generated). Consider setting up webhooks to sync invoice data between Recurly and your internal systems in real time.
Customization Limitations
- While Recurly’s Automated Invoicing feature is highly customizable, there are certain fields and sections (e.g., the title of the “Terms and Conditions” section) that cannot be changed. Be sure to review these limitations in detail and plan accordingly.
Error Handling
- When integrating with Recurly’s API, ensure that your system is set up to handle errors gracefully. For example, if an API call to create a new invoice fails, your system should be able to retry the request or log the error for manual review.
Security Considerations
- Ensure that your integration with Recurly adheres to best practices for security. This includes using secure connections (HTTPS) for all API calls and safeguarding any API keys or credentials.
Compliance and Tax Considerations
- Automated Invoicing in Recurly is designed to be compliant with various tax regulations, including EU VAT. However, tax regulations can vary significantly between regions, so it is essential to consult with a tax professional to ensure that your invoicing practices are fully compliant with all relevant laws and regulations.
Performance and Rate Limiting
- Be mindful of API rate limits when integrating Recurly’s Automated Invoicing feature. Ensure that your integration is designed to stay within these limits to avoid service disruptions.
Testing Environment
- Before deploying your integration in a production environment, thoroughly test it in a sandbox or staging environment. Recurly provides a sandbox environment for this purpose.
By paying attention to these integration notes, you can ensure a smooth and effective implementation of Recurly's Automated Invoicing feature within your existing infrastructure and workflows.
Manage automated invoicing in Recurly
Step 1: Access invoice settings
- Log in to your Recurly Admin Console.
- Navigate to Configuration in the left sidebar.
- Click con Invoice Templates.
- Select Invoice Settings.
Step 2: Customize default values
- In the Charge Invoice Defaults section, set your preferred invoice terms from the Terms dropdown menu.
- Enter any desired notes in the Terms and Conditions and Customer Notes sections.
Step 3: Configure VAT reverse charge notes (if applicable)
- If you are using Recurly’s EU VAT feature, customize the VAT Reverse Charge Notes as needed.
- To edit the default message, navigate to Configuration > Taxes > Tax Settings and click the Tax Settings button in the top right corner.
Step 4: Set up email settings
- In the Attachments section on the email template "edit" page, enable or disable PDF attachments for invoice-related emails.
- Review and customize the seven email templates that mention an invoice, as needed.
Step 5: Configure the bill to ddress
- Navigate to Configuration > Taxes > Tax Settings.
- Enable the Use Account Information Address for all Invoices option and save the page.
Step 6: Review example invoice
- Review the example invoice provided in the Invoice Settings to ensure all configurations meet your business needs.
Step 7: Set modification enforcement (if desired)
- In the Modification enforcement section, choose your preferred settings for subscription upgrades and downgrades.
- Save your settings.
Step 8: Test and review
- Generate a test invoice to ensure all settings are configured correctly.
- Review the test invoice and make any necessary adjustments in the Invoice Settings.
Step 9: Save and deploy
- After reviewing and confirming that all settings are as desired, click the Save Changes button at the bottom of the Invoice Settings page.
- Your Automated Invoicing settings are now live and will be applied to future invoices.
Updated 4 months ago