Recurly for Salesforce setup
Getting Started
Setting up an integration with Salesforce can be complicated, especially if you have a significant amount of data in your system. Before getting started, please be sure to read through this entire page. If you have questions or are unsure of how the setup process functions, please reach out to our team and we will be happy to assist you in setup.
Initial Steps
-
If you don't already have a Salesforce account, you can create a free developer account for evaluation. We highly recommend that you test the integration in a Recurly sandbox account before integrating your production account.
-
Install the Recurly for Salesforce package in your Salesforce organization. We recommend you install in a sandbox org first to test the integration with your business process. Click here for the sandbox Salesforce integration link. Once this feature is enabled on your production Recurly account, you'll receive a separate install link for the production integration.
-
Within the Install Package window, choose the audience for whom you want to install the integration. Most merchants will want to install the package for specific profiles. This allows you to assign specific access to the package for each profile in your Salesforce instance.
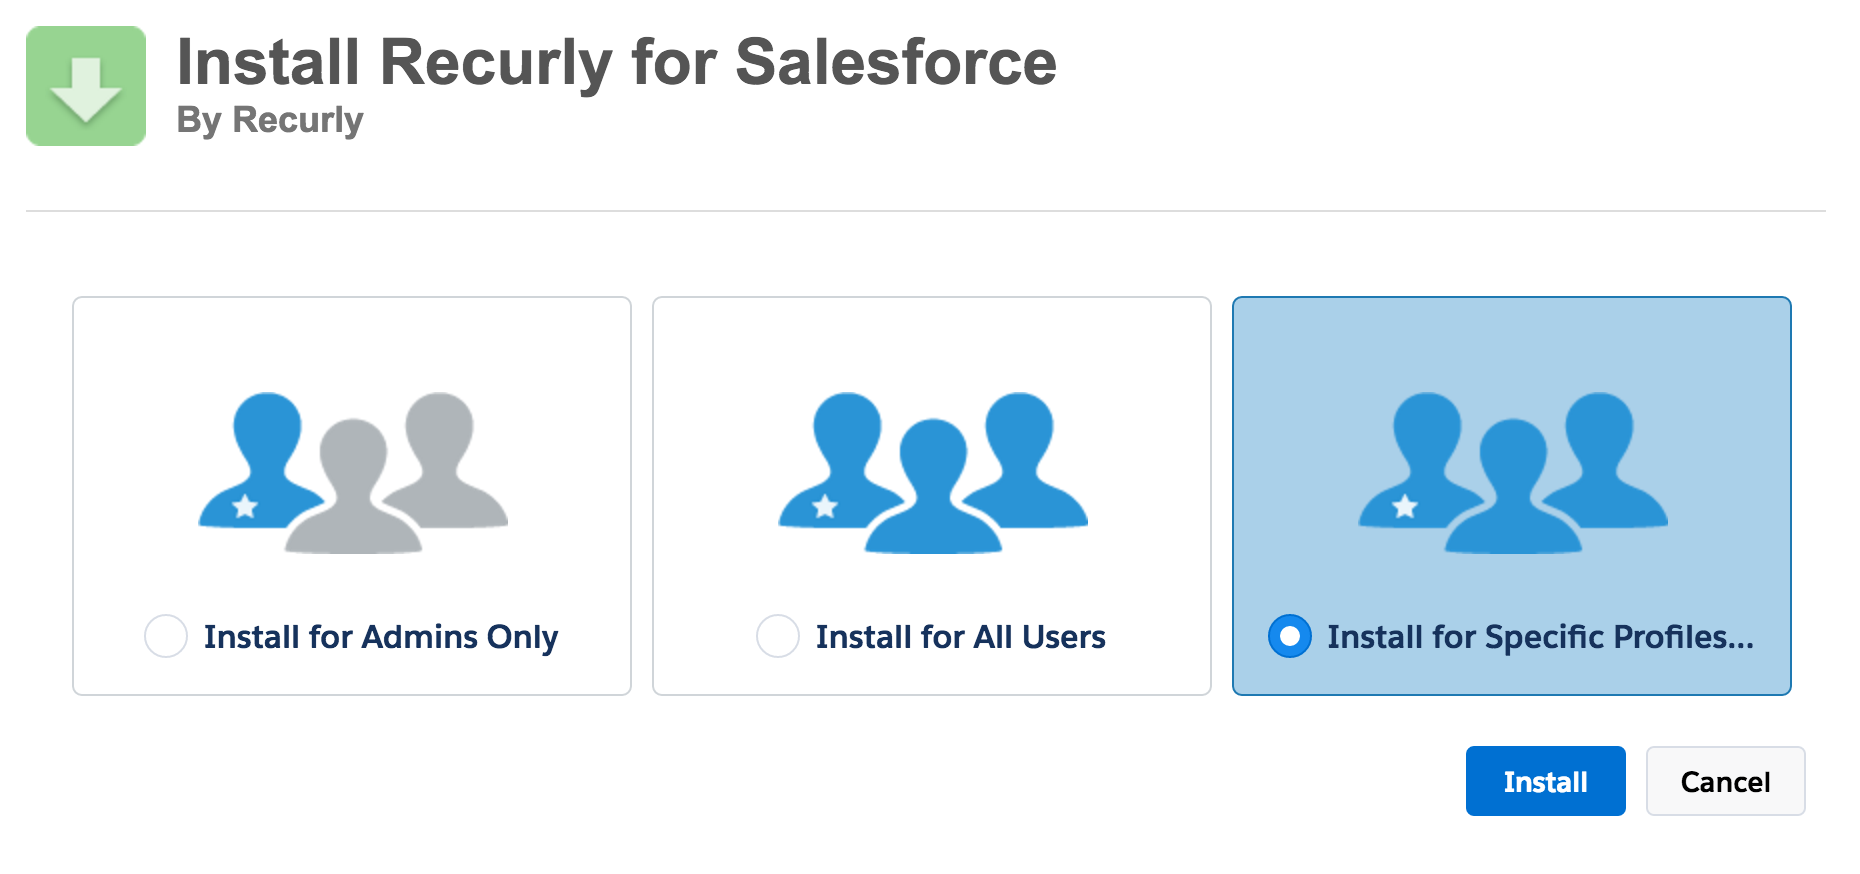
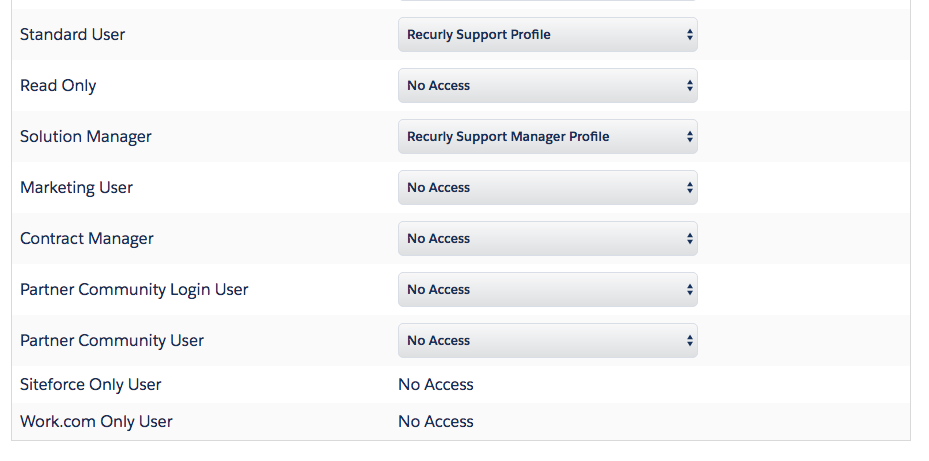
- Choose the roles you would like to assign Recurly permissions to. It is important to do this before installing the package because you will assign the permission sets in the package to these profiles during package installation. If you would like to make new profiles, clone existing Salesforce profiles that you would like to have Recurly permission sets added to and label them " Recurly__Profile ." e.g. "Recurly Support Profile."
-
Click Install. Grant access to the Recurly API when prompted.
-
The install process will run. It may take a few minutes to complete.
-
We recommend you review your user profiles after the install process is complete to ensure that your profiles have been assigned to the user roles you would like to access Recurly data.
-
We STRONGLY recommend if you have state/country fields set up as pick lists, that you change them to be text fields. This will likely save you many hours of headaches in the integration process as pick lists are very challenging for all integrations, including ours.
Configuring Your Recurly for Salesforce Integration
Configure API Settings
After installing the app, navigate to the API Settings tab on the Recurly Admin page in Salesforce and follow these instructions to connect your Recurly site(s) to your Salesforce org. You'll leverage the API key(s) found on the API Credentials page within the Integrations menu in Recurly.
-
Set the Private API Key: This is the field that will capture your API key to authenticate with Recurly. You can find this under "API Credentials" in Recurly. If you do not already have a Salesforce private API key in Recurly, click the "Add Private API Key" button to create a new API key called "Salesforce".
-
Set the Public API Key: This field will accept your public API key on the "API Credentials" page in Recurly so that you can integrate with Recurly.js for payment information. If you do not want to sync information from SFDC back to Recurly, you do not need to include the Public API Key.
-
Continue to set the Private and Public API keys for any other Recurly subdomains which you would like to have populate data in Salesforce. The integration supports a maximum of ten (10) subdomains syncing data from Recurly. This functionality is helpful if you have multiple business units or product lines using different Recurly sites.
Configure Sync Settings
Once your API settings are configured, continue to the Sync Settings tab to set the rest of your automated data sync preferences:
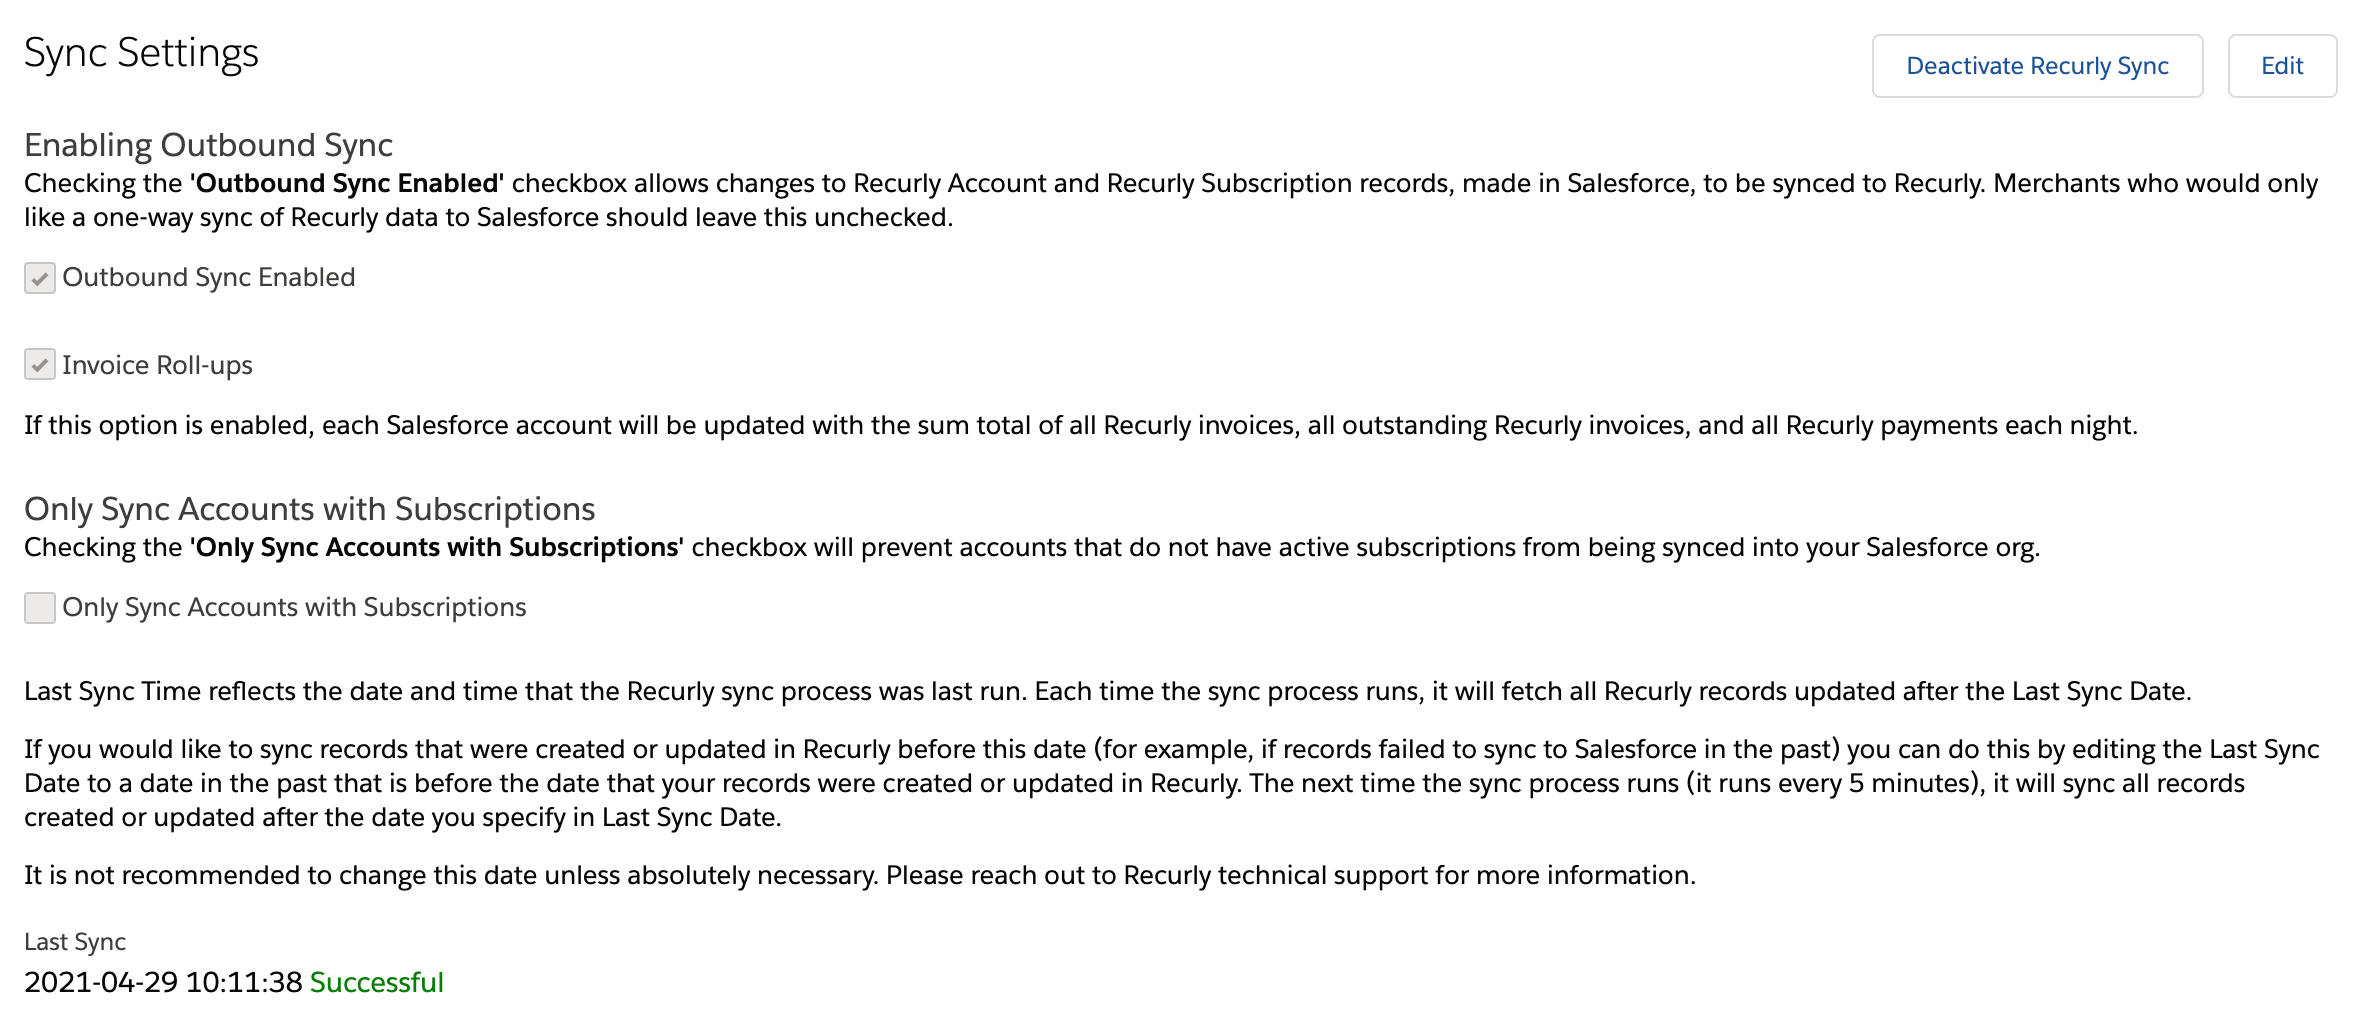
Sync Settings tab
-
Enable Outbound Sync: Checking this box will enable the ability to sync records from Salesforce to Recurly. These new/edited records sync immediately. If this option is disabled, records updated in Salesforce will not sync to Recurly. Note that this functionality requires that the Public API Key be populated in step #2, above.
-
Invoice Roll-Ups: By enabling this option, Salesforce accounts that are linked to Recurly accounts will be populated with the overview and summarization fields listed in our docs, which can be used for reporting on Salesforce accounts.
-
Most Recent Invoice: By enabling this option, Salesforce accounts you have linked to Recurly accounts will be populated with "Recurly Most Recent Invoice Amount" which can be used for reporting on Salesforce accounts.
-
Only Sync Accounts with Subscriptions: Checking this box will only sync accounts that have active, pending, or expired subscriptions to Salesforce. Accounts without subscriptions will not be synced. This will limit the amount of data sent to Salesforce.
WarningDO NOT click Activate Recurly Sync yet. This will be the last step after more settings are enabled.
Linking Recurly Accounts with Native Salesforce Accounts
The Account Link Settings enable you to link the Recurly Accounts custom object with the native Account object within Salesforce. By clicking this checkbox, when accounts are integrated from Recurly, the app will create a link between the Recurly Account record and a related Salesforce account record if a match exists.
For example, if you link Recurly accounts and Salesforce accounts based on email address: If you have a Recurly account with email address "[email protected]" and you enable the setting, the integration will look to see if there is a Salesforce account with the email address "[email protected]". If a Salesforce account with this email exists, then it will be linked to the applicable Recurly account. If there is no account with this email address, the Recurly account will not be linked to any accounts in Salesforce.
This setting is not required, and we advise you to review the documentation below before enabling it or contact Recurly Support for assistance.
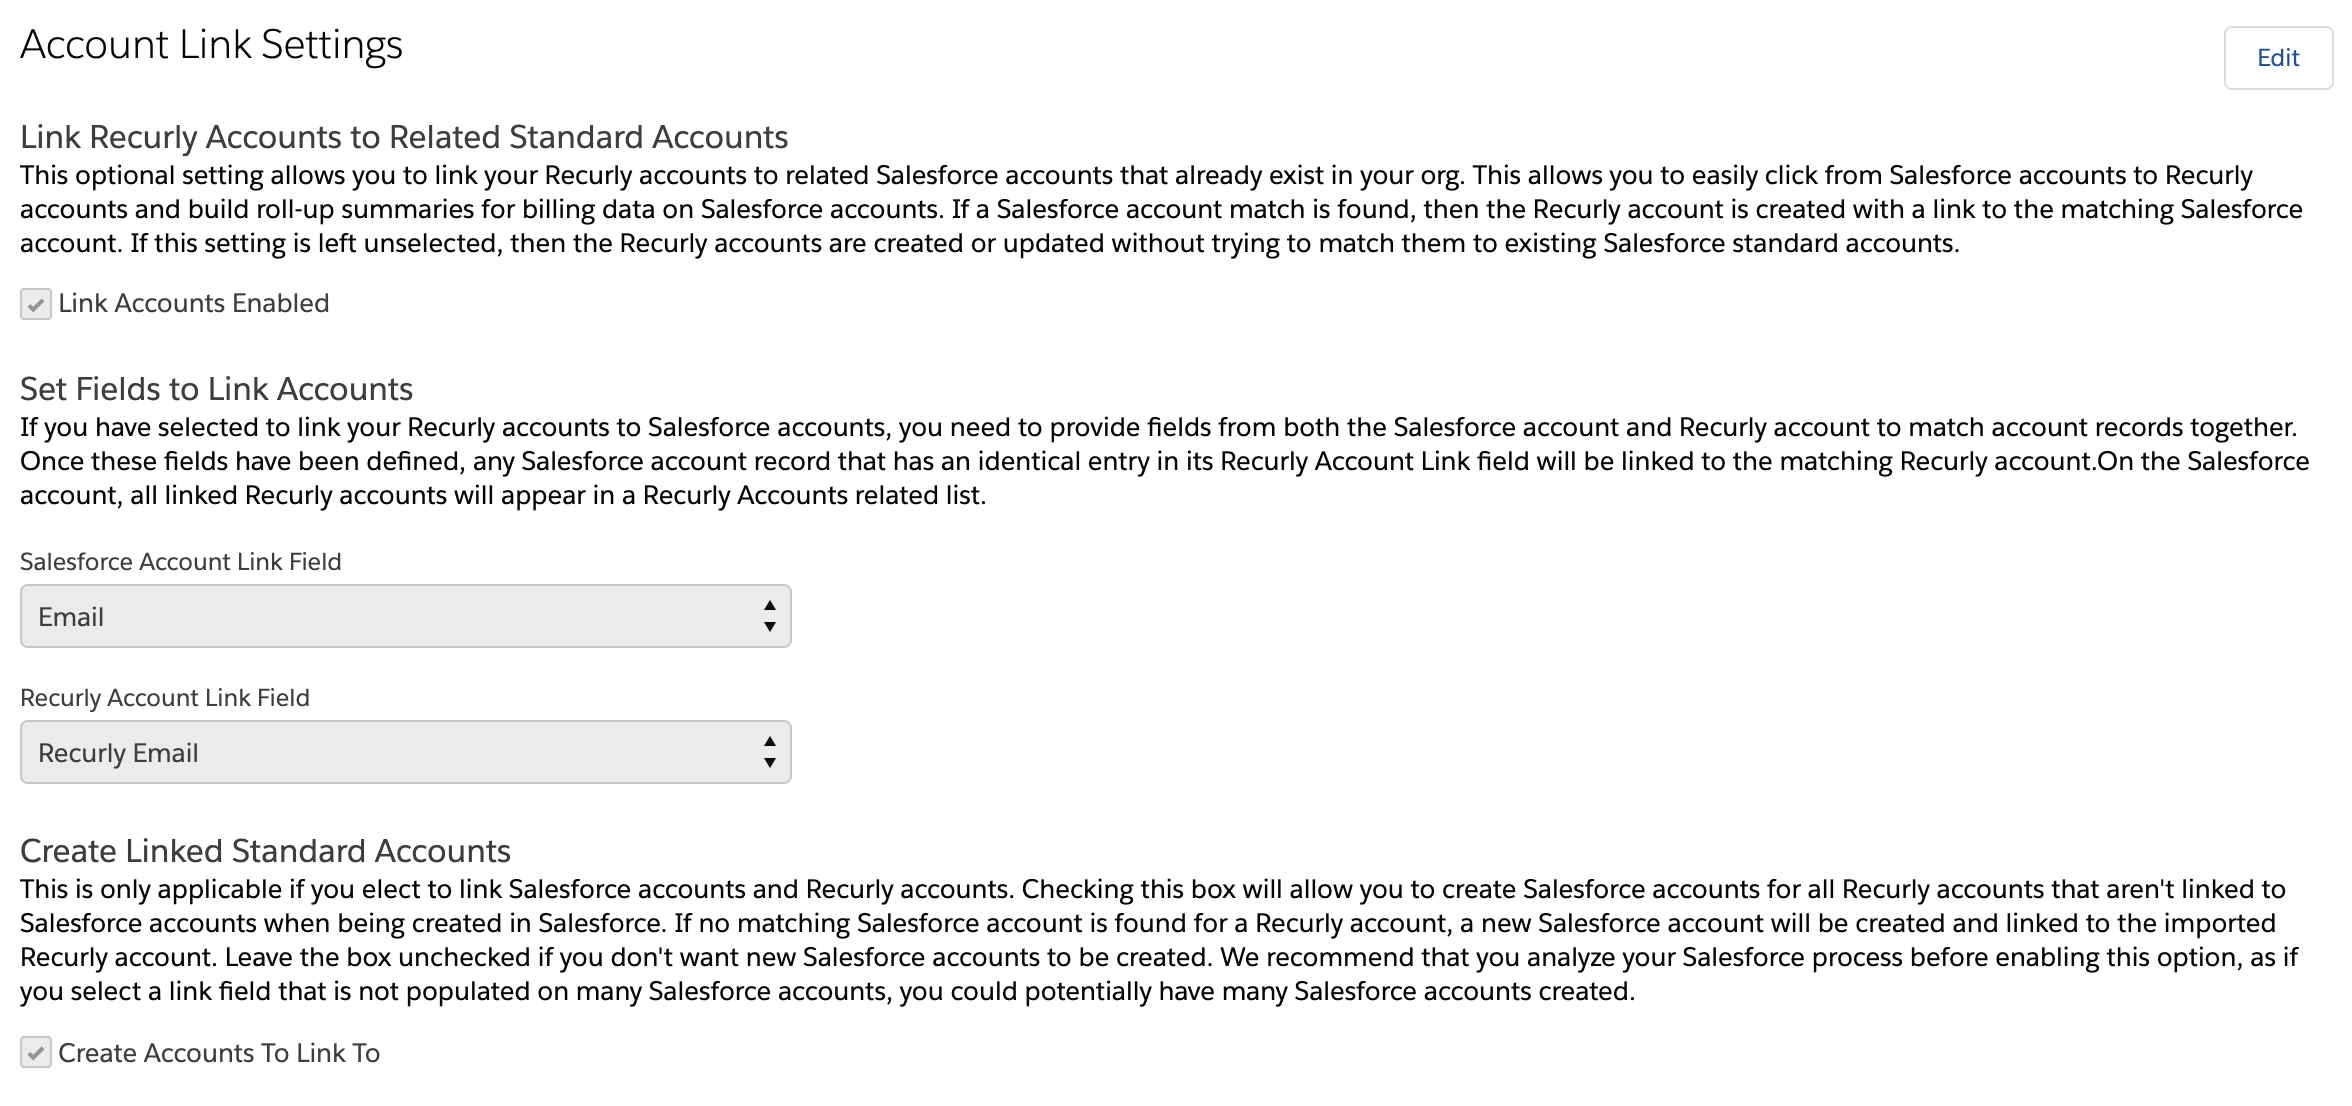
Account Link Settings tab
-
Link Accounts Enabled: Checking this box will enable the ability to link Recurly accounts to related Salesforce accounts that already exist in your organization.
-
Choose the desired fields on which to match accounts in the Salesforce Account Link Field and Recurly Account Link Field. Note that this is mandatory to enable account linking.
Warning on Calculated FieldsDo not use a calculated field, a field that is not writable from external systems, or a field that is not visible to your Salesforce users. If you choose a field that fits this description, Recurly will not be able to create accounts in Salesforce and this functionality will not work.
- Create Accounts To Link To: If account linking is configured, this setting enables Salesforce to create accounts in the native Accounts object for any Recurly accounts that don't match an existing Salesforce account. See below for more details.
Creating Salesforce Accounts from Recurly Accounts
If you choose to link Recurly accounts to standard Salesforce accounts, the integration gives you the additional option to create a Salesforce account if a Recurly account does not find a match within Salesforce. In the Account Link Settings, checking the Create Accounts to Link to box will cause Salesforce accounts to be created if a link is not found to associate a Recurly account to an existing Salesforce account.
For example, if you link Recurly accounts and Salesforce accounts based on email address: If you have a Recurly account with email address "[email protected]" and you enable the setting, the integration will look to see if there is a Salesforce account with email address "[email protected]". If a Salesforce account with this email exists, then it will be linked to the applicable Recurly account. If there is no account with this email address, the integration will attempt to create a Salesforce account for it.
This feature is helpful for merchants who have an online channel that generates leads for their sales team. It will create Salesforce accounts that can be edited and owned by sales and service teams.
Warning on Salesforce Account CreationThis setting is not required, and we advise you to review all documentation before enabling the setting as it may result in a significant number of accounts being created in your Salesforce instance.
Configure Product Sync Settings
If you have enabled the integration to sync your Recurly offerings (plans, add-ons, and items) with the native Product object in Salesforce (via the Advanced Settings tab), these settings will allow you to tailor that sync.
This option will not be editable if product syncing is not enabled
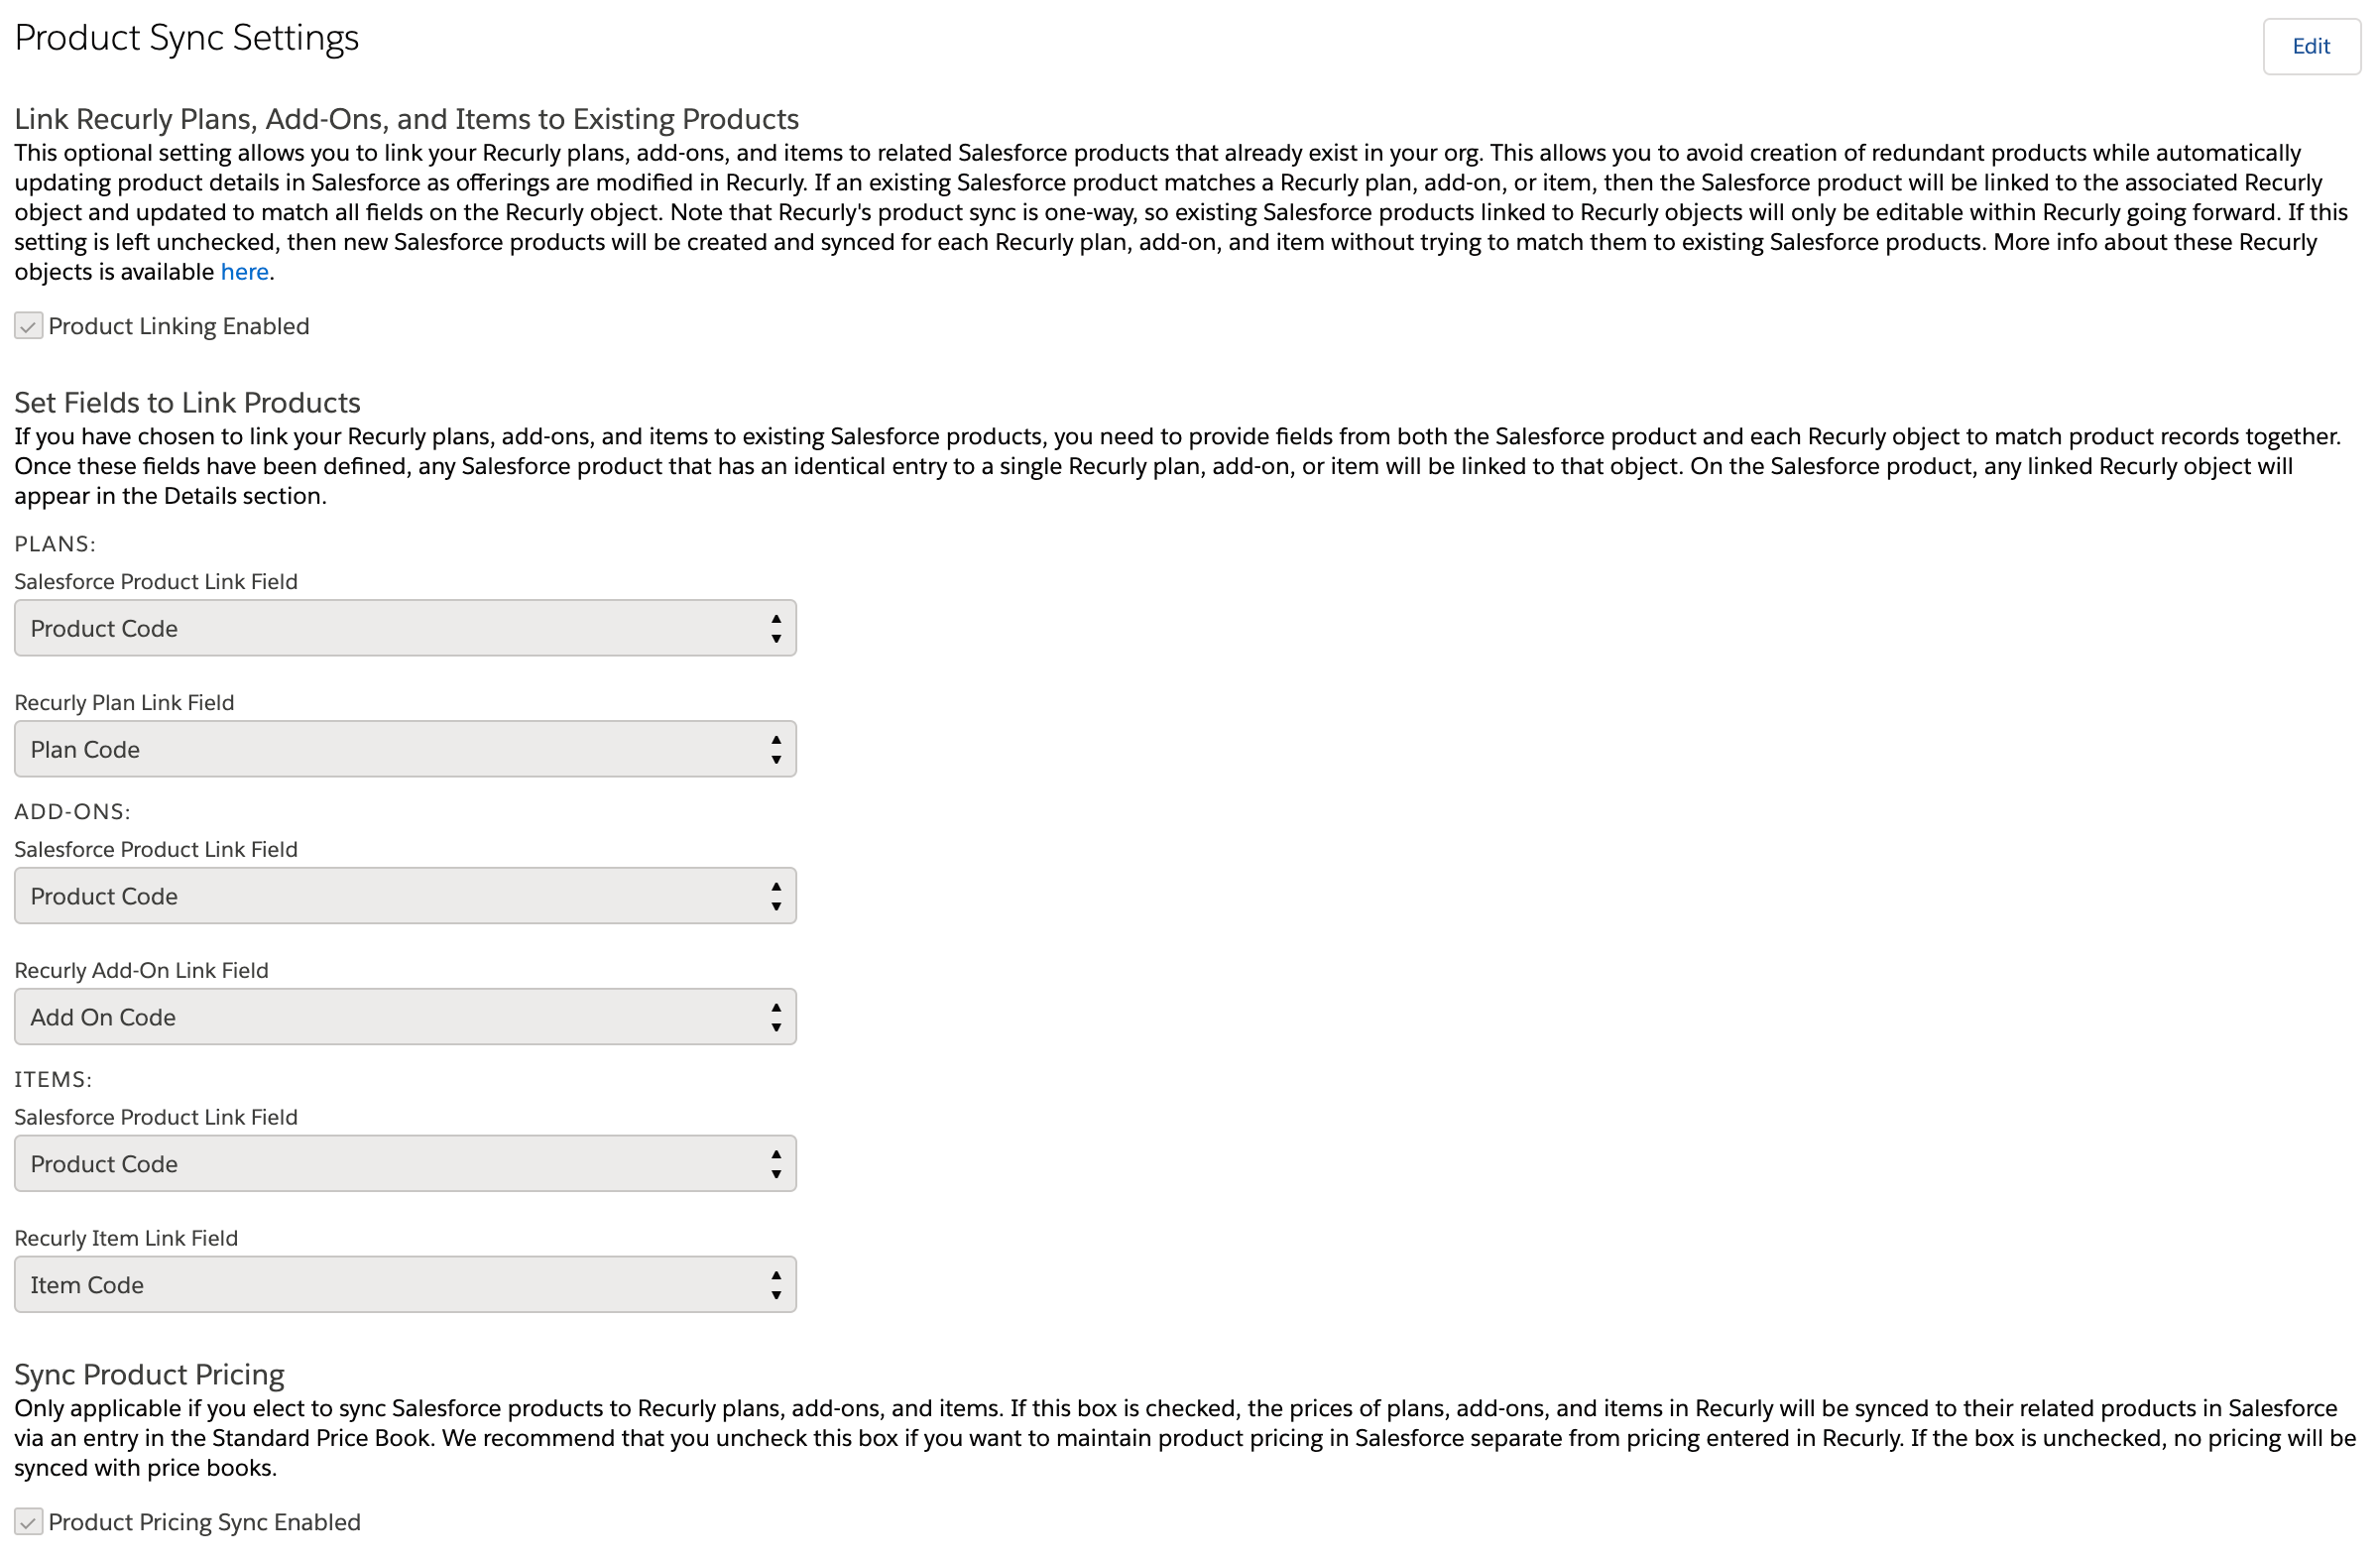
Product Sync Settings tab
- Product Linking Enabled: This setting defaults to disabled. Checking this box will cause the integration to link Recurly Plans, Recurly Add-Ons, and Recurly Items to related Salesforce products that already exist in your organization. If a matching Salesforce product does not exist, or if this setting is disabled, then a new product will be created and linked to each Recurly custom object.
For example, if you link Recurly plans and Salesforce products based on Plan Code and Product Code: If you have a Recurly plan with plan code "test123" and you enable the setting, the integration will look to see if there is a Salesforce product with the product code "test123". If a Salesforce product with this product code exists, then it will be linked to the applicable Recurly plan. If there is no product with this product code, then a new product will be created and linked to the Recurly plan.
- Choose the desired fields on which to match your Recurly offerings and your Salesforce products. Note that this is mandatory to enable product linking. If a 1:1 match can't be identified for any Recurly offering (e.g. multiple Recurly objects match to a single existing product), then the existing product will be untouched and new products will be created for each Recurly object.
Warning on Calculated FieldsDo not use a calculated field, a field that is not writable from external systems, or a field that is not visible to your Salesforce users. If you choose a field that fits this description, Recurly will not be able to create accounts in Salesforce and this functionality will not work.
-
Product Pricing Sync Enabled: This setting defaults to disabled. Checking this box will cause the integration to sync the price for each Recurly offering to a Standard Price Book entry for the related product. Only prices that match the default currency of your Salesforce organization will be synced.
-
Convert Opportunities to Recurly Subscriptions: This setting defaults to disabled. Checking this box will enable the ability to create subscriptions, one-time charges, and accounts in Recurly from Closed Won opportunities in Salesforce.
Configure Sync Custom Field Settings
In this section, you will be able to setup mappings to sync over Recurly custom field data into Salesforce. To learn more about Recurly custom fields: check out this documentation.

Setting up the mapping for custom fields
This section will be populated with all your custom fields set up on your site(s) and categorized by Item, Account, and Subscription for easy configuration. From there, you can proceed to select which Salesforce custom field from the drop down you will want to map to the Recurly custom field. You can reuse the Salesforce custom field in the mapping for different sites but not in the same site.
The custom fields available in the drop down will be only be String type fields from the respective Recurly object (no picklist, multi-picklist, email, phone, URL, or formula). We recommend to exclude Mandatory fields as it can cause sync issues if data is missing.
Configure Advanced Sync Settings
The majority of users should ignore this section. If you have complex needs, please read on.
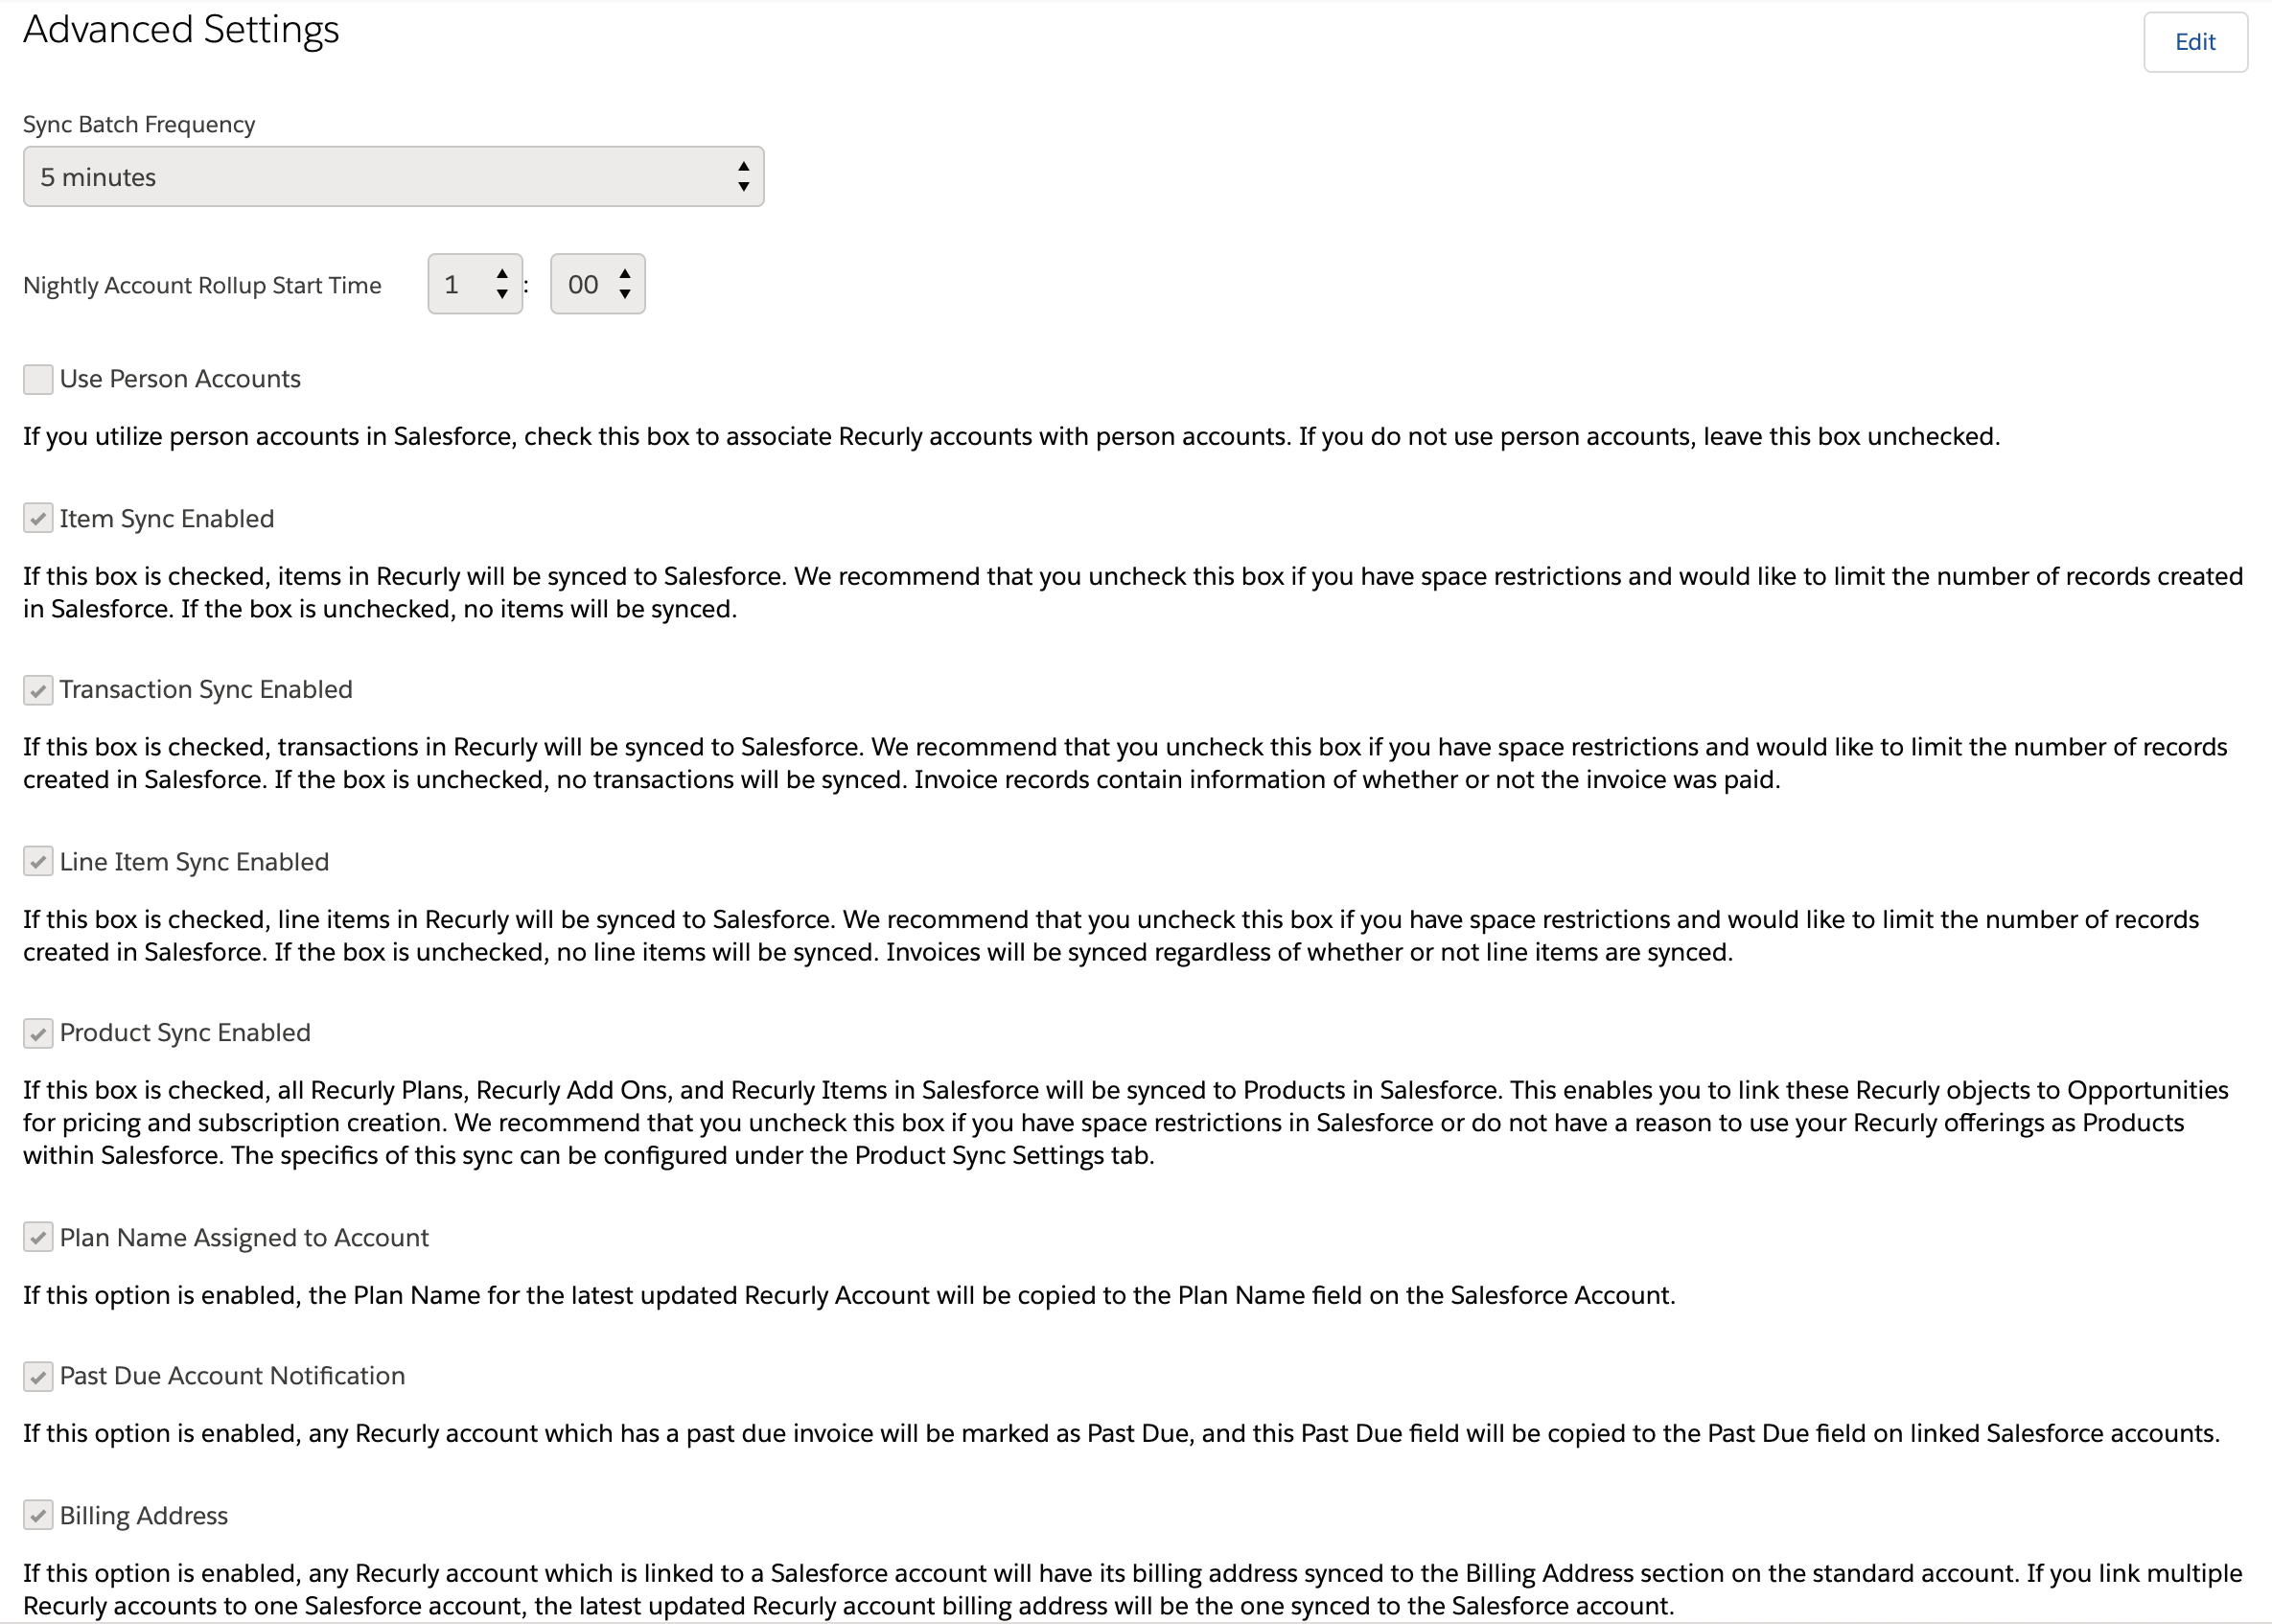
Advanced Settings tab
-
Sync Batch Frequency: By default, Salesforce will query Recurly once every 5 minutes to get new data. This can put a lot of strain on your Salesforce system but it gets you near-real-time information. If you would like to increase this interval, you can use this selector to choose any time between 5 and 60 minutes as the interval between data syncs.
-
Nightly Account Rollup Start Time: If you have invoice roll-ups enabled in your Sync Settings, these fields on the Salesforce account will be calculated each night at the specified time.
-
Use Person Accounts: If you have person accounts enabled in your Salesforce org, you will see the option to associate Person Accounts with Recurly Accounts when setting up Advanced Settings. Enable it to use the account linking functionality to work with person accounts.
-
Item Sync Enabled: This setting defaults to enabled. If you uncheck this box, items from your Recurly item catalog will not be synced with Salesforce. The purpose of this option is to limit the amount of data that is sent to Salesforce and should be used when you have concerns about data limits in your Salesforce org. If you elect to remove this option, items sold as add-ons or one-time charges will still be visible within the Recurly Add Ons and Recurly Line Items objects.
-
Transaction Sync Enabled: This setting defaults to enabled. If you uncheck this box, transactions will not be synced with Salesforce. The purpose of this option is to limit the amount of data that is sent to Salesforce and should be used when you have concerns about data limits in your Salesforce org. If you elect to remove this option, you can use the payment fields on the Recurly Invoice object to report on transactions.
-
Line Item Sync Enabled: This setting defaults to enabled. If you uncheck this box, invoice line items will not be synced with Salesforce. The purpose of this option is to limit the amount of data that is sent to Salesforce and should be used when you have concerns about data limits in your Salesforce org. If you elect to remove this option, you can use the total fields on the Recurly Invoice object to report on amounts invoiced, but you may lose detail that is only held on line item records.
-
Product Sync Enabled: This setting defaults to disabled. If you check this box, your plans, add-ons, and items from Recurly will be synced with the native Product object in Salesforce. The purpose of this option is the limit the amount of data that is sent to Salesforce and should be used when you have concerns about data limits in your Salesforce org. With this option disabled, your Recurly offerings will still sync with the custom Recurly objects in Salesforce but will not be available to sell on Opportunities. More details around configuring this functionality are above.
-
Plan Name Assigned to Account: This setting will transfer the name of any subscriptions linked to the Recurly account to the linked Salesforce standard accounts. You will also need to add the "Recurly Plan" field to the Salesforce account layout. This is best used in Salesforce for reporting on accounts by plan type. Note that this option is only available if you elect to link Recurly accounts and Salesforce accounts.
-
Past Due Account Notification: If you enable this function, any Salesforce account with a linked Recurly account that is past due will have the "Recurly Past Due Invoice" field on the Salesforce account checked. This is best used in Salesforce for reporting on accounts that are past due. Note that this option is only available if you elect to link Recurly accounts and Salesforce accounts.
-
Billing Address: If you enable this setting, the billing address from the Recurly account will transfer to the Billing Address fields on the linked Salesforce account. Note that this option is only available if you elect to link Recurly accounts and Salesforce accounts.
-
Active Subscriber: If you enable this setting, when a Recurly account that is linked to a Salesforce account has an active subscription, then the "Recurly Active Subscriber" checkbox on the Salesforce account will be checked. This feature is best used in reporting to see which customers have active subscriptions. Note that this option is only available if you elect to link Recurly accounts and Salesforce accounts.
-
In Trial: If you enable this setting, any Salesforce account with a linked Recurly account that has a subscription in the trial stage will have the "Recurly In Trial" checkbox on the Salesforce account checked.
Editing Your Salesforce Layouts
To take full advantage of your integration between Salesforce and Recurly, a number of Recurly-specific fields can be added to your native account, product, and opportunity layouts in Salesforce for easy access by your team.
Modifying the Salesforce Account Layout
If you are not linking Recurly accounts and Salesforce standard accounts, you can ignore this section.
In order to view Recurly data alongside the sales data that you have on your linked Salesforce accounts, you will need to edit the layout of your Salesforce account page. To do this, navigate to a Salesforce account layout and click "Edit Layout." Note that you need to have appropriate permissions to edit and save these forms.
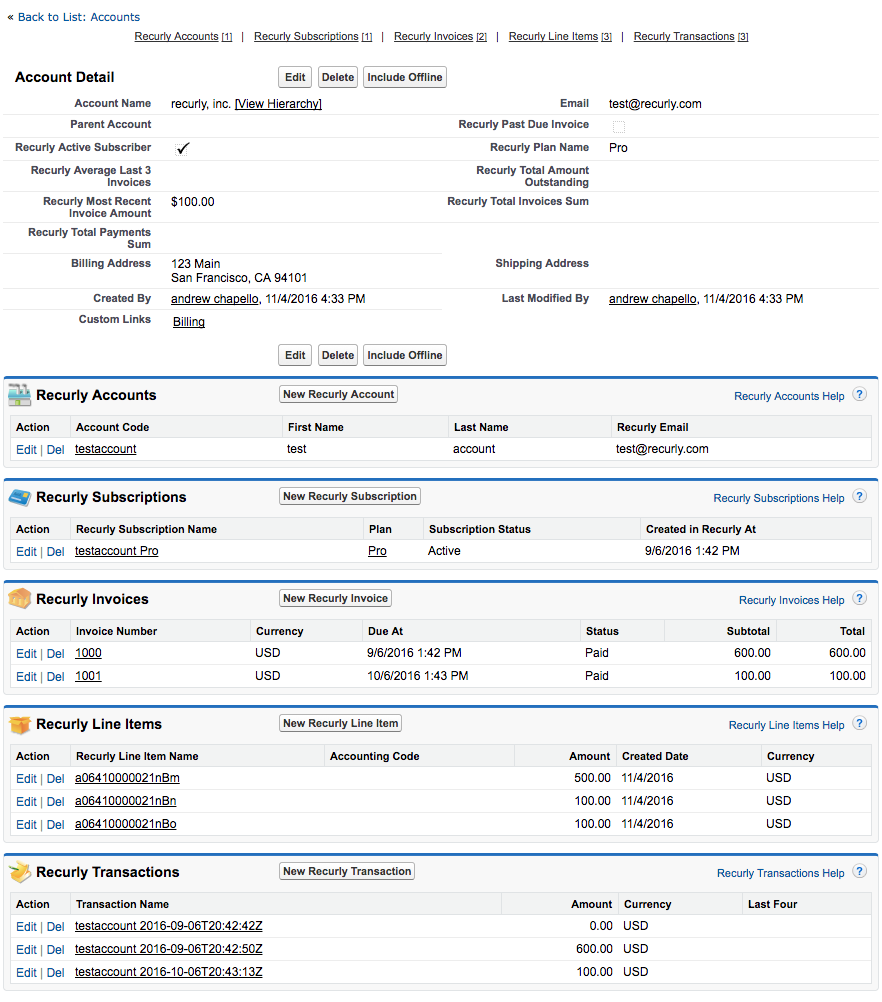
Fields: If you elected to enable the advanced settings during the setup process, the following fields will be populated on Salesforce accounts. These fields will be updated each time a Recurly account is updated, except where noted below.

- Recurly Active Subscriber: If there are linked accounts with an active subscription, this will be True.
- Recurly Average Last 3 Invoices: Average of the last 3 invoices issued in Recurly (updated overnight).
- Recurly Most Recent Invoice Amount: The amount of the most recent invoice issued to this customer.
- Recurly Past Due Invoice: If the account has a past due invoice in Recurly, this will be True.
- Recurly Plan Name: If the account has an active subscription, the name of the plan will be populated here.
- Recurly Total Invoice Amount: The sum of the total amount of invoices issued to this customer (updated overnight).
- Recurly Total Payment Amount: The sum of the total amount of payments this customer has paid (updated overnight).
You can choose to drag any of these fields onto your account layout. An example layout is below:

Related Lists: You can also add Related Lists for Recurly objects to your Salesforce account. This allows your sales reps and support reps to see billing information on the account object and is available for:
- Recurly Accounts
- Recurly Subscriptions
- Recurly Invoices
- Recurly Transactions
- Recurly Line Items
Below is our recommended account layout if you use all of the Recurly sync features:
Modifying the Salesforce Product Layout
If you are not syncing Recurly offerings to Salesforce products, you can ignore this section.
In order to easily transition between your Salesforce products and their linked Recurly offerings, you can edit the layout of your Salesforce product page. To do this, navigate to a Salesforce product layout and click "Edit Layout." Note that you need to have appropriate permissions to edit and save these forms.
Visualforce Pages: If you elected to sync Recurly offerings to Salesforce products, the following Visualforce page/field will be available on Salesforce products. This field is updated any time the linked Recurly offering is updated.

Linked Recurly Object: If there is a linked plan, add-on, or item for this product, the name and link will be provided here. The field name is dynamic and will indicate the object type for this linked object.
Modifying the Salesforce Opportunity Layout
If you are not creating Recurly subscriptions from Salesforce opportunities, you can ignore this section.
In order to create Recurly subscriptions directly from Closed Won opportunities in Salesforce, you need to edit the layout of your Salesforce opportunity page. To do this, navigate to a Salesforce opportunity layout and click "Edit Layout." Note that you need to have appropriate permissions to edit and save these forms.
Visualforce Pages: If you elected to create Recurly subscriptions from Salesforce opportunities, the following Visualforce page/field will be available on Salesforce opportunities.

Recurly Subscription Button: If the opportunity includes one or more Recurly-based products and is in a Closed Won status, this button will appear on the page to trigger the process of subscription (and account) creation in Recurly. Once a subscription has been created for an opportunity, this button will no longer be displayed. If you want to control access to this subscription creation capability, consider restricting the visibility of this button to specific user profiles.
Related Lists: You can also add Related Lists for Recurly subscriptions to your Salesforce opportunity. This allows your sales reps and support reps to see the final Recurly subscription that was created from an opportunity.
Modifying the Salesforce Opportunity Product Layout
If you are not creating Recurly One-Time Charges from Salesforce opportunities, you can ignore this section.
In order to create one-time charges from Closed Won opportunities in Salesforce, you need to edit the layout of your Salesforce opportunity product page. To do this, navigate to a Salesforce opportunity product layout and click "Edit Layout."

Opportunity Product Layout Setup
Once here, you will need to select the "Edit Multi-Line Layout" option at the top. Note that you need to have appropriate permissions to edit and save these forms.
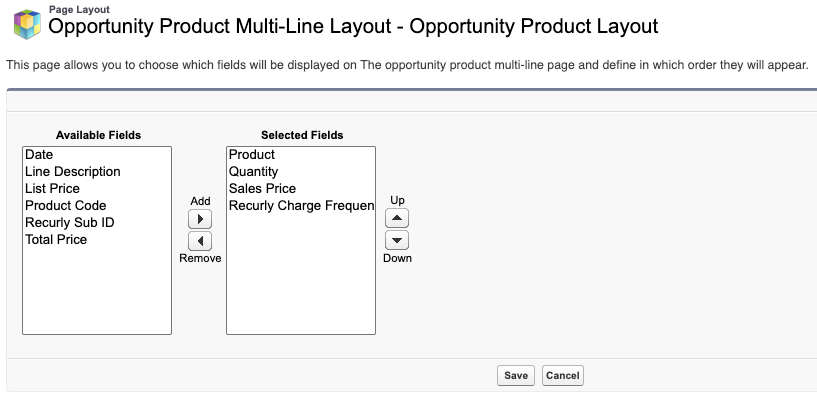
Opportunity Product Multi-Line Layout Setup
To add Recurly Charge Frequency to the Opportunity Product related list, you will have to edit the Opportunity Layout of your choosing and follow the steps below:
- Click the wrench icon above Products and below Related Lists
- Select Recurly Charge Frequency under Available Fields
- Click Add
- Click Okay
How to view the Subscription Term Fields (on the Recurly Subscription Layout)
If you are not able to see all the Subscription Term fields on the Recurly Subscription layout, you will need to go to the edit layout and add the relevant fields as listed below (in any order you prefer):
- Current Period Started At
- Date-time of when the billing period began
- Current Period Ends At
- Date-time of when the billing period ends
- Trial Started At
- Date-time of when the trial period began
- Trial Ends At
- Date-time of when the trial period ends
- Current Term Started At
- The start date of the term when the first billing period starts. The subscription term is the length of time that a customer will be committed to a subscription. A term can span multiple billing periods
- Current Term Ends At
- When the term ends. This is calculated by a plan's interval and Total Billing Cycles in a term
- Paused At
- Null unless subscription is paused or will pause at the end of the current billing period
- Activated At
- Date-time of when the subscription was activated
- Canceled At
- Date-time of when the subscription was cancelled
- Expires At
- Date-time of when the subscription expired
- Total Billing Cycles
- The number of cycles/billing periods in a term. When Remaining Billing Cycles equals 0, if Auto Renew is true the subscription will renew and a new term will begin, otherwise the subscription will expire
- Renewal Billing Cycles
- If Auto Renew is true, when a term completes, Total Billing Cycles takes this value as the length of subsequent terms. Defaults to the plan's Total Billing Cycles
- Remaining Billing Cycles
- The remaining billing cycles in the current term
- Remaining Pause Cycles
- Null unless subscription is paused or will pause at the end of the current billing period
- Auto Renew
- Whether the subscription renews at the end of its term
Salesforce CPQ Configuration Considerations
If you are not creating Recurly subscriptions from Salesforce opportunities or creating Recurly One-Time Charges from Salesforce opportunities, you can ignore this section.
If you are using Salesforce CPQ, you can leverage quotes to select and configure your products as you would normally. They will then flow into the Opportunity and follow the same Closed Won Subscription creation flow. The validations for the out of the box integration will prevent incompatible behavior to persist onto the Subscription page like multiple plans on one opportunity or a recurring one-time charge by hiding the button.
For one-time charges though, you can continue to leverage your CPQ setup with a little extra configuration on your end. You will need add your own twin field to Quote Line and Opportunity Product. Then to complete the flow, you will add a workflow (or other similar mechanism, like Apex triggers or Lightning Flows) to copy the value from your field on the Opportunity Product to field in the manage package (api name: "recurly_v2_Recurly_Charge_Frequency__c") on the Opportunity Product before insertion. This will put the validations we have placed to occur when the quote is synced into the opportunity
Begin Syncing Data
Once you've completed the setup above, we recommend that you ensure your settings are complete and accurate. If you feel unsure of your setup, please get in touch! We are happy to work with you ensure you have the appropriate setup for your business and org.
When you are ready, click the Activate Recurly Sync button on the Sync Settings tab in order to sync data from Recurly to Salesforce. Note that the user who clicks the "Activate Recurly Sync" button will be the owner of the Recurly custom objects, as well as the Salesforce Account, Product, and Price Book Entry objects created in your instance.
The first sync process will likely take longer than your future syncs due to your historical Recurly data syncing to Salesforce
After the initial sync:
-
Records will be queried from Recurly into Salesforce every 5 minutes (or other cadence specified in your Advanced Sync Settings
-
Updates made to these records within Salesforce will be sent back to Recurly immediately (if you have the Outbound Sync setting enabled).
-
If you would like to retry a sync process, you can change the date/time in the Last Sync Time field on the Sync Settings tab to trigger a fresh sync
-
If you would like to stop Salesforce from querying Recurly, click the "Deactivate Recurly Sync" button on the Sync Settings tab
Uninstalling Recurly for Salesforce
If you need to uninstall a previous version of the package (version 1.5 is incompatible with version 2.0) or would simply like to uninstall the package, follow these instructions.
- Click on the Sync Settings tab
- Click on the "Deactivate Sync" button to turn off the automatic sync from Recurly
- Click Setup in the upper right corner of the screen (note: if you are not an administrator in your Salesforce org, you may not have access to the below steps)
- Click on Build→Installed Packages

- Click "Uninstall" next to Recurly for Salesforce
- You will be asked whether or not you would like to keep your data in your org or delete it
Should you run into issues with processes currently running, you can review your background jobs and stop them from running. If you have any other problems or questions, feel free to contact us.
Updated 7 months ago
