
Tours

Build a Tour in Recurly Engage — a multi-step, element-anchored tooltip walkthrough that guides subscribers through your site.

Overview

Prerequisites

Verify that you have the Company, App Administrator, or App Member permission in Recurly Engage.

Limitations

Tours run in standard web browsers only. They do not support connected TV (CTV), mobile, or other device platforms.

Definition

A Tour is a guide type that walks subscribers through your site with a sequence of floating tooltips, each anchored to a specific element on the page. It's built for onboarding, feature discovery, and guided navigation — helping new subscribers find value quickly, without a third-party onboarding tool.

The subscriber moves through steps in a fixed, sequential order and can move backward to revisit a step they've already seen. Because steps can span multiple pages, you can guide a subscriber from, say, a homepage to an account page within a single flow. Everything is configured natively in Pulse.

Key benefits

  • Native onboarding: Guide subscribers through your product without adding a separate onboarding tool or contract.
  • Element-anchored guidance: Attach each tooltip to the exact element it describes, so guidance lands in context.
  • One place for data: Tour impressions, step completions, and exits flow into your existing Engage analytics alongside your other prompts.

Key details

How a tour works

Each Tour step is a web notification prompt with two capabilities specific to Tours:

  • Pin to element: Anchor the prompt to a page element with a CSS selector, then place it above, below, to the left, or to the right of that element. Pinning overrides the size and position in the prompt's standard settings.
  • Scroll into view: When the anchored element is off-screen, scroll it to the top, center, or bottom of the viewport. You can also turn off automatic scrolling.

Button 1 advances to the next step, and Button 2 acts as the Back button. Dismissing a step with the X exits the entire Tour. Subscribers cannot skip ahead, but they can move backward and forward among steps they have reached.

Tour steps inherit the guide's Limits, Segments, and Schedule settings. Tour impressions, step completions, and exits appear in Engage analytics.

Build a tour

  1. Go to Guides > New Guide.

  2. Enter a Name and, optionally, a Description. Select the Tour guide type.

  3. Configure your Segments and the guide's trigger conditions — audience segment, page URL, event, and schedule — using the standard Engage targeting options.

  4. Add Tour steps in the order subscribers should see them. Each step is a web notification prompt with its own content, targeting, and placement.

  5. For each step, navigate to the prompt design editor to configure the Pin to section:

    1. Enter the CSS selector of the element you want to anchor the tooltip to.

    2. Choose the placement relative to that element: top, bottom, left, or right.
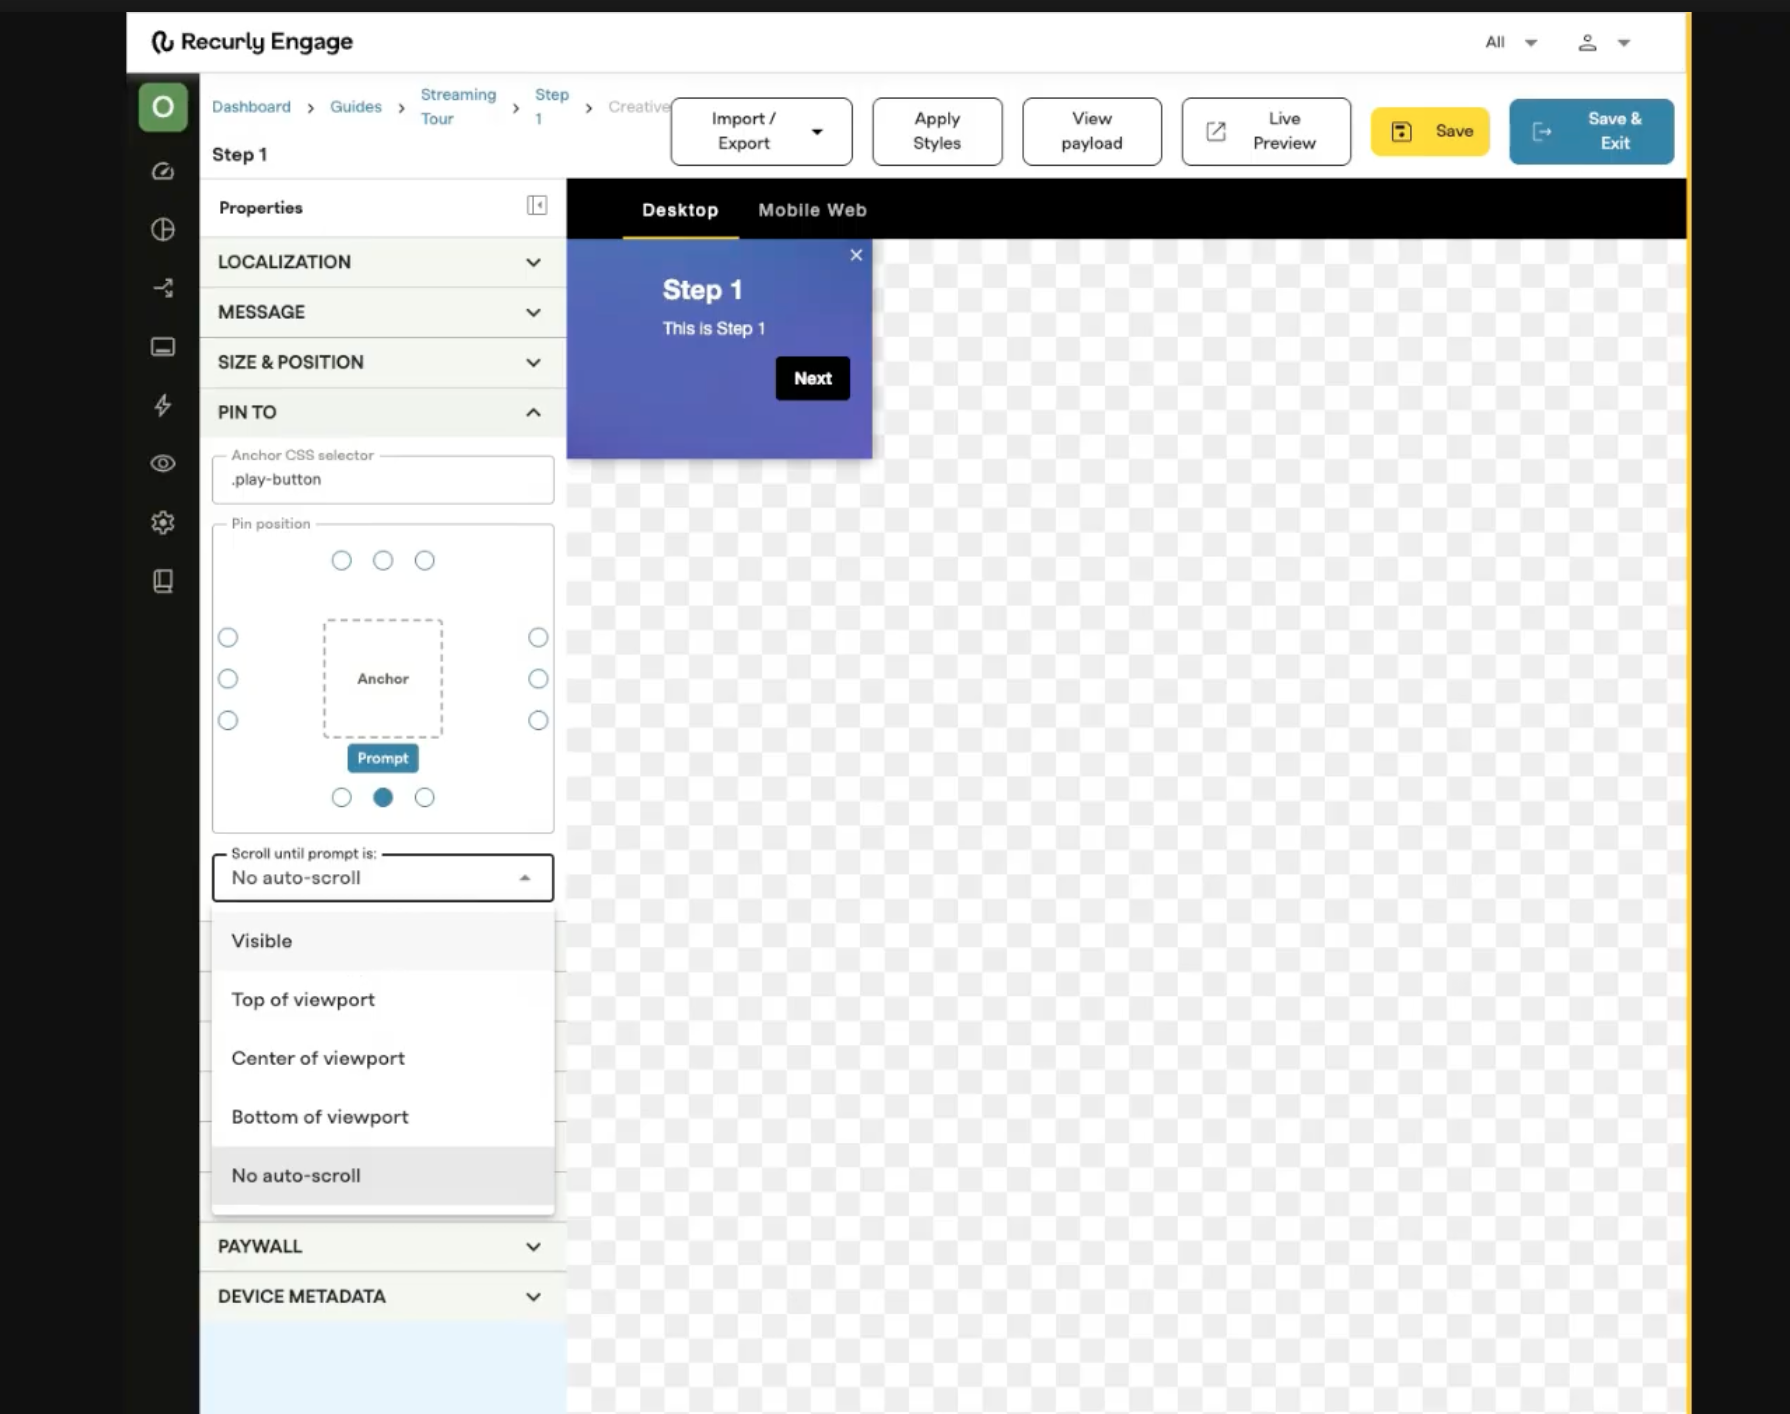
  6. (Optional) Set the scroll into view behavior so the page scrolls the anchored element into view — top, center, or bottom of the viewport — when the step triggers.

  7. Under User interactions, set Show prompt again after Button 1 click and Show prompt again after Button 2 click to Amount of time: 0 minutes. Set the Fadeout timer to 0 seconds.

  8. Return to the guide page to configure the optional transition settings.

  9. Set the transition URL for any step that moves the subscriber to a different page. This tells Engage where to navigate next as the subscriber moves forward or backward through the Tour.

  10. (Optional) Set Limits and a Schedule for the entire Tour.

  11. Preview the Tour against your site to confirm positioning and copy, then click Start to make it live.


Did this page help you?