
Revenue workbench
Explore Recurly's Revenue Workbench: a centralized hub for comprehensive contract management and insights.
Overview
Video
Checkout below our overview of the 5 key features of the Revenue workbench.
This feature is part of our product, Recurly Revenue Recognition Advanced. [Learn more here].
Prerequisites
- A valid Recurly account with appropriate permissions.
- Basic understanding of Recurly's revenue recognition processes.
- Familiarity with contract terms and conditions.
Limitations
- Any changes that are made will be applied for future transactions only.
- Modifications must be approved by both parties.
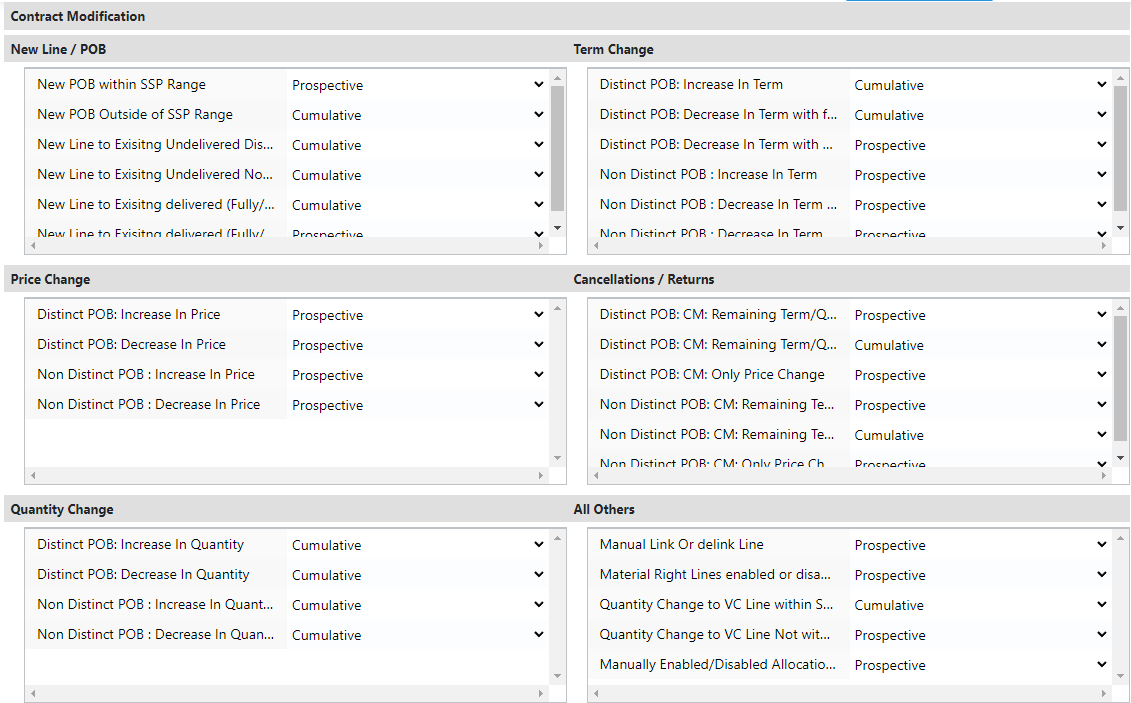
- Not all types of modifications may be supported under certain conditions.
- Manual modifications using Revenue Workbench may be treated differently.
Definition
The revenue workbench is a comprehensive tool that provides valuable insights into contracts and their related aspects. It allows you to review performance obligations, variable consideration, billing information, costs, revenue waterfalls, journal entries, modifications, allocation details, contract balances, business events, holds, and audit trails.
Key benefits
- Comprehensive contract insights: Gain a detailed view of contracts and their associated elements such as performance obligations, billing information, costs, and more.
- Multi-perspective analysis: Explore contracts from various angles using tabs like POB, VC, Billing, Cost, Waterfall, Journals, and more, to analyze specific contract elements and make informed decisions.
- Manual contract modifications: Make necessary changes to contracts directly within the Revenue Workbench, with all modifications being recorded and accessible through the Audit tab for transparency and accountability.
- Enhanced contract management: Access vital contract details including modifications, allocation details, contract balances, business events, holds, and audit trails, allowing for streamlined contract management and analysis.
- Seamless decision-making: With the Revenue Workbench, leverage its user-friendly interface and comprehensive data to make informed decisions, ensuring accurate revenue recognition and efficient financial operations.
Centralized contract management
The revenue workbench provides a detailed overview of contracts and their associated elements, offering insights essential for informed decision-making. This centralized platform facilitates efficient contract management, allowing users to analyze, monitor, and optimize contract performance.
Contract insights
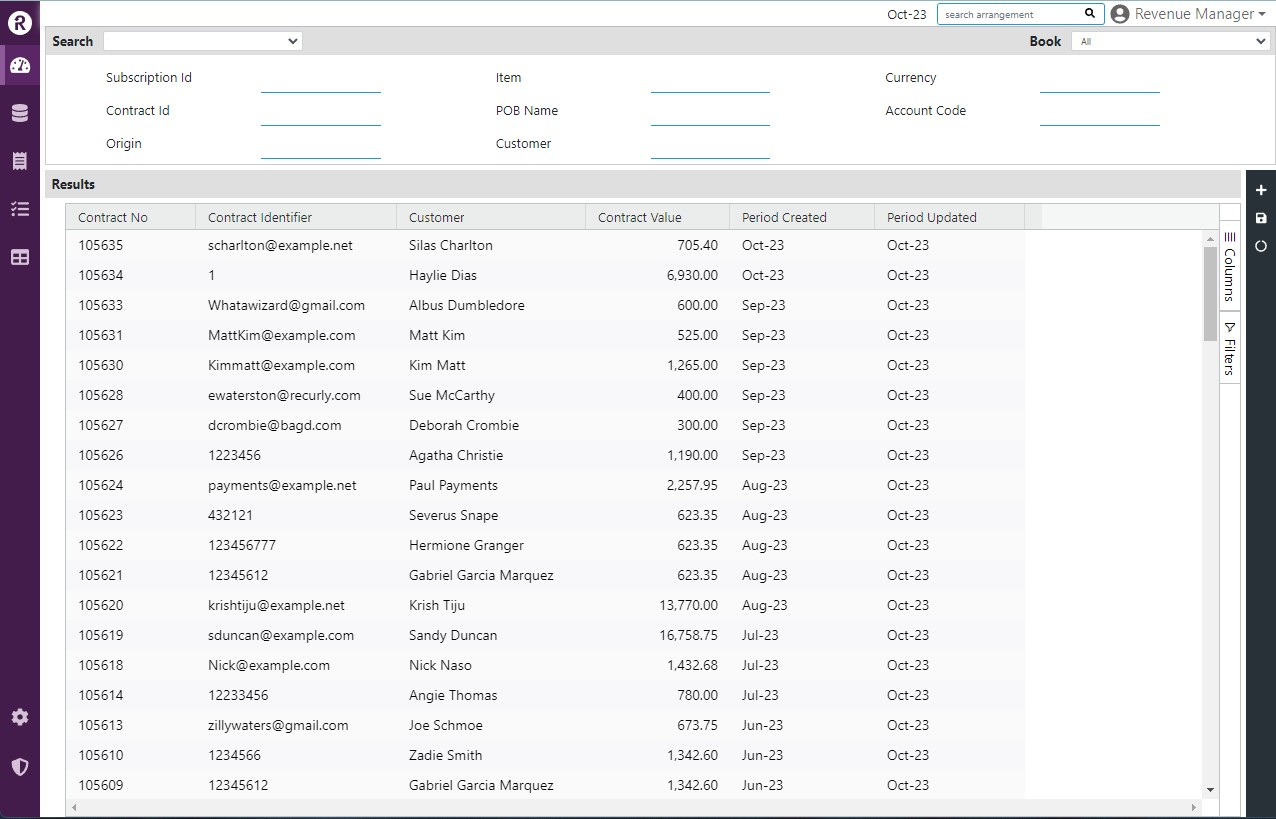
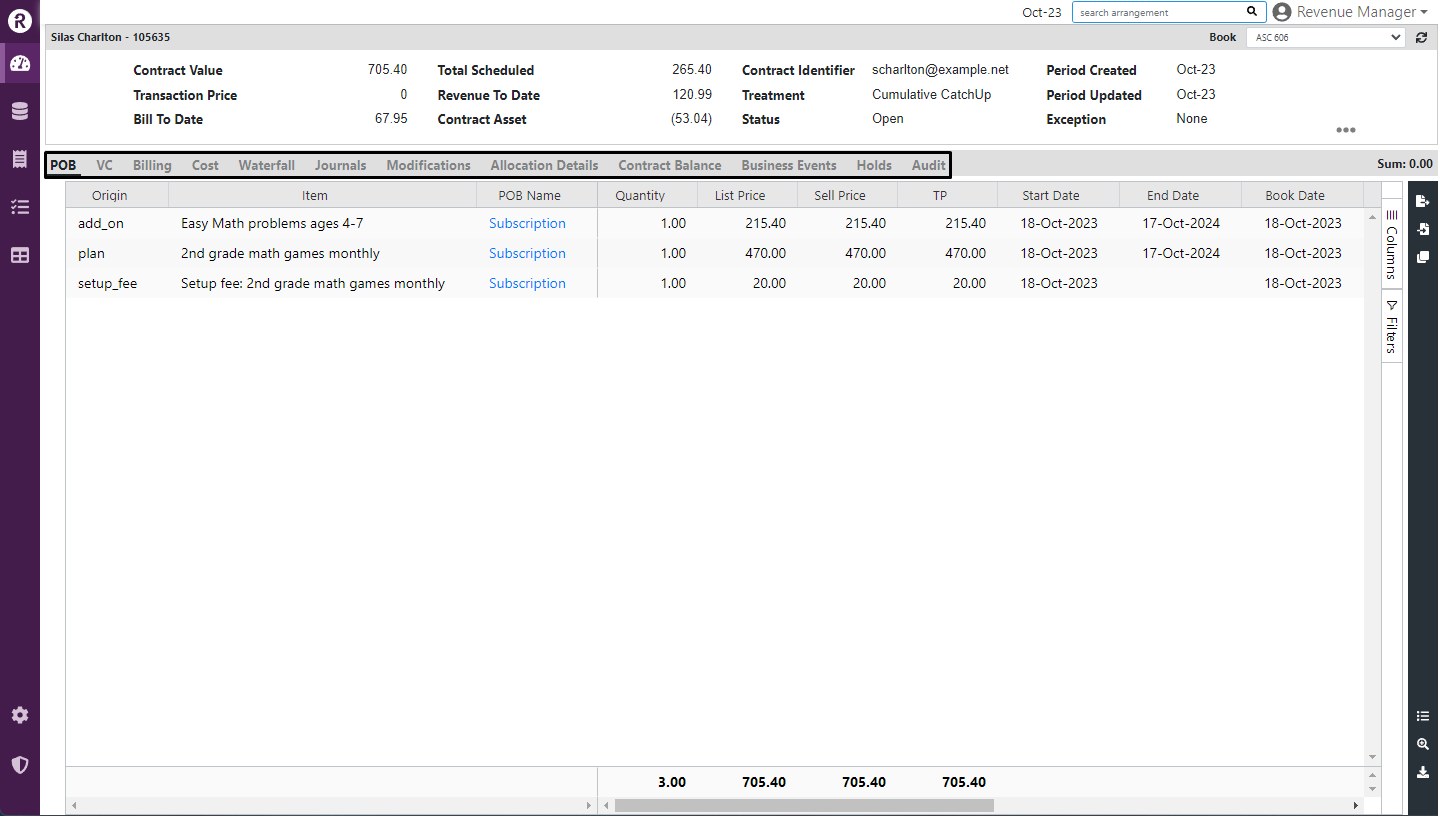
The revenue workbench is designed for optimal contract management. Its intuitive interface and comprehensive features enable users to delve deep into contract details. Select one contract from the list and explore its details:
- Tab-based contract analysis: Navigate through various tabs to access different contract perspectives, such as Performance Obligations (POB), Variable Considerations (VC), Billing, Cost, Waterfall, Journals, Modifications, Allocation Details, Contract Balance, Business Events, Holds, and Audit.
- Manual adjustments: Modify contract details directly within the revenue workbench. All changes are logged in the Audit tab for transparency.
- In-depth insights: Utilize the workbench's detailed contract insights for strategic decision-making. Review specific elements, understand contract balances, and navigate modifications with ease.
Manual action tools
You can modify a contract in the Revenue Workbench, by simply following these steps:
- Access the desired contract.
- Choose the field to modify.
- Right-click the selected field to view modification tools.
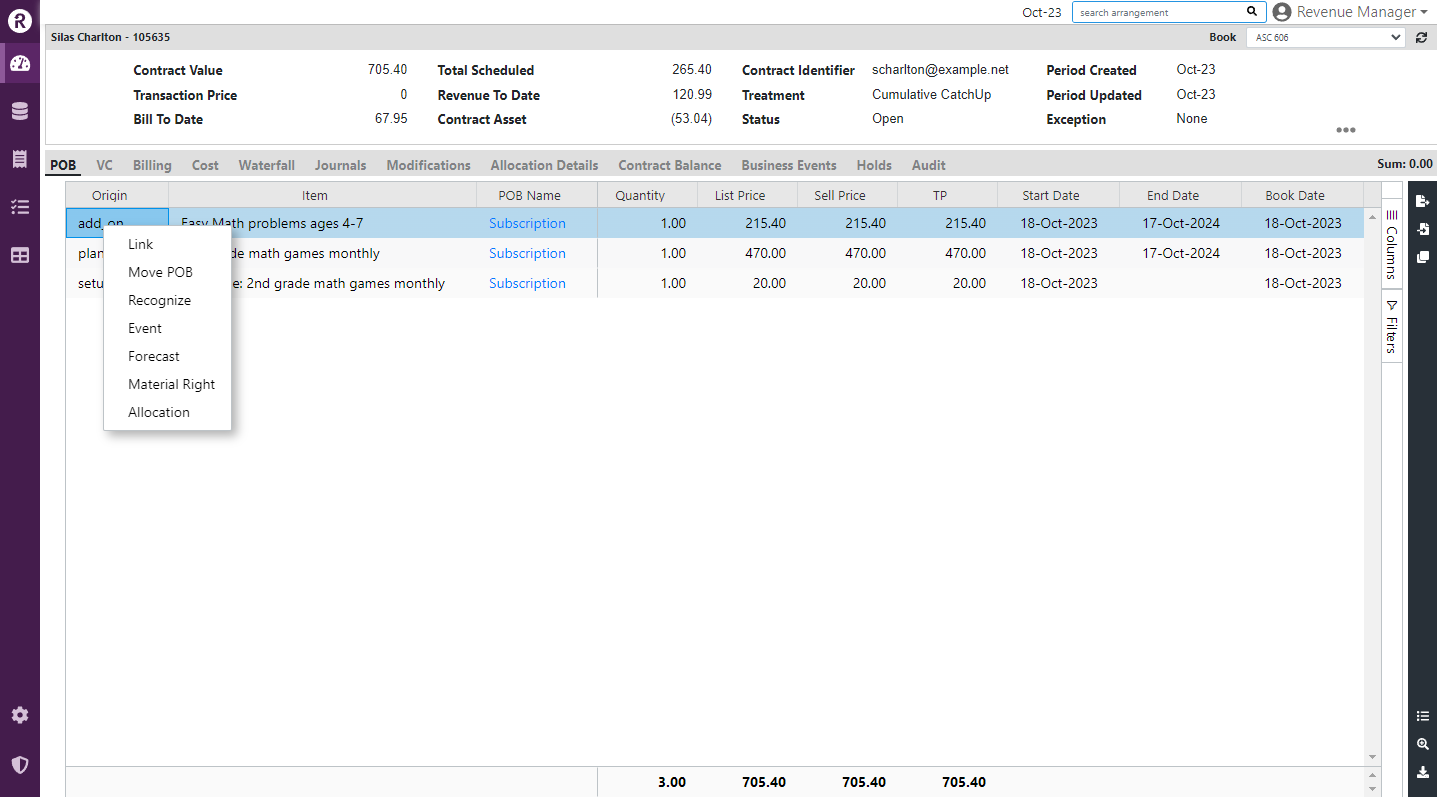
Linking & de-linking contracts
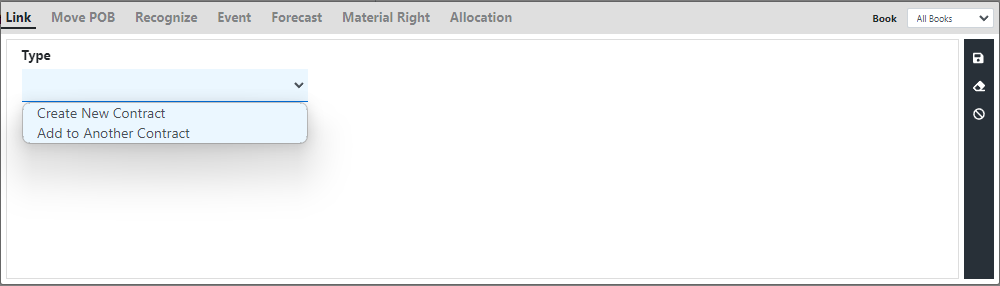
- Select "Link".
- Navigate to the "Type" tab within the link dialogue box.
- Choose between creating a new contract or adding to an existing one.
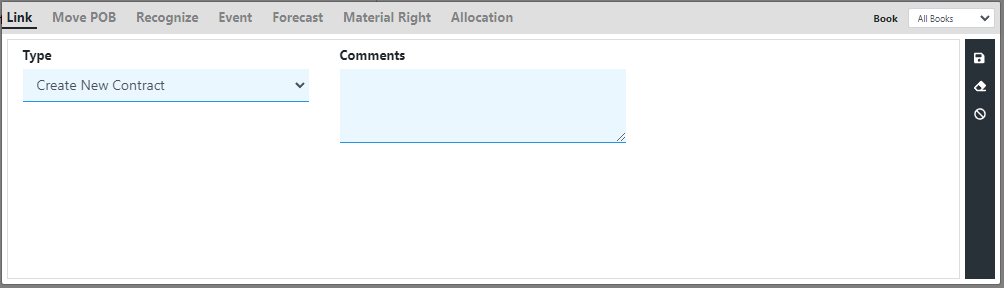
Create New Contract: Select this option to create a new contract for the line(s) that have been deselected from the current contract. You can do this by de-linking the selected line(s). Additionally, you have the option to add a comment for reference purposes. Don't forget to save the changes.
Add to another contract: Choose this option to link the selected line(s) to another existing contract. By de-linking the line(s) from the current contract, you can associate them with a different contract. This allows for flexible management of contract allocations.
- When Add to Another Contract is selected under the type tab, the below dialogue box will appear with the following option.
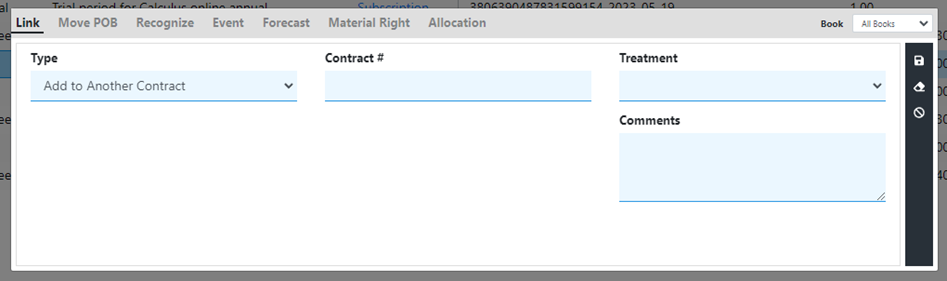
- Contract# field: Enter the contract number to which the selected line(s) should be linked. This ensures that the line(s) are associated with the correct contract.
- Treatment: In the drop-down list under the Treatment tab, choose the appropriate treatment for the contract when it is linked to another contract. Select either "Cumulative Catch up" or "Prospective" based on the desired revenue recognition approach.
- Comments: Provide a brief explanation in the Comment Box regarding the reason for linking the selected line(s) to another contract. This helps in documenting and tracking the purpose of the linkage.
Moving the POB
- Click on the "Move POB" option. A dialogue box will open, presenting you with various link features.
New POB: Select this option if you want to assign a new POB to the selected line(s). This allows you to create a new performance obligation specifically for those lines.
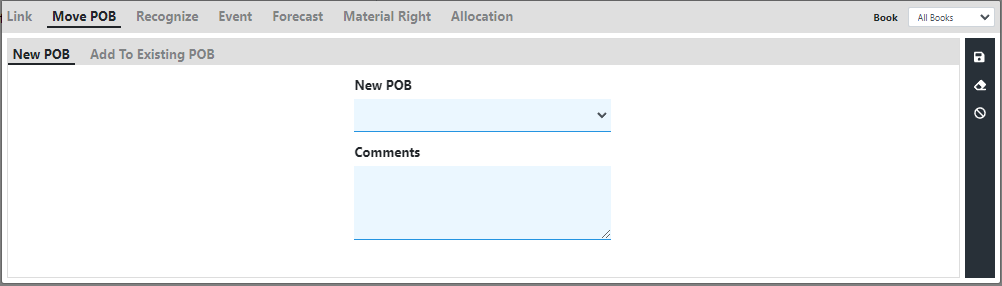
- Add to Existing POB: Choose this option if you want to manually add the selected line(s) to an existing POB within the same contract. This enables consolidation of related lines under a single performance obligation.
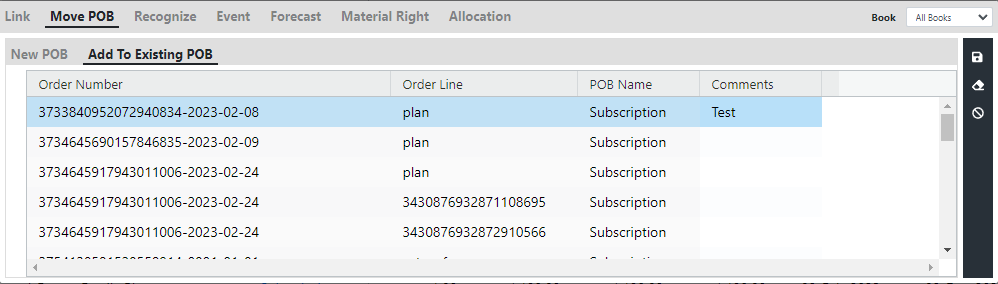
- Enter your comments: Provide any relevant comments or notes in the designated field. This can be used to explain the rationale behind the POB movement or provide additional context.
- Click on the Save icon: After making your selection and adding comments, click the Save icon to update the POB assignment for the chosen line(s).
Recognizing revenue
- Highlight the line(s) you want to manually recognize or defer, then right-click to access the available options.
- Click on the "Recognize" option. A dialogue box will open, presenting you with various link features.
- A window with the following items would be displayed.
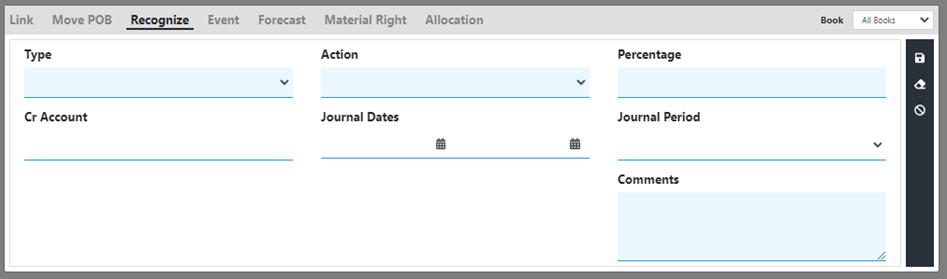
- Type: Choose the appropriate revenue type from the dropdown options. This helps categorize the revenue for accurate recognition or deferral.
- Action: Select either "Recognize" or "Defer" based on the desired treatment for the revenue. The selection determines whether the revenue will be recognized or deferred.
- Percentage: Enter the percentage of revenue to be deferred or recognized. This allows you to specify the portion of revenue associated with the selected line(s).
- Journal dates (optional): If you want the recognition or deferral to occur only for certain journal dates, input the start date and end date accordingly. This feature provides flexibility in timing the revenue recognition or deferral.
- Comments: Provide a clear explanation in the comments box regarding the reasons for the chosen recognition or deferral. This helps maintain proper documentation and provides context for future reference.
- Click on the save icon: After selecting and entering the required information, click the Save icon to update the revenue recognition or deferral settings for the selected line(s).
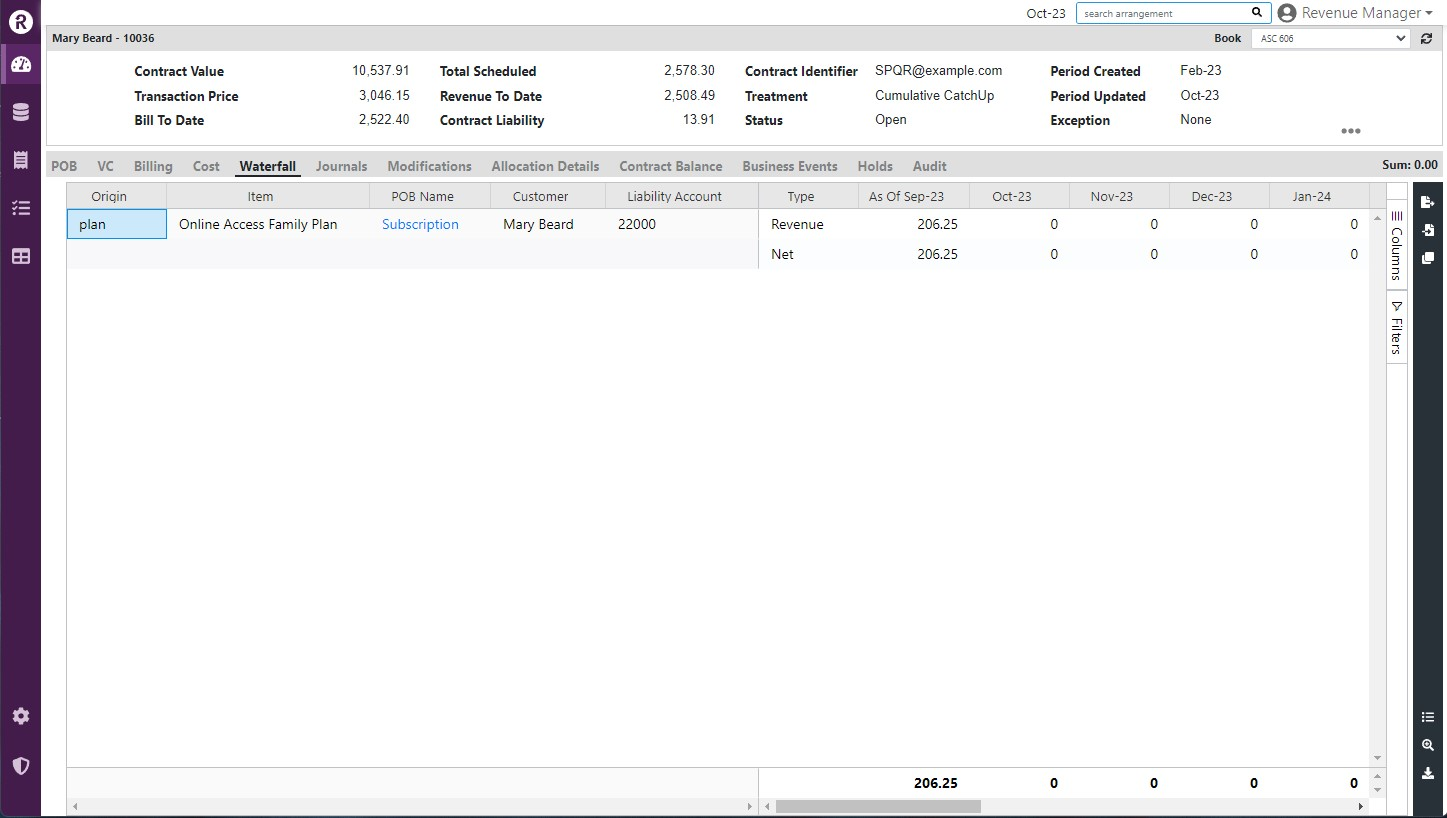
- To view the results of the recognition or deferral, navigate to the Waterfall tab under the revenue workbench. This tab provides a visual representation of the revenue allocation and the impact of recognition or deferral on the revenue waterfall.
Releasing revenue for events
-
Click on the order to which the event has to be manually applied.
-
Select "event" from the options.
-
In the Release Pct column, input the desired percentage as a number. For example, if you want to release 20% of the revenue, input 20.
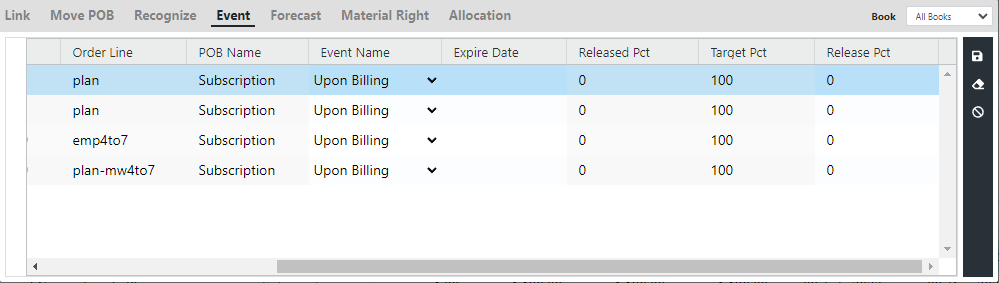
-
Check the waterfall tab in the revenue workbench to view the revenue release based on the percentage given in the Revenue Workbench.
Enabling/disabling allocation
- Select the line/lines that you want to manually Enable/Disable SSP.
- Click on the Allocation option to open a dialogue box with Allocation features.
- Under the Allocation option, select one of the two options from the drop-down list:
a. Enable: Select this option to enable SSP allocation for the selected line/lines.
b. Disable: Select this option to disable SSP allocation for the selected line/lines.
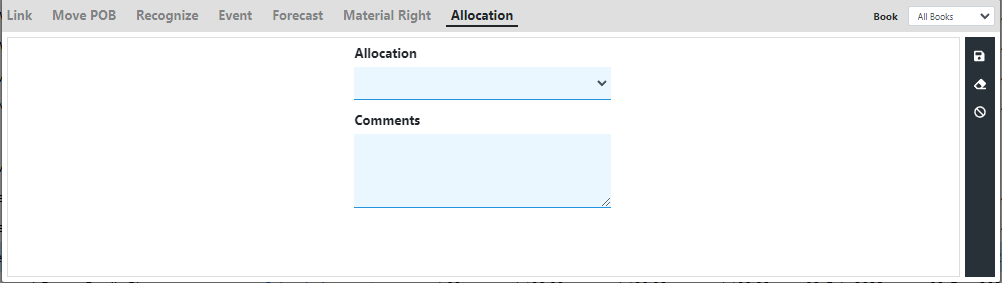
- After selecting the appropriate option under the Allocation tab, explain the reason in the Comments box.
- Once you have filled in the comments, click on the Save icon to save your changes.
Updated about 1 month ago